Quick Look
Grade Level: 9 (9-12)
Time Required: 3 hours
(two 90-minute sessions)
Expendable Cost/Group: US $0.00
Group Size: 2
Activity Dependency: None
Subject Areas: Biology, Computer Science, Science and Technology
NGSS Performance Expectations:

| HS-LS1-3 |
Summary
Students explore the human brain's comparison to a computer by observing the autonomic nervous system's responses to stimuli, focusing on panic attacks. They simulate a panic attack by submerging their feet in ice water to activate the sympathetic nervous system (“fight-or-flight” response). Using BBC micro:bit and pulse sensors and applying the engineering design process, students measure heart rate and then test different methods to lower it, such as meditation or singing, aiming to reverse the fight-or-flight response. If unsuccessful, they refine their approach. Finally, students perform a positive control by submerging their faces in ice water to trigger the mammalian diving reflex (MDR), which activates the parasympathetic system and lowers heart rate.Engineering Connection
Biomedical engineers apply engineering principles to solve problems in medicine and biology. Their work combines science, math, and technology to design equipment, devices, and software that help improve healthcare and save lives. For example, biomedical engineers might create artificial limbs (prosthetics), design pacemakers that help the heart to beat correctly, or develop machines that doctors use to take pictures inside the body, such as MRI scanners. They also work on cutting-edge projects like designing 3D-printed organs, improving robotic surgery tools, and even developing new ways to deliver medicine. In short, biomedical engineers use their creativity and technical skills to help doctors and patients by inventing new tools and solutions for the medical field.
Learning Objectives
After this activity, students should be able to:
- Explain the sympathetic and parasympathetic nervous system balance.
- Compare the human brain to a computer.
- Understand the nature of a panic attack and how to counteract it.
Educational Standards
Each TeachEngineering lesson or activity is correlated to one or more K-12 science,
technology, engineering or math (STEM) educational standards.
All 100,000+ K-12 STEM standards covered in TeachEngineering are collected, maintained and packaged by the Achievement Standards Network (ASN),
a project of D2L (www.achievementstandards.org).
In the ASN, standards are hierarchically structured: first by source; e.g., by state; within source by type; e.g., science or mathematics;
within type by subtype, then by grade, etc.
Each TeachEngineering lesson or activity is correlated to one or more K-12 science, technology, engineering or math (STEM) educational standards.
All 100,000+ K-12 STEM standards covered in TeachEngineering are collected, maintained and packaged by the Achievement Standards Network (ASN), a project of D2L (www.achievementstandards.org).
In the ASN, standards are hierarchically structured: first by source; e.g., by state; within source by type; e.g., science or mathematics; within type by subtype, then by grade, etc.
NGSS: Next Generation Science Standards - Science
| NGSS Performance Expectation | ||
|---|---|---|
|
HS-LS1-3. Plan and conduct an investigation to provide evidence that feedback mechanisms maintain homeostasis. (Grades 9 - 12) Do you agree with this alignment? |
||
| Click to view other curriculum aligned to this Performance Expectation | ||
| This activity focuses on the following Three Dimensional Learning aspects of NGSS: | ||
| Science & Engineering Practices | Disciplinary Core Ideas | Crosscutting Concepts |
| Plan and conduct an investigation individually and collaboratively to produce data to serve as the basis for evidence, and in the design: decide on types, how much, and accuracy of data needed to produce reliable measurements and consider limitations on the precision of the data (e.g., number of trials, cost, risk, time), and refine the design accordingly. Alignment agreement: Scientific inquiry is characterized by a common set of values that include: logical thinking, precision, open-mindedness, objectivity, skepticism, replicability of results, and honest and ethical reporting of findings.Alignment agreement: | Feedback mechanisms maintain a living system's internal conditions within certain limits and mediate behaviors, allowing it to remain alive and functional even as external conditions change within some range. Feedback mechanisms can encourage (through positive feedback) or discourage (negative feedback) what is going on inside the living system. Alignment agreement: | Feedback (negative or positive) can stabilize or destabilize a system. Alignment agreement: |
Materials List
Each group needs:
- a laptop computer
- lined paper or lab notebook to record data
- a writing utensil
- a stopwatch (can be a cell phone)
- a micro:bit and pulse sensor
- USB cord
- 3 alligator clamps or alternative wiring method
- affordable alternative to the micro:bit and pulse sensor: oximeter, (not as FUN!)
- ice and scoops for ice
- containers of water (1L glass bottles work great)
- footbath/small plastic tubs
- towels/paper towels
- Assessment #1: Pre/Post Quiz (one for each student)
- Assessment #2: Pre-Lab: Interpreting Diagrams (1 per student)
- Assessment #3: EDP Worksheet (1 per student)
- Assessment #4: Applied Knowledge (1 per student)
- Assessment #5: Making Sense (1 per student)
For the entire class to share:
- whiteboard
- dry erase markers
Worksheets and Attachments
Visit [www.teachengineering.org/activities/view/umo-2921-panic-attack-brain-computer-nervous-system-activity] to print or download.Pre-Req Knowledge
Students need to be able to:
- Understand homeostasis and have a basic understanding of the nervous system.
- Perform independent research on novel topics.
- Operate electronic components and follow simple coding instructions.
Introduction/Motivation
Today, you will step into the shoes of biomedical engineers as you explore panic attacks and discover ways to address them. So, what exactly is a biomedical engineer? Biomedical engineers apply engineering principles to tackle challenges in medicine and biology. They blend science, math, and technology to design innovative equipment, devices, and software that enhance healthcare and save lives. For instance, they might develop artificial limbs (prosthetics), design pacemakers that regulate heartbeats, or create imaging machines such as MRI scanners that allow doctors to see inside the body. Biomedical engineers also work on cutting-edge projects such as 3D-printed organs, advanced robotic surgical tools, and novel methods for drug delivery. These engineers use their creativity and technical expertise to invent new tools and solutions that support doctors and improve patient care. Today, you’ll be using that same spirit of innovation as you investigate panic attacks!
The nervous system consists of two main parts: the somatic and autonomic nervous systems. The somatic system controls voluntary actions such as movement and thought, while the autonomic system governs involuntary functions such as digestion, sweat, and hormone release.
The autonomic system is divided into the sympathetic and parasympathetic systems. The sympathetic system handles the fight-or-flight response, which increases heart rate, redirects blood flow to muscles, and opens airways during stress or fear. In contrast, the parasympathetic system promotes “rest and digest,” conserving energy, slowing heart rate, and aiding digestion. Both systems are always active at the same time and working in balance, pushing and pulling like yin and yang.
In this activity, we’ll simulate a panic attack (i.e., trigger the sympathetic nervous system) and then explore ways to counter the panic attack by activating the parasympathetic system. If you or a friend you know has ever experienced a panic attack, then you know some of the emotions that accompany the panic attack are embarrassment and fear. This fear can be debilitating to the point that avoidance becomes a coping mechanism. Avoiding homework, peers, and the real world can lead to depression and can increase anxiety, turning it into a vicious cycle, including the fear of having more panic attacks.
Can anything be done to stop panic attacks? Pop psychology promotes all sorts of suggestions, from rigorous exercise, to thinking about something else, to simply telling yourself that everything is OK; but do these work? During this activity, we will put these ideas to the test by simulating a panic attack. We can induce the sympathetic fear response by immersing our feet in ice water. This will release epinephrine and norepinephrine, leading to increased heart rate. We will use sympathetic activation as our simulated panic attack, and we will attempt to stimulate the parasympathetic nervous system to counteract the fear response, easing up on the hormone release and lowering the heart rate.
During this activity, let’s think of the human brain as a computer that follows a predetermined pathway like this:
INPUT => COMPUTATION => OUTPUT
Your brain is constantly receiving information from the environment and signals from inside your body, which are processed as "inputs." These inputs are managed by a part of the brain called the hypothalamus, which undergoes a complex electrical and chemical process that is not yet fully understood. This leads to an "output," or an appropriate response, aimed at maintaining survival and homeostasis. Just like a computer, the brain computes and generates outputs, even if we don’t fully understand what happens behind the scenes.
During a panic attack, the sympathetic nervous system becomes excessively overactive, leading to the continuous release of epinephrine (adrenaline). This heightened state throws the body's natural balance out of sync. However, by activating the parasympathetic nervous system, we can counteract the effects of the fight-or-flight response. Stimulating this rest-and-digest system helps restore equilibrium and reduce the overwhelming effects of sympathetic activation.
We will measure heart rate during a simulated panic attack and then use your ideas to attempt to lower it by activating the parasympathetic nervous system. What will you choose? What activities do you typically turn to “calm down,” “take a break,” or “chill out”? It could be meditating, singing, praying, listening to music, reading a good book, playing video games, watching short videos, or chatting with friends online. Are these activities helping with anxiety, doing nothing, or even making it worse? Let’s find out!
The goal is to come up with three strategies that could help stabilize someone in the middle of a panic attack using the engineering design process. The strategies you test should meet the following criteria:
- One activity must be possible with simple household items.
- One activity must be suitable for a work or school setting.
- One activity must be doable with nothing but the clothes on your back.
For example, you might choose activities that you believe will strongly activate the parasympathetic response and counteract the simulated panic attack, such as snuggling under a warm blanket, programming a video game, or singing a favorite song. Each fits the criteria as a potential strategy for someone experiencing a panic attack. You will then test these ideas during the simulated panic attack to determine whether they effectively reduce heart rate during the ice water bath.
Finally, to validate our findings, we’ll perform a positive control test using a well-known method: activating the mammalian diving reflex (MDR). This reflex, shared by all mammals, increases parasympathetic stimulation of the heart, slowing the heart rate when the head is submerged in water. We’ll use ice water for this. If your strategy is comparable to MDR, then we’ve made a breakthrough! Let’s get started!
Procedure
Background
Baseline. It is important for students to find their heart rate under normal conditions to establish a baseline. They will use this baseline to compare changes in their own heart rate, rather than focusing on the absolute heart rate values compared to others.
Water Bath. We have found that the ice water footbath elicits the strongest sympathetic nervous system activation, which simulates a fight-or-flight response, but partial immersion of the forearm and hand of one arm is a viable alternative.
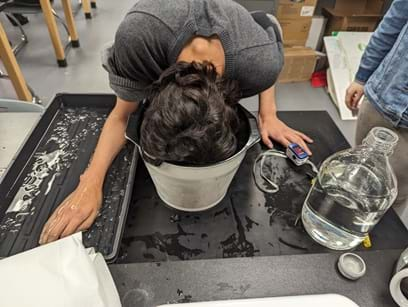
Face Immersion. The mammalian diving reflex will only work if the face is submerged in water while holding the breath. The use of a snorkel or other breathing apparatus will nullify the effect, as the reflex is an oxygen-conserving reflex. Room temperature water will yield acceptable results, but ice water elicits a greater response.
Student Choices. Allow the student to choose any idea that they prefer, even if it seems like it may raise heart rate (such as playing an exciting video game). The learning they will receive from the data gathered will generate new ideas for better activities.
Limitation. The sympathetic nervous system is not the sole answer to the panic attack, but the increase in epinephrine has a strong effect on the cardiac pacemaker, increasing heart rate. One limitation of this activity is using the ice water footbath, which is a known activator of the sympathetic response, as a simulated panic attack, because this is an oversimplification of what a panic attack is. However, as already expressed, we believe the translation to panic attacks is useful.
Positive Control. The positive control will elicit a known effect. In this case, we are looking for some external stimuli that can dramatically increase parasympathetic stimulation even during sympathetic activation, so we use the mammalian diving reflex (MDR).
Mammalian Diving Reflex. This is a homologous evolutionary trait shared with all mammals to maintain homeostasis while being submerged under water. It is known to reduce heart rate through parasympathetic activation of the cardiac pacemaker, and this reflex is expressed in all mammals. When submerged and holding breath, a mammal will trigger a response to slow the heart rate to conserve oxygen. Many diving mammals rely on this reflex to survive, allowing them to hold their breath for tremendous lengths of time. Because this is a homologous trait in mammals, humans have this reflex as well. This makes it useful as a positive control to lower heart rate, because it is well known.
Nervous System. The nervous system relies heavily on both external and internal cues to be interpreted by the thalamus and the hypothalamus. The hypothalamus is the “master controller” because it manages homeostasis by direct autonomic control. The autonomic nervous system maintains a balance between sympathetic nervous stimulation and opposing parasympathetic nervous stimulation. Activation of the sympathetic nervous system will initiate the fight-or-flight response. This includes dilation of pupils for increased vision, dilation of airways and increased heart rate to provide more oxygen to working limbs, shunting of blood flow to skeletal muscle, inhibiting digestive secretions and/or motility in all parts of the digestive system, including salivary, and relaxing the detrusor muscle located inside the bladder, but the most notable effect is the secretion of epinephrine and norepinephrine from the adrenal medulla located on top of the kidneys. Parasympathetic activation in the medulla will result in stimulation of parasympathetic nerves, including the vagus nerve, which has influence on all visceral organs, and to counter all of the effects of the sympathetic response, including constricting pupils, constricting airways, reducing heartrate, constricting peripheral blood flow and dilating visceral blood flow, and stimulating digestive enzyme secretions and increasing digestive motility. This is what is meant by “rest and digest.”
Before the Activity
- Make copies of the following documents (one per student):
- Assessment #1: Pre/Post Quiz
- Assessment #2 Pre-Lab: Interpreting Diagrams
- Assessment #3: EDP Worksheet
- Assessment #4: Applied Knowledge
- Assessment #5: Making Sense
- Make sure students have lined paper or a lab notebook (preferred) to record the raw data.
- Ready a large container of ice and have ice scoops available to be shared collectively.
- Provide students with tubs and water.
- Make sure each group’s micro:bit and pulse sensor combo has all of the required components.
- Ensure that the micro:bit works by flashing the block code onto your own micro:bit. Note: Downloading your code from the computer to the micro:bit is called a “flash.”
- Familiarize yourself with the micro:bit and pulse sensor connections, making sure the pulse sensor has a green light. Once you flash the code from Microsoft MakeCode to your micro:bit, you will be ready to start measuring heart rate.
- For those new to programming micro:bit:
- Begin by going to makecode.microbit.org.
- Click “Import” on the middle-right side of the screen.
- Import the .hex file, which contains the code we made to use the micro:bit with the pulse sensor.
- Everything should be ready. You do not need to make changes, except to the threshold value if you are not hearing beeps with your pulse rate.
- You will notice three windows: coding space, a center toolbox, and a simulation window. You will need to arrange the blocks into the coding space.
- Make sure you understand how to visualize these data using the micro:bit and sensors. (Note: The micro:bit Microsoft MakeCode has a simulator section on the left side of the screen. Below the image of the micro:bit is a button labeled “Show Data Device.” This will allow you to visualize the waveform of your heart rate, and one of the waveforms will be a calculation of bpm.
During the Activity
Day 1
Pre-Activity
- Have students complete the Assessment #1: Pre/Post Quiz.
- Have students turn in their Assessment #1: Pre/Post Quiz for pre-activity assessment.
- Divide the students into pairs.
- Have students complete the Assessment #2 Pre-Lab: Interpreting Diagrams worksheet with their partner. (Note: Depending on students’ previous knowledge of and familiarity with the nervous system, they may need help completing this worksheet. Options to complete include going through the worksheet together as a class or allowing students to research via the Internet.)
Set up the sensors and obtain a beats per minute (bpm) baseline.
- Have each group gather their micro:bit and sensors or oximeter.
- Have each pair decide who will be the test subject and who will be the data specialist for the first round. Note: the data specialist will operate the micro:bit, pulse sensor, and laptop, and record all data. Once the first run of the activity is complete, students will switch roles so that both feel comfortable in each role.
**NOTE: If using the oximeter alternative, skip the micro:bit steps below and move to Step 10. 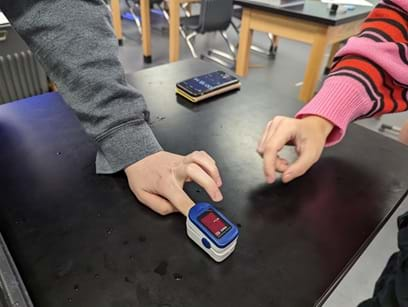
- Ready the micro:bit.
- Plug in the micro:bit device to the laptop computer using the USB connector cord. A red light will display.
- Using alligator clamps or other connection means, connect the pulse sensor to the micro:bit using the following configuration:
- Connect the black wire to GND on the micro:bit.
- Connect the red wire to 3V on the micro:bit.
- Connect the purple wire to pin #2 on the micro:bit.
- Confirm the configuration is correct by the emission of green light.
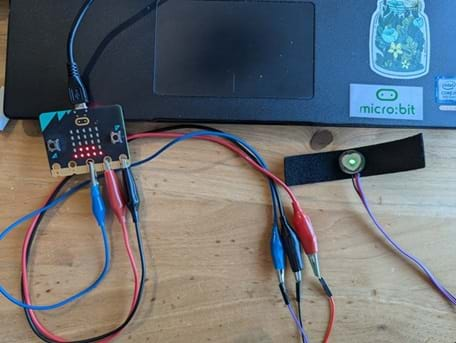
Make sure your micro:bit is connected to the pulse sensor in this way. The green light on the pulse sensor will indicate that it is connected. The black wire should connect to the ground pin on the micro:bit (GND), the red wire should connect to the 2V pin, and the purple wire should be connected to pin #2. The reading from pin #2 is your pulse. - Assemble the finger Velcro and sensor cover.
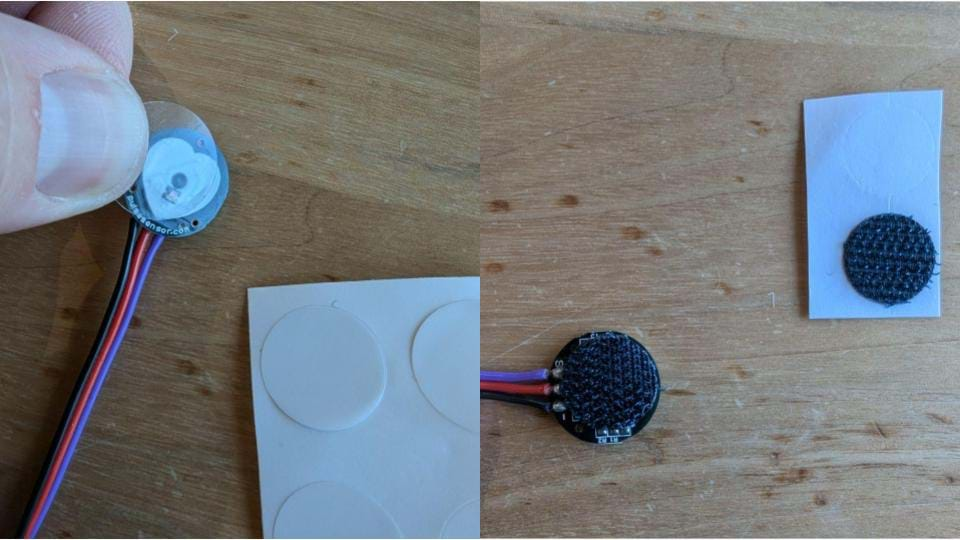
Place the clear sticker over the pulse sensor light emitter, and place the tiny Velcro directly on the back. You are now ready to attach the pulse sensor to the long Velcro strip and wrap the strap around your finger.
- Program the micro:bit.
- Go to makecode.microbit.org and select “Import.” Import the .hex file that accompanies this activity, titled microbit-Pulse-Sensor-bpm.hex, and make sure it matches the block code shown.
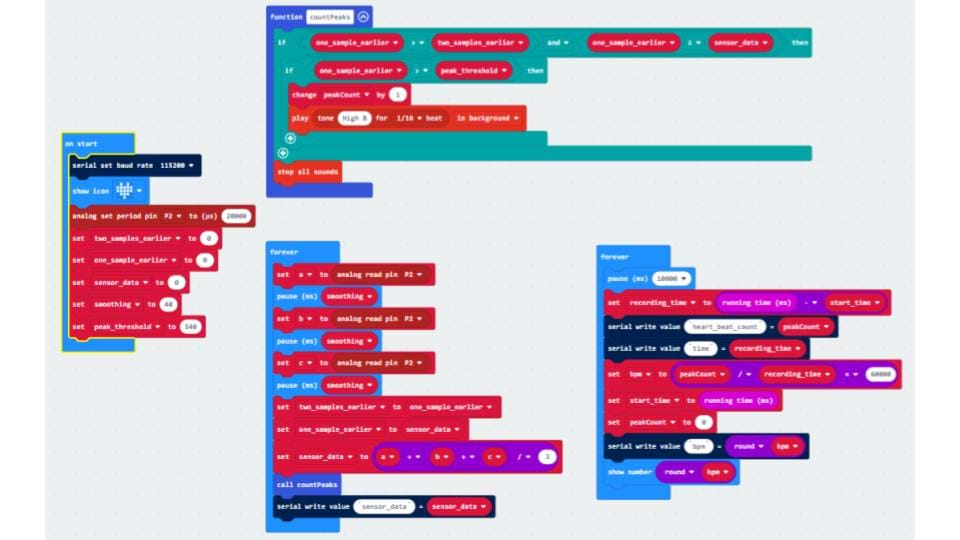
Go to microbit.org to open Microsoft CodeMaker. Here is the block code from Microsoft Codemaker to flash to your micro:bit device. - Flash (download) the code to the micro:bit.
- Confirm that an image of a heart has appeared to indicate that it has received the code file and is ready to operate. Note: There is a reset button on the back of the micro:bit, which you can use to run the code again from the beginning.
- Use the micro:bit to record baseline heartrate.
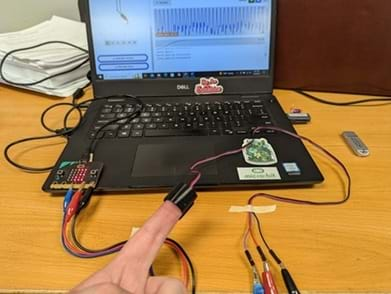
Make sure that the micro:bit and pulse sensor are connected properly, and that the pulse sensor is firmly wrapped around your finger either at the tip or in between the knuckles. Note: Refrain from moving the pulse sensor while getting a reading.
- Wrap the Velcro on the pulse sensor around the test subject’s finger, making sure it is not too tight; otherwise, the signal will not read.
- Confirm that the micro:bit is beeping and flashing the LED lights along with the test subject’s pulse.
- Make sure to keep the test subject’s hand still for the duration of the measurement to avoid artifact readings. (Note: The pulse sensor is sensitive to movement.)
- Visualize the pulse wave form by doing the following:
- Go to the Microsoft MakeCode program, which has three window panels: a simulator, a toolkit, and a coding area.
- On the left is the simulator; scroll down to the button “Show Data Device.”
- Click on this button to generate the waveform of the team member’s pulse.
- Calculate heartrate:
- The .hex file code includes a calculation for beats per minute (bpm) from based on the heart rate detected from the pulse sensor.
- Note: You can see the bpm in one of the waveforms under “Show Data Device,” but also the micro:bit LEDs will display your heart rate in bpm every 10 seconds or so.
- Repeat this a few times if there is variation in the signal.
- Have the data specialist record the test subject’s baseline bpm in their lab notebook.
- If using an oximeter instead of a micro:bit and pulse sensor:
- Ensure that the oximeter is on.
- Have the test subject insert their index finger into the oximeter clip. Make sure their fingertip is placed completely within the device, and keep it still.
- The oximeter will emit light to measure the amount of oxygen in the blood. This usually takes a few seconds. During this time, make sure the test subject keeps their hand relaxed and avoids moving to get an accurate reading.
- The oximeter will display a pulse rate in beats per minute (bpm). Have the data specialist record this baseline bpm in their lab notebook.
Simulate a panic attack.
- Have the data specialist pour water and ice into the footbath.
- While recording heartrate, have the test subject place both feet into the ice water bath.
- DO NOT get the micro:bit or pulse sensor wet.
- Students should observe a rise in heartrate; this is the simulated panic attack (SPA).
- Have the data specialist record this bpm.
- Allow 1 minute for the test subject’s heart rate to stabilize, and then take another heartrate measurement using the data recorded on the micro:bit.
- Have the data specialist record this bpm.
- Have the test subject remove their feet from the footbath and rest (5 minutes).
- Repeat Steps 1-7 before moving on to the next section. Note: This means getting a new baseline reading and another SPA reading.
Stimulate the MDR during SPA.
- Have the data specialist pour water and ice into a second footbath.
- Have the test subject submerge their entire face under the water and ice of the second footbath and hold their breath for as long as possible while remaining comfortable.
- Have the data specialist use the stopwatch to measure how long the test subject holds their breath.
- Have the data specialist record the start bpm, ending bpm, and time.

The mammalian diving reflex can only occur if the face is submerged while holding breath. You cannot achieve these results with a snorkel. You may need to complete a few practice trials to extend your breath holding to the maximum time you are comfortable with. Remember to keep the pulse sensor out of the water! Towels help here.
Note: There should be a noticeable decrease in the test subject’s heart rate during the MDR; if this does not happen, make sure the test subject is holding their breath for more than 15 seconds. This may take a few practice rounds to extend the test subject’s breath holding.
Switch team roles and repeat experiment.
- Have partners switch roles and repeat the baseline measurements for the new test subject.
- Repeat the SPA with the new test subject.
- Repeat the MDR positive control with the new test subject.
- Remind students that for data to be valid in science and engineering, it needs to be repeatable. Make sure each individual team member has recorded data for at least two SPAs and two MDRs.
- Make sure both students in each group are comfortable with the procedures, equipment, and data gathering. Lab notebooks will be most useful for managing raw data.
Design Challenge
- Give each student an Assessment #3: EDP Worksheet.
- Review the engineering design process.
- Optional: Remind students of the activity challenge, that we’ll simulate a panic attack (i.e., trigger the sympathetic nervous system) and then explore ways to counter the panic attack by activating the parasympathetic system.
- Provide students with the constraints of the problem: Each team must come up with three activities that can reduce a panic attack. One activity must be able to be done at home, one must be able to be done at work or school, and one must be able to be done without any accessories (i.e., it is a purely mental activity).
Ask: (optional homework if not enough time in class)
- Have students answer the questions in the “Ask” section of the Assessment #3: EDP Worksheet.
Research: (optional homework if not enough time in class)
- Give students 15-20 minutes to research their challenge.
- Say: “You have gathered data for the negative control (simulated panic attack with no intervention) and the positive control (powerful known intervention, MDR). Now it is time to research potential activity ideas to STOP a panic attack.”
- Have students record their findings in the “Research” section of their Assessment #3: EDP Worksheet.
Imagine: (optional homework if not enough time in class)
- Give students 5-10 minutes to individually brainstorm five or six potential ideas that they think may counter panic attacks based on their research findings.
- Have them record these ideas in the “Imagine” section of their Assessment #3: EDP Worksheet. (Remind students that this step should be completed on their own, WITHOUT talking to their partner. This is important because it will help the team generate lots of unique ideas. Then when all the ideas are shared, the team will have a variety of ideas to choose from.)
Plan: (optional homework if not enough time in class)
- Give each team time to compare their individually brainstormed ideas and to come up with three ideas/activities they want to test.
- Have each student fill out the “Plan” section of their Assessment #3: EDP Worksheet.
Day 2: This is the suggested time to split the activity into two periods. This will allow time for each team to gather materials for the activity (if needed) and return prepared for the second half of the activity.
Create/Test:
- Have students gather the materials they need to “create” their activity.
- Have each pair decide who will be the test subject and who will be the data specialist for each activity. Each team may take turns, or one test subject can complete all three activities.
- For clarity, have students copy over the data they collected in the previous session from their lab notebooks into the “Create and Test” section of the Assessment #3: EDP Worksheet.
- Have each team repeat Steps 11 through18 to simulate a panic attack.
- During the simulated panic attack, have the test subject engage in the team’s chosen activity or idea to STOP the panic attack.
- Have the data specialist maintain the recording for 5 minutes.
- Have the data specialist record the average heartrate over the 5 minutes in the “Create and “Test” section of the Assessment #3: EDP Worksheet.
- Have each team repeat Steps 1 through 7 under the "Simulate a panic attack" section for their other two chosen activities.
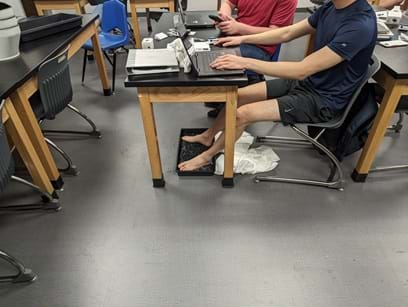
Students will engage in an activity of their choice to counter the simulated panic attack and lower their heart rate. This student chose to code for a computer game he was programming and he keeps his feet in the ice water footbath the entire time. His partner in the experimenter role keeps track of the data so the subject can focus on the activity. - Once each team completes their tests, have them compare the effectiveness of their three chosen activities in lowering heart rate during a simulated panic attack.
- Have students answer the questions in the “Create and Test” section of the Assessment #3: EDP Worksheet.
Improve:
- Have students answer the questions in the “Improve” section of the Assessment #3: EDP Worksheet.
Conclusions:
- To wrap up, have a discussion with the students about how engineers use testing to gain information and then go back through the design process to improve their design. (Remember that the design here is the activity the students chose to reduce panic attacks.) This way, any students who had failure can be taught that failure is information used to improve the design and does not mean they did not have a good idea.
- For example, you can say: "Let's talk about how engineers use testing to improve their designs. When engineers test something and it doesn’t work perfectly, that’s not a failure—it’s a chance to learn. Testing gives them important information about what worked and what didn’t, so they can go back and make their design even better. So, if your design did not work exactly how you planned, that is okay! It just means you have learned something new, and you can use that knowledge to make improvements. Remember, no design is perfect the first time—that’s why the design process is all about trying, testing, and improving."
- Potential questions to ask the class:
- Why do you think engineers test their designs? What can they learn from testing?
- If your design did not work the way you expected, what information did you gain from that? (This will encourage students to think about how failures provide useful insights.)
- How can failure be helpful in the design process? (This question reinforces the idea that failure is a step toward improvement, not a setback.)
- What changes would you make to improve your design based on your test results? (This invites students to connect what they learned to the next steps in the design process.)
- Can anyone think of an example where something failed but was later improved? (Asking for real-world examples shows students how failure is a normal and important part of innovation.)
- How does this process help engineers create better designs? (This question encourages students to recognize the value of iteration and continuous improvement.)
- Optional: Have students complete the post-activity assessments: Assessment #4: Applied Knowledge and Assessment #5: Making Sense.
Vocabulary/Definitions
autonomic nervous system: The part of the nervous system responsible for regulating involuntary bodily functions and visceral organs, including heartbeat, digestion, and respiratory rate.
cardiac pacemaker: This refers to the sinoatrial (SA) node in the heart, which generates electrical impulses that regulate the heartbeat.
epinephrine: Also known as adrenaline, it is a hormone and neurotransmitter produced by the adrenal glands in response to stress or excitement. It increases heart rate, dilates airways, and mobilizes glucose.
ganglion: A structure in the nervous system in which nerve cell bodies are clustered together. These structures play crucial roles in the processing and transmission of neural signals.
homeostasis: The ability of an organism or system to maintain internal stability and balance despite external changes.
homologous: Similar in structure and evolutionary origin, usually referring to organs or structures in different species that have a common ancestry.
hypothalamus: A region of the brain that plays a crucial role in many bodily functions, including regulation of body temperature, thirst, hunger, and control of the autonomic nervous system and pituitary gland.
innervate: To supply with nerves and nerve impulses, thereby stimulating muscles or glands to function.
norepinephrine: Also known as noradrenaline, it is a hormone and neurotransmitter that is released by nerve endings in the sympathetic nervous system. It affects arousal, attention, and the fight-or-flight response.
parasympathetic: A branch of the autonomic nervous system that conserves energy and promotes rest and digestion (rest-and-digest response).
sympathetic: A branch of the autonomic nervous system that mobilizes the body's resources during stress and emergencies (fight-or-flight response).
vagus nerve: Also known as the tenth cranial nerve or CN X, it is one of the longest and most complex nerves in the human body. It extends from the brainstem (specifically, the medulla oblongata) down through the neck, chest, and into the abdomen. The vagus nerve is a key part of the parasympathetic nervous system, which regulates various involuntary bodily functions such as heart rate, digestion, and respiratory rate.
visceral organs: Organs located within the body, such as the heart, lungs, liver, and intestines, which are responsible for internal functions.
Assessment
Pre-Activity Assessment
Assessment #1 Pre/Post Quiz: Have students complete the Assessment 1: Pre/Post Quiz to assess their pre-activity understanding of the somatic and autonomic nervous systems.
Assessment #2: Have students complete the Assessment #2 Pre-Lab: Interpreting Diagrams worksheet with their partner to see how well they can read information from a diagram.
Activity Embedded (Formative) Assessment
Assessment #3: Have students work through the Engineering Design Process in the Assessment #3: EDP Worksheet.
Post-Activity (Summative) Assessment
Any of the following:
Reflection questions: Have students answer the reflection questions in the Assessment #3: EDP Worksheet.
Assessment #4: Have students complete Assessment #4: Applied Knowledge worksheet.
Pre/Post Quiz: Have students redo the Assessment #1: Pre/Post Quiz to show what knowledge they retained from the activity.
Making Sense Assessment: Have students complete Assessment #5: Making Sense worksheet.
Safety Issues
Water and electronics. We are really asking the students to be responsible with using water and electronics. DO NOT get the micro:bit wet under ANY circumstances.
Troubleshooting Tips
Micro:bit. Feel free to use the micro:bit support website for general issues: https://support.microbit.org/support/home
Pulse sensor. Make sure your micro:bit is connected to the pulse sensor by the green light on the pulse sensor. When using the pulse sensor to measure heart rate, make sure the finger is flush against the sensor and secured with the Velcro strap. Keep the hand steady, as stray movement can throw off the pulse sensor.
Microsoft MakeCode. If you cannot see the heartrate waveform in the “Show Data Device” section of the simulator window, then double check that the pulse sensor is connected correctly. If you have the Velcro too tight, it will not take a reading at all. If you can see the waveform, but the micro:bit is not beeping along with the peaks of the waveform, then you will need to adjust the peak threshold in the algorithm in Microsoft MakeCode. Go to the “On Start” loop in the coding area and locate the peak_threshold variable (in red) and adjust that number down to capture the highest peaks. Make sure you do not lower the number enough to detect the intermediate or small-sized peaks. Once you lower the peak_threshold variable, you will be able to start counting peaks.
Activity Scaling
- For lower grades, students will need to be assessed differently. If they haven't taken biology, they may not have any understanding of the nervous system. We can emphasize the INPUT => COMPUTATION => OUTPUT nature of the autonomic nervous system to help them make the connection. Additionally, a brief mini-lesson on thermoregulation and homeostasis could help younger students grasp these concepts more easily.
- For younger students, focus on the concept of “fight or flight” and provide them with extensive help and guidance during the research phase. The research section should be shorter, followed by collaboration. For example, when I work with 6th graders on advanced topics, I supply them with keywords to explore on Google for about 8-12 minutes, and then lead a classroom discussion to share and expand on their findings.
- For upper grades, continue with the current approach, but consider incorporating concepts from neuroscience, physiology, and anatomy, such as the role of the pituitary gland.
- For older students, encourage them to generate innovative ideas for managing panic attacks by researching existing suggestions, advice columns, life hacks, and popular psychology resources. Ask them to integrate their findings into new concepts to test. They might consider condensing similar ideas into one or isolating others into smaller, distinct activities.
- For more advanced students, consider having them write a proposal to present their ideas for implementation in institutions or resources aimed at improving mental health and well-being, in alignment with the United Nations' Goal #3: Ensure healthy lives and promote well-being for all at all ages. One valuable resource to reference could be the Psychological First Aid Field Operations Guide, which provides guidance for preparing and training individuals to support and stabilize those experiencing extreme emotional states following a disaster.
Additional Multimedia Support
micro:bit support website for general issues: https://support.microbit.org/support/home
Subscribe
Get the inside scoop on all things TeachEngineering such as new site features, curriculum updates, video releases, and more by signing up for our newsletter!More Curriculum Like This

Students learn about the function and components of the human nervous system, which helps them understand the purpose of our brains, spinal cords, nerves and five senses. In addition, how the nervous system is affected during spaceflight is also discussed.
Copyright
© 2024 by Regents of the University of Colorado; original © 2024 University of MissouriContributors
W. Donnie Howell, Dr. Satish Nair, David Fague, Matthew Straud, Jessica WhiteSupporting Program
Research Experience for Teachers RET Missouri University College of Computer EngineeringAcknowledgements
This work is based upon work supported in part by the National Science Foundation under grant no. EEC-1801666—Research Experiences for Teachers at the University of Missouri. Any opinions, findings and conclusions or recommendations expressed in this material are those of the authors and do not necessarily reflect the views of the National Science Foundation.
Last modified: October 2, 2024


User Comments & Tips