Summary
Students learn how an optical telescope works before designing and building their own telescope to image the moon. Once they design and build their telescope, students test their telescopes by imaging the moon with and without the telescope using their smartphones. This is an excellent way for students to better understand, by doing, the engineering required to make a good telescope and observe the night sky.Engineering Connection
An astronomical instrument engineer designs, builds, tests, and maintains instruments used in astronomical research, including telescopes, spectrometers, and detectors. Their work is crucial for gathering data from celestial objects, such as stars, planets, and galaxies. Astronomical instrument engineers play a key role in expanding our understanding of the universe, enabling scientists to make more precise observations and uncover new phenomena across cosmic distances.
Learning Objectives
After this activity, students should be able to:
- Describe how an optical telescope works.
- Discuss properties of a telescope that lead to high-quality images.
- Use the engineering design process to design, build, test, and improve a prototype telescope.
Educational Standards
Each TeachEngineering lesson or activity is correlated to one or more K-12 science,
technology, engineering or math (STEM) educational standards.
All 100,000+ K-12 STEM standards covered in TeachEngineering are collected, maintained and packaged by the Achievement Standards Network (ASN),
a project of D2L (www.achievementstandards.org).
In the ASN, standards are hierarchically structured: first by source; e.g., by state; within source by type; e.g., science or mathematics;
within type by subtype, then by grade, etc.
Each TeachEngineering lesson or activity is correlated to one or more K-12 science, technology, engineering or math (STEM) educational standards.
All 100,000+ K-12 STEM standards covered in TeachEngineering are collected, maintained and packaged by the Achievement Standards Network (ASN), a project of D2L (www.achievementstandards.org).
In the ASN, standards are hierarchically structured: first by source; e.g., by state; within source by type; e.g., science or mathematics; within type by subtype, then by grade, etc.
NGSS: Next Generation Science Standards - Science
| NGSS Performance Expectation | ||
|---|---|---|
|
HS-ETS1-2. Design a solution to a complex real-world problem by breaking it down into smaller, more manageable problems that can be solved through engineering. (Grades 9 - 12) Do you agree with this alignment? |
||
| Click to view other curriculum aligned to this Performance Expectation | ||
| This activity focuses on the following Three Dimensional Learning aspects of NGSS: | ||
| Science & Engineering Practices | Disciplinary Core Ideas | Crosscutting Concepts |
| Design a solution to a complex real-world problem, based on scientific knowledge, student-generated sources of evidence, prioritized criteria, and tradeoff considerations. Alignment agreement: | Criteria may need to be broken down into simpler ones that can be approached systematically, and decisions about the priority of certain criteria over others (trade-offs) may be needed. Alignment agreement: | |
| NGSS Performance Expectation | ||
|---|---|---|
|
HS-PS4-5. Communicate technical information about how some technological devices use the principles of wave behavior and wave interactions with matter to transmit and capture information and energy. (Grades 9 - 12) Do you agree with this alignment? |
||
| Click to view other curriculum aligned to this Performance Expectation | ||
| This activity focuses on the following Three Dimensional Learning aspects of NGSS: | ||
| Science & Engineering Practices | Disciplinary Core Ideas | Crosscutting Concepts |
| Communicate technical information or ideas (e.g. about phenomena and/or the process of development and the design and performance of a proposed process or system) in multiple formats (including orally, graphically, textually, and mathematically). Alignment agreement: | Solar cells are human-made devices that likewise capture the sun's energy and produce electrical energy. Alignment agreement: Information can be digitized (e.g., a picture stored as the values of an array of pixels); in this form, it can be stored reliably in computer memory and sent over long distances as a series of wave pulses.Alignment agreement: Photoelectric materials emit electrons when they absorb light of a high-enough frequency.Alignment agreement: Multiple technologies based on the understanding of waves and their interactions with matter are part of everyday experiences in the modern world (e.g., medical imaging, communications, scanners) and in scientific research. They are essential tools for producing, transmitting, and capturing signals and for storing and interpreting the information contained in them.Alignment agreement: | Systems can be designed to cause a desired effect. Alignment agreement: Science and engineering complement each other in the cycle known as research and development (R&D).Alignment agreement: Modern civilization depends on major technological systems.Alignment agreement: |
Materials List
Each group needs:
- 1 eyepiece lens (150 mm concave lens, https://www.homesciencetools.com/product/lens-double-concave-150mm-f-l)
- 1 objective lens (500 mm convex lens, https://www.homesciencetools.com/product/lens-double-convex-500mm-f-l)
- 1 optical tube (e.g., multiple sheets of black construction paper)
- 1 meter stick or measuring tape
- Telescope Activity Worksheet (1 per student) or access to the Telescope Building Notebook PowerPoint
- 1 laptop or tablet with access to internet to view videos noted in the Telescope Activity Worksheet
- 1 smartphone
For the class to share:
- 1 red light bulb (https://www.amazon.com/Colored-Equivalent-Halloween-Christmas-Ambiance/dp/B08NV7KN3X)
- 1 lamp base (any lamp base that can hold the red light bulb)
- (optional) lens wiper or eyeglass/microfiber cloths
Note: For a class of 20 students, it is recommended to have approximately 10 eyepiece lenses, 10 objective lenses, multiple sheets of black construction paper, 1 red light bulb, and 1 lamp base.
Construction materials
- masking or blue tape
- glue
- duct tape
- scissors
- miscellaneous construction materials that could be used to create a sturdy optical tube, such as the following:
- multiple layers of newspaper or construction paper
- recyclable materials (paper towel rolls, toilet paper rolls, other ideas students produce)
- (optional) 3-inch mailing tubes: https://www.amazon.com/Earth-Hugger-Mailing-Tube-37022-EH/dp/B011Y5ZMZC
- (optional) 2-inch craft rolls: https://www.amazon.com/30-Pack-Craft-Rolls-Cardboard/dp/B07SLV4R67
Worksheets and Attachments
Visit [www.teachengineering.org/activities/view/bos-2918-optical-telescope-building-activity] to print or download.Introduction/Motivation
Have you ever wondered how we learned about the other planets in our solar system, or discovered that Earth is not the center of the universe? How did people manage to make detailed sketches of the moon and planets hundreds of years ago, long before we had space probes? The answer lies in a remarkable invention: the telescope.
Today, we have a wide range of telescopes—radio, space, reflecting, refracting, and even telescopes that use multiple mirrors. One of the simplest types to build is the refracting telescope, which will be our focus for this activity. Although it is a straightforward design, using it effectively requires considering several important factors to capture images that are sharper than what your smartphone can achieve alone.
In this activity, we will start by learning how a telescope works, and then you will build one using a few provided materials. Once your telescope is assembled, you will test it by capturing images of the moon at night, working with a partner if you like. Finally, we will compare the images across the class, examining the differences between photos taken with and without the telescopes’ assistance. Let’s get started!
Procedure
Background
A refracting telescope is a type of optical telescope that uses lenses to gather and focus light from distant objects, making them appear larger and more detailed. Invented in the early 17th century, it’s one of the oldest types of telescopes and remains popular today, especially among amateur astronomers. Refracting telescopes are primarily used to observe celestial objects such as planets, moons, and stars. They are also suitable for terrestrial applications, such as birdwatching and landscape viewing, due to their sharp image quality and straightforward design.
The basic mechanism of a refracting telescope involves two lenses: the objective lens and the eyepiece lens. The objective lens, a large convex lens at the front of the telescope, captures light from a distant object and bends (refracts) it to a focal point within the telescope tube. At this focal point, the light forms a small, inverted image. The eyepiece lens, positioned near this focal point, magnifies the image for the observer. By adjusting the eyepiece, the viewer can change the magnification to see more detail. The magnification depends on the ratio of the focal lengths of the objective and eyepiece lenses.
Refracting telescopes have several advantages, including producing sharp, high-contrast images, especially suited for viewing planets and the moon. They are also low maintenance due to their sealed tube design, which protects the optics from dust and other contaminants. However, refractors can suffer from chromatic aberration, a color distortion that occurs because different wavelengths of light bend at slightly different angles. High-quality refractors address this issue with special glass or additional lenses to correct color distortions, ensuring clear and accurate images for both astronomical and terrestrial observations.
Procedure
This activity is split into four parts, approximately lining up with four class periods.
Day 1
Before the Activity:
- Make copies of the Telescope Activity Worksheet. (1 per student)
- Ensure that students have access to tablets/laptops to view the YouTube videos.
- Note: Students can work on the hard copy Telescope Activity Worksheet or the digital PowerPoint Telescope Building Notebook.
During the Activity:
- (optional) Review the steps of the engineering design process: Ask, Research, Imagine, Plan, Create, Test, and Improve.
- Give each student a copy of the Telescope Activity Worksheet.
- Ask: Read through the Overview of the Activity.
- Research: Have students complete the Introduction to Refracting Telescope section of the Telescope Activity Worksheet. They will need to view the following videos, which explain how telescopes work, and then answer the questions in the worksheet.
- Video #1: (7:53 minutes) https://www.youtube.com/watch?v=5v7bN13PjZ8
- Video #2: (5:53 minutes) https://www.youtube.com/watch?v=abCykcw5os8
- Have students complete the Telescope Diagram section of the Telescope Activity Worksheet.
- Allow students to compare their telescope diagrams with those of their neighbors.
- (optional) If you choose to give students the Telescope Building Notebook PowerPoint, have each student complete Slides 1-8.
- (optional) If students finish the Research sections early, you can have them start the Day 2 activity.
Day 2
Before the Activity
- Set out telescope building materials in a center location for students to easily access.
- Ensure that the lenses are not scratched, as this can affect the ability to see through them.
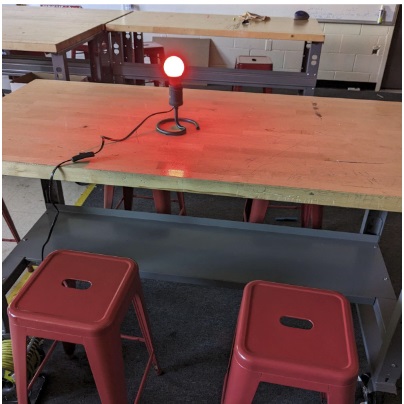
- Set up the lens focusing station, as shown in Figure 1.
- Put a red bulb in the lamp base.
- Center the red bulb and lamp base on a table where students can view the red bulb from at least four different angles: north, east, south, and west.
- Divide the students into pairs.
- Show the class the materials available for them to make their telescopes.
- Imagine: Give students 10 minutes to brainstorm and sketch how they would design a telescope with only the materials available.
- Plan: Have students complete the Maximize Magnification activity under the Plan section of the Telescope Activity Worksheet to find the ideal lens distance. For reference, here are the student instructions:
- Hold the double concave lens (the thick one) in front of your eye, and the double convex lens (the thin one) further out while focusing on the red-light source.
- Move the double convex lens back and forth until the light source is as big as possible.
- Have your partner use a meter stick to measure the distance between both lenses.
- Note the focal length of each lens, as well as the distance measured below.
** Note: If students are working from the Telescope Building Notebook, they are completing Slide 9.
- Once students have calculated their lens specifications, give them 10 minutes to draw their telescope design, incorporating the necessary focal length, labeling their materials, and providing details as necessary.
- (optional) Approve the students’ telescope designs.
- Create: Have students begin to build their telescopes based on their design drawings.
- Let students use the lens focusing station to check their prototype during their build session.
- At the end of the period, have students appropriately store their telescope prototypes. Note: It might be helpful to dedicate a space in the classroom for storage of their telescope and have them name their telescopes.
Day 3
Before the Activity:
- Make sure students can easily access their projects from the previous day.
- Make sure students have access to the telescope building materials from the previous day.\
- Set up the lens focusing station, if disassembled from the previous session.
During the Activity:
- Give students time to build their telescopes.
- During the building time, walk around the classroom and support students as needed.
- Remind students to use the lens focusing station to check their prototype during their build session.
- Note: Some students may finish early; if so, ask them to test the image quality with objects within the classroom and to modify as necessary. Images should be clear and slightly magnified; see Figure 2 for an example. BE SURE TO WARN STUDENTS TO NOT DIRECTLY VIEW THE SUN.
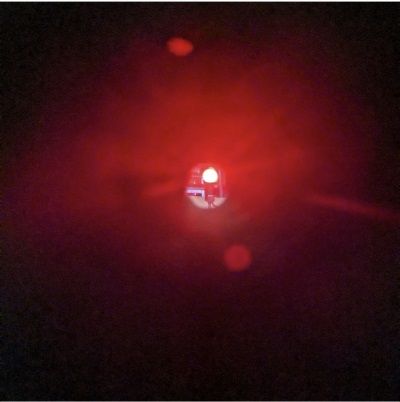
Figure 2. Example of clear and magnified image through telescope from 10 feet away.
- Test: Tell students that they are responsible for imaging the moon during nighttime. It may be the case that the moon is not in view due to a cloudy night sky; if this is the case, you can give students an additional day or decide to view something past the horizon during class time.
- Have students put their images into the Telescope Activity Worksheet and give you a copy of them.
Day 4
Before the Activity:
- Collect digital images taken by the students. Note: Each group should have two images: one of the moon without the telescope and one of the moon with the telescope.
- Put all images into a slideshow to present to the class.
- Set up a laptop/tablet and projector to display the collected images to the class.
During the Activity:
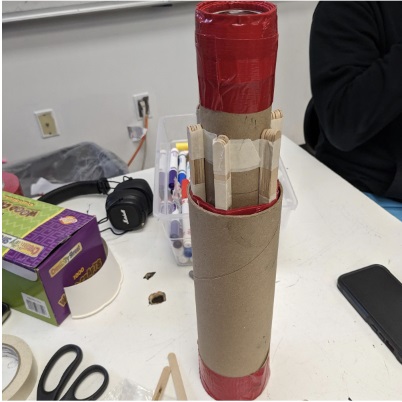
- Improve: Have students view the images from the slideshow to determine which telescope took the best images. (See Figure 3 and Figure 4 for examples of student-built telescopes and Figure 5 and Figure 6 for example images taken by a student.)

Figure 3. Example of a telescope built by students. 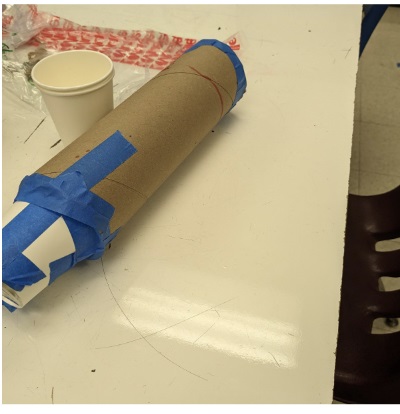
Figure 4. Another example of a telescope created by students. 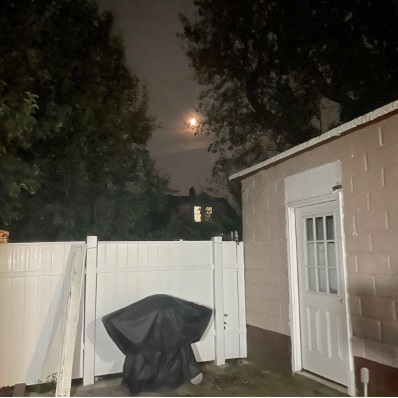
Figure 5. Cellphone image of the moon without a telescope. 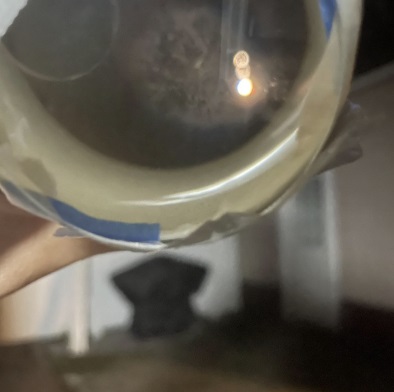
Figure 6. Cellphone image of the moon with a telescope created by a student.
- Reflection: Engage students in a class-wide reflection based on the collected digital images and ask the following questions (also included on their Telescope Activity Worksheet):
- Who took the best images?
- How does their telescope differ from yours, or—if this is yours—why did you design it the way that you did?
- If you were to continue refining your telescope design, what might be your next steps for a clearer image of the moon?
Vocabulary/Definitions
concave lens: A lens that is hollowed or rounded inward like the inside of a bowl on one or both sides.
convex lens: A lens that is rounded outward like the exterior of a sphere on one or both sides.
eyepiece: The lens or combination of lenses at the eye end of an optical instrument.
focal length: The distance of a focus from the surface of a lens or curved mirror.
objective lens: The lens or system of lenses in a telescope or microscope that is nearest the object being viewed.
refraction: Deflection from a straight path undergone by a light ray or energy wave in passing obliquely from one medium (such as air) into another (such as glass) in which its velocity is different.
Assessment
Pre-Activity Assessment:
Refracting Telescope Videos and Questions: Students learn how refracting telescopes work. They are responsible for watching two videos and answering pre-activity assessment questions in the Telescope Activity Worksheet.
Telescope Diagram: After students learn how refracting telescopes work, they draw an accurate diagram of how a refracting telescope works in their Telescope Activity Worksheet.
Activity Embedded (Formative) Assessment:
Building and Testing the Telescope: Students build and test their telescope over the course of two or three days. They should be finding the ideal lens distance and then designing, building, and testing their designs by taking two types of images:
- Without the telescope of the moon (using their smartphone)
- With the telescope of the moon (using their smartphone)
Post-Activity (Summative) Assessment:
Discussion Questions: After students have built and tested their telescopes, take their images with the telescope and put them into a presentation. Have students discuss the following questions before answering them in their Telescope Activity Worksheet:
- Who took the best images?
- How does their telescope differ from yours, or—if this is yours—why did you design it the way that you did?
- If you were to continue refining your telescope design, what might be your next steps for a clearer image of the moon?
Rubric: The Telescope Activity Rubric can also be utilized for a proficiency-based summative assessment; exceeding proficiency can be to your discretion. You can go through this activity and see what your goals are for students, and then fill in more specific feedback on what makes it Not Yet or Exceeding. For example, a student is Exceeding Proficiency if they go out of their way to engineer a novel solution to capture high-quality moon images (such as using a polarizing filter, which one student did the previous semester). Another example: A student is Not Yet if they do not understand what the components of a telescope are, but are able to assemble it.
Safety Issues
Imaging in general. Be sure to warn students to not directly view the sun with their telescope, as this can damage their eyes.
Troubleshooting Tips
Clarity of images. Ensure that all lenses are cleaned so they provide a nice, clear image; for this reason, lens wipers are good to have, or students can use eyeglasses and microfiber cloths.
Imaging the moon. Some students may find it difficult to take images of the moon with one hand while holding the telescope with the other; for this reason, it is recommended that—if the student has sufficient time—a tripod of sorts be built. The mailing tubes and craft rolls will immensely help with this.
Activity Extensions
- As an extension, you can purchase polarized film sheets. These were especially helpful for students after they realized that initial images of the moon were too bright, and we needed to find a way to dim the moon’s brightness.
Activity Scaling
- For lower grades, it may be helpful to do an introduction of the vocabulary first.
- For upper grades, you can have students investigate or discuss the potential impact an atmosphere or lack thereof may have on the images they take.
- As discussed in the equipment and materials section, you may have students modify their design by including a polarized film sheet to reduce light from the moon and make it easier to see.
- For students who are done early, it may be beneficial to have them build a tripod of sorts to stabilize the telescope when taking images of the moon.
Additional Multimedia Support
How Do Telescopes Work? | Earth Lab
Astronomy - Ch. 6: Telescopes (5 of 21) How the Refracting Telescope is Built
Subscribe
Get the inside scoop on all things TeachEngineering such as new site features, curriculum updates, video releases, and more by signing up for our newsletter!More Curriculum Like This

Students are introduced to the basic known facts about the universe, and how engineers help us explore the many mysteries of space.

Students explore the outermost planets of our solar system: Saturn, Uranus and Neptune. They also learn about characteristics of Pluto and its interactions with Neptune. Students learn a little about the history of space travel as well as the different technologies that engineers develop to make spa...
Copyright
© 2024 by Regents of the University of Colorado; original © 2023 Boston UniversityContributors
Christopher Alba - Revere Public Schools @ Revere High School ; Shereen Mejia - Boston Public Schools @ East Boston High SchoolSupporting Program
NSF Research Experience for Teachers (RET) in Integrated Nanomanufacturing at the Photonics Center, Boston UniversityAcknowledgements
This curriculum was based upon work supported by the National Science Foundation under RET grant no. EEC 1407165—at the Research Experience for Teachers in Integrated Nanomanufacturing at the Photonics Center at Boston University. Any opinions, findings, and conclusions or recommendations expressed in this material are those of the authors and do not necessarily reflect the views of the National Science Foundation.
Last modified: November 22, 2024


User Comments & Tips