Quick Look
Grade Level: 11 (11-12)
Time Required: 3 hours
(four 45-minute sessions)
Expendable Cost/Group: US $0.00
Group Size: 2
Activity Dependency: None
Subject Areas: Computer Science, Physics, Science and Technology
NGSS Performance Expectations:

| HS-ETS1-2 |

Summary
Students use an Arduino kit and infrared (IR) sensors to calculate the speed of a moving object. Using kinematic equations, they determine the distance the object travels before hitting the ground. Building on this knowledge, students compete to design and build the most effective projectile launcher. As they refine their launcher designs through the engineering design process, they connect its performance to the principles of projectile motion, incorporating the varying speeds measured by the Arduino.Engineering Connection
Infrared sensors play a critical role in various engineering applications, including security cameras, remote control devices, night vision equipment, chemical analysis tools, and technologies used for gathering data about the universe. Speed sensors, on the other hand, are widely utilized to monitor motion in robotics and industrial systems. The principles of projectile motion are fundamental for testing structural designs, ensuring safety, and optimizing performance. Designing and building the launcher will engage students in the full engineering design process—identifying constraints, creating a design, constructing and testing the launcher, and iterating to make improvements.
Learning Objectives
After this activity, students should be able to:
- Set up an Arduino speed sensor using IR proximity sensors.
- Determine the distance of a horizontally launched projectile given initial velocity and height.
- Use the engineering design process to create a working projectile launcher.
Educational Standards
Each TeachEngineering lesson or activity is correlated to one or more K-12 science,
technology, engineering or math (STEM) educational standards.
All 100,000+ K-12 STEM standards covered in TeachEngineering are collected, maintained and packaged by the Achievement Standards Network (ASN),
a project of D2L (www.achievementstandards.org).
In the ASN, standards are hierarchically structured: first by source; e.g., by state; within source by type; e.g., science or mathematics;
within type by subtype, then by grade, etc.
Each TeachEngineering lesson or activity is correlated to one or more K-12 science, technology, engineering or math (STEM) educational standards.
All 100,000+ K-12 STEM standards covered in TeachEngineering are collected, maintained and packaged by the Achievement Standards Network (ASN), a project of D2L (www.achievementstandards.org).
In the ASN, standards are hierarchically structured: first by source; e.g., by state; within source by type; e.g., science or mathematics; within type by subtype, then by grade, etc.
NGSS: Next Generation Science Standards - Science
| NGSS Performance Expectation | ||
|---|---|---|
|
HS-ETS1-2. Design a solution to a complex real-world problem by breaking it down into smaller, more manageable problems that can be solved through engineering. (Grades 9 - 12) Do you agree with this alignment? |
||
| Click to view other curriculum aligned to this Performance Expectation | ||
| This activity focuses on the following Three Dimensional Learning aspects of NGSS: | ||
| Science & Engineering Practices | Disciplinary Core Ideas | Crosscutting Concepts |
| Design a solution to a complex real-world problem, based on scientific knowledge, student-generated sources of evidence, prioritized criteria, and tradeoff considerations. Alignment agreement: | Criteria may need to be broken down into simpler ones that can be approached systematically, and decisions about the priority of certain criteria over others (trade-offs) may be needed. Alignment agreement: | |
Common Core State Standards - Math
-
Solve equations and inequalities in one variable
(Grades
9 -
12)
More Details
Do you agree with this alignment?
State Standards
Ohio - Math
-
Rearrange formulas to highlight a quantity of interest, using the same reasoning as in solving equations.
(Grades
9 -
12)
More Details
Do you agree with this alignment?
-
Solve equations and inequalities in one variable.
(Grades
9 -
12)
More Details
Do you agree with this alignment?
Ohio - Science
-
Problem-solving involving horizontally launched projectiles
(Grades
9 -
12)
More Details
Do you agree with this alignment?
Materials List
Each group needs:
- 1 Arduino UNO with USB cable (Example kit)
- 1 computer or laptop with access to the Arduino Integrated Development Environment (IDE)
- 2 infrared proximity sensors (e.g., https://www.amazon.com/Infrared-Avoidance-Transmitting-Receiving-Photoelectric/dp/B07PFCC76N)
- 1 RGB LED (available in the kit above)
- 6 female-to-male Dupont wires (available in the kit above)
- 1 ruler or measuring tape
- (optional) Arduino holder (i.e., device that protects Arduino boards from damage); not necessary but makes setup easier for students
- (optional) ramp; not necessary but makes setup easier for students
- 1 plastic cup
- 1 projectile (e.g., small ball)
- Horizontal Projectile Motion Intro Worksheet (1 per student)
- Horizontal Projectile Motion With Arduino Handout (1 per group)
- Horizontal Projectile Launcher Competition (1 per group)
For the entire class to share:
- various materials for projectile launcher construction:
- cardboard, plastic containers, PVC pipes, popsicle sticks, etc.
- springs, rubber bands or other elastic material, air pumps, etc.
Worksheets and Attachments
Visit [www.teachengineering.org/activities/view/bgsu-2915-projectile-motion-arduino-launcher-competition-activity] to print or download.Pre-Req Knowledge
Students should have:
- A basic understanding how an Arduino microcontroller works.
- An ability to use algebra to solve for a missing variable.
- A basic understanding of free fall.
Introduction/Motivation
(Show the class this video from Mac and Me [1988]: https://www.youtube.com/watch?v=NvDEv-kE0zI from approximately 1:00 to 2:10 in which a kid in a wheelchair accidentally rolls off a cliff and falls into the water below.)
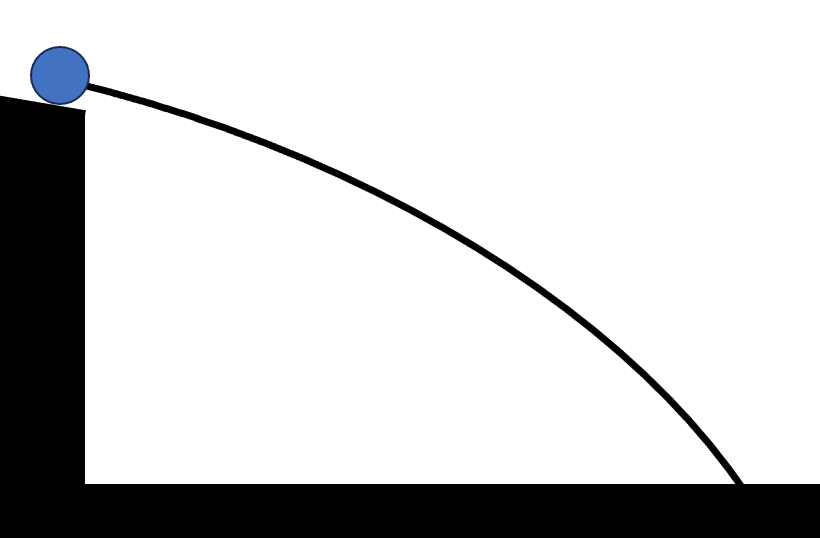
All right, class, what is happening in the Mac & Me clip? (Let students offer answers.) In this movie scene, a kid in a wheelchair accidentally rolls off a cliff and falls into the water below. Let’s think about what the path, or trajectory, of his fall looks like in the movie. How did he fall? Do you think that is an accurate demonstration of what would happen? (The trajectory of the kid in the wheelchair is basically straight down, which is inaccurate.) What do you think? Would the wheelchair just drop straight down, or would it follow more of a curve as it falls? Let’s draw it out together. First, let’s sketch what a straight-down path might look like. (Draw a figure similar to Figure 1 on the board.)


Procedure
Background
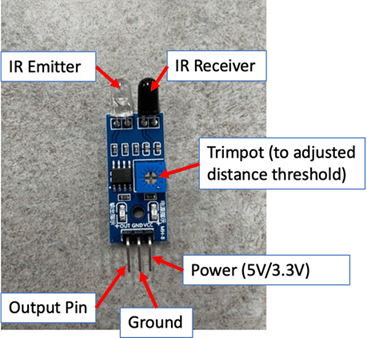
The purpose of the Arduino speed detector is to measure the time it takes for an object to pass between two infrared (IR) sensors. These sensors rely on reflection to detect the presence of an object. As shown in Figure 4, the clear bulb of the IR sensor emits infrared light. When an object is present, the emitted light reflects off the object and is received by the dark bulb, signaling to the Arduino that the object is in the sensor's detection range. This mechanism is used to determine when the object passes each sensor, allowing for precise time measurement.

The velocity of the object is calculated within the Arduino code using the formula velocity=distance/time. The distance between the two IR sensors must be input into the code to ensure accurate calculations, and this distance should be adjusted to match the physical setup used by the students. The code measures the time it takes for the object to travel from the first sensor to the second, and by dividing the known distance by this time, the velocity of the object is determined. This setup is particularly useful for experiments involving motion and velocity measurement.
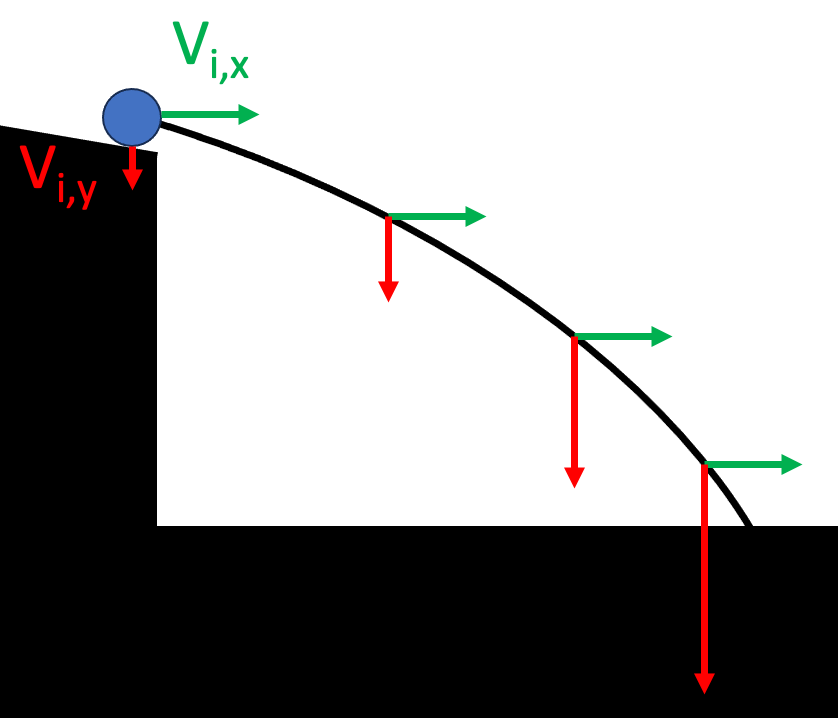
The horizontal motion of a launched projectile can also be analyzed using the Arduino speed detector. The horizontal (x-direction) motion of the projectile is independent of its vertical (y-direction) motion due to the force of gravity being the sole force acting on it after launch (neglecting air resistance). The horizontal velocity remains constant during flight, as no horizontal forces act on the projectile once it is launched. By contrast, the vertical velocity increases due to gravitational acceleration at 9.81 m/s2, following the principles of free fall. By combining these principles, the horizontal distance traveled by the projectile can be calculated using kinematic equations, given the height of the launch and the initial horizontal velocity. This enables a comprehensive study of motion using both Arduino and physics concepts.
Before the Activity
- Make sure the Arduino kits have all necessary parts.
- Make sure the Projectile Motion Speed Sensor Code is available for students to cut and paste into their Arduino IDE software.
- Make copies of the following:
- Horizontal Projectile Motion Intro Worksheet (1 per student)
- Horizontal Projectile Motion With Arduino Handout (1 per group)
- Horizontal Projectile Launcher Competition (1 per group)
- Have ramps, projectiles, and metersticks/tape measures ready.
- Have resources for building the launcher ready.
During the Activity
- Go through the Introduction and Motivation section with the class.
- Give each student a Horizontal Projectile Motion Intro Worksheet.
- Give students time to individually work through the Horizontal Projectile Motion Intro Worksheet.
- Once students complete the worksheet, go over how to calculate the answers as a class. (Refer to the Horizontal Projectile Motion Intro Worksheet Answer Key for answers.)
- Divide students into groups of 2-4.
- Pass out one Horizontal Projectile Motion With Arduino Handout to each group.
- With the students, review the learning objectives of the activity as listed on the handout.
- By the end of this project, you will be able to:
- Set up an Arduino speed sensor using IR proximity sensors.
- Understand the basics of Arduino programming.
- Determine the distance of a horizontally launched projectile given initial velocity and height.
- Present the materials students will be using for the activity:
- 1 Arduino UNO w/ USB cable
- 1 computer or laptop with Arduino IDE
- 2 IR proximity sensors
- 1 RGB LED
- 6 female-to-male Dupont wires
- 1 Arduino holder and ramp
- Have students gather their materials and then follow the diagrams in the handout to assemble the Arduino IR speed sensor. The handout instructions are summarized below:
- Gather the necessary materials.
- Plug the RGB LED into the 9, 10, 11, and 12 digital IO headers on the Arduino UNO.
- Plug the IR sensor into the Arduino board, using the A0 analog input of the Arduino.
- Plug the 2nd IR sensor into the A3 analog input on the Arduino board.
- Plug the USB cable into the Arduino UNO and into the computer.
- Have students confirm that their Arduino setup is the same as the fifth diagram in the handout.
- Have students set up their Arduino IDE on a computer or laptop.
- Make sure students can cut and paste the Projectile Motion Speed Sensor Code into their Arduino IDE software.
- Give students time to answer the questions about the code in Step 4 of the Horizontal Projectile Motion With Arduino Handout.
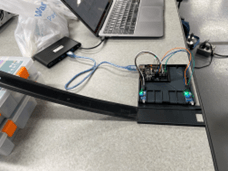
- Have students set up their ramp following Step 5 of the Horizontal Projectile Motion With Arduino Handout.

Figure 5. Arduino and ramp setup
- Have students measure the height of their launch point and write it in their Horizontal Projectile Motion With Arduino Handout.
- Have students test their ramp and Arduino setup by doing the following:
- Students determine the initial velocity by placing a projectile on the ramp and releasing it from the same spot three times. Note: Each time, the projectile should be caught after it passes the speed sensor. The projectile should NOT hit the floor. They should record these times on the table in their handout.
- Students then use the kinematic equation to determine the distance away the projectile will hit the ground based on the calculated average velocity and the height of their launch point.
- Finally, students place a plastic cup at the distance they calculated using the kinematic equation. They then place the projectile on the ramp and release it.
- Have students answer the post-experiment questions.
- Pass out one Horizontal Projectile Launcher Competition sheet to each group.
- (optional) Review the steps of the engineering design process: Ask, Research, Imagine, Plan, Create, Test, and Improve.
- Have students work their way through the engineering design process to create their launcher by following the Horizontal Projectile Launcher Competition sheet.
- Give students time to design, plan, and build their launchers.
- At the end of the activity, have the students compete against each other to see who built the best launcher (i.e., whose projectile goes the farthest.)
Vocabulary/Definitions
projectile: An object propelled through the air.
trajectory: The path followed by a projectile flying or an object moving under the action of given forces.
Assessment
Pre-Activity Assessment
Practice Calculations of Horizontal Projectile Motion. Have students complete the Horizontal Projectile Motion Intro Worksheet individually and then have a classroom discussion about the answers. This will gauge the students’ general understanding of the math involved with the kinematic equations.
Activity Embedded (Formative) Assessment
Exploring Arduino code: In the Horizontal Projectile Motion With Arduino Handout, there are questions to explore potentially new concepts such as the programming of the Arduino. When students complete these parts and get to the questions, stop briefly and discuss students’ answers to these questions; generally expected answers are provided in the Horizontal Projectile Motion With Arduino Handout Answer Key.
Post-Activity (Summative) Assessment
Horizontal Projectile Launcher Competition. At the end of the Horizontal Projectile Launcher Competition, there is a challenge to use the best distance and kinematic equations to work backwards to find the initial velocity. This answer could be tested using the Arduino speed detector. Actively checking the students’ ability to do this process in reverse and surveying the class as to whether they were correct after testing is important.
Troubleshooting Tips
The code and Arduino setup should be double checked before trying to run the activity. If there is an error in the code, the speed detector will not work right. This activity can be done by hand, measuring the time it takes to cross a small distance at the end of the ramp, if you cannot get the Arduino to work.
Activity Extensions
The next step in studying projectile motion is adding a launch angle. Investigations can be done studying the motion of the flight of a football or baseball, trying to determine the height of the peak of the throw, release angle, initial velocity, etc.
Activity Scaling
- For lower grades:
- Having the Arduino speed detector set up beforehand could simplify the activity for younger grades.
- For older/ advanced students:
- Students with more programming experiencing can modify the Arduino code to calculate the distance as well as the speed.
- A height constant would need to be added.
- The kinematic equations would need to be written in.
- The code to display the distance would need to be added.
- Classrooms with 3D printers and students with CAD experience could design and 3D print parts of their launcher.
Subscribe
Get the inside scoop on all things TeachEngineering such as new site features, curriculum updates, video releases, and more by signing up for our newsletter!References
yashastronomy. “Arduino Speed Detector.” Arduino Project Hub, 28 Apr. 2020, projecthub.arduino.cc/yashastronomy/arduino-speed-detector-55410d.
Copyright
© 2024 by Regents of the University of Colorado; original © 2024 Bowling Green State UniversityContributors
Alexander Lutheran, MD Sarder, Mohammad Mayyas, Mohammed Abouheaf, Zahabul IslamSupporting Program
Research Experience for Teachers (RET) Site: Mission Rebuild Workforce through Advanced Manufacturing, Bowling Green State UniversityAcknowledgements
This work is based on work supported in part by the National Science Foundation under grant no. EEC-10011260—Research Experiences for Teachers at the Bowling Green State University. Any opinions, findings and conclusions, or recommendations expressed in this material are those of the authors and do not necessarily reflect the views of the National Science Foundation.
Last modified: December 4, 2024


User Comments & Tips