Quick Look
Grade Level: 10 (9-12)
Time Required: 2 hours 15 minutes
(two sessions, one 45 minutes and one 90 minutes)
Expendable Cost/Group: US $0.00
Group Size: 3
Activity Dependency: None
Subject Areas: Physical Science, Science and Technology
Summary
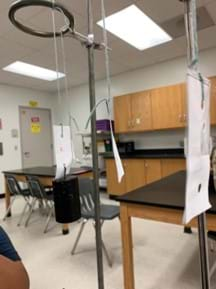
Students combine paper strips to measure how much gravitational force the paper can withstand by adding masses to the combined paper strips until they tear. Students compare the strength of one paper strip versus the combination of two, three, four, and five strips. Students cut out paper strips and glue them together using a glue stick or a glue bottle. Students punch holes in the paper strips and tie yarn or string through the hole on the paper strip. As they hang the paper strips on the ring stand, they add weights such as a 100 g mass to the paper. When the paper strips tear, the students will record the mass before the paper broke and the mass that caused the tear in the paper. Students will notice that the paper strips tear at increasing masses because of the strength of the combined paper strips. Students need to understand that composite materials are not created by changing their chemical and physical components. After recording the data, students create a graph with the number of strips on the X-axis and the mass at which the paper tears on the Y-axis. Students compare their findings with the other groups and discuss the results of the project. They discuss why the paper strips could hold more mass as the number of combined paper strips increased. They need to think about what other materials they use in daily life that could be made of composite materials.Engineering Connection
Composite materials represent a significant advancement in engineering, offering tailored solutions that address specific needs across various disciplines. Their versatility and enhanced properties make them indispensable in modern engineering applications.
Learning Objectives
After this activity, students should be able to:
- Describe how a composite material can be designed.
- Compare and contrast strengths and weaknesses of composite materials and original materials.
- Explain how different materials are combined to change their properties.
Educational Standards
Each TeachEngineering lesson or activity is correlated to one or more K-12 science,
technology, engineering or math (STEM) educational standards.
All 100,000+ K-12 STEM standards covered in TeachEngineering are collected, maintained and packaged by the Achievement Standards Network (ASN),
a project of D2L (www.achievementstandards.org).
In the ASN, standards are hierarchically structured: first by source; e.g., by state; within source by type; e.g., science or mathematics;
within type by subtype, then by grade, etc.
Each TeachEngineering lesson or activity is correlated to one or more K-12 science, technology, engineering or math (STEM) educational standards.
All 100,000+ K-12 STEM standards covered in TeachEngineering are collected, maintained and packaged by the Achievement Standards Network (ASN), a project of D2L (www.achievementstandards.org).
In the ASN, standards are hierarchically structured: first by source; e.g., by state; within source by type; e.g., science or mathematics; within type by subtype, then by grade, etc.
NGSS: Next Generation Science Standards - Science
-
SEP.12.9-12.6.
Use mathematical representations of phenomena or design solutions to support and revise explanations.
(Grades 9 - 12)
More Details
Do you agree with this alignment?
Common Core State Standards - Math
-
Interpret complicated expressions by viewing one or more of their parts as a single entity.
(Grades
9 -
12)
More Details
Do you agree with this alignment?
-
Use units as a way to understand problems and to guide the solution of multi-step problems; choose and interpret units consistently in formulas; choose and interpret the scale and the origin in graphs and data displays.
(Grades
9 -
12)
More Details
Do you agree with this alignment?
Materials List
Each group needs:
- paper
- scissors
- ruler
- yarn/string
- hole punch
- glue stick/bottle of glue
- packing tape/ tape
- safety goggles (one pair per student)
For the entire class to share:
- ring stand with ring attached
Worksheets and Attachments
Visit [www.teachengineering.org/activities/view/uoh-2794-materials-matter-composites-properties-activity] to print or download.Pre-Req Knowledge
Students should know:
- The definition of composite materials.
- How to convert grams to kilograms.
- The definition of force.
Introduction/Motivation


(This introduction helps students understand that everything is made of different components that are chemically or physically combined. It also introduces students to how objects such as cars, phones, and roads are built.
Tell students: “Before engineers can solve a problem, they determine the criteria and constraints and conduct research. For example, if you were an engineer tasked with building a bridge, you would need to know the project criteria (e.g., the bridge must span 100 feet and be able to support 20 cars driving over it at once) and constraints (e.g., budget). You would also need to do research on the types of materials you could use to build the bridge. In today’s activity, you are mimicking materials engineers and conducting research on composite materials.”
Ask the students to look at Figure 1 and Figure 2 and list the materials that are used to build the house and the car. Have students think about which of the two items are made of composite materials. Ask students to explain their answers in pairs/small groups before sharing with the class.
Show the 1:47-minute video: What is a Composite?
Lead students through an explanation: Composite materials are materials composed of two different elements. The composite is stronger and more durable than the original materials. Composite materials are used in your daily life. For example, the bathtub or the shower stall that you use is made of composite glass fiber and other materials. In addition, window frames are made of fiberglass. 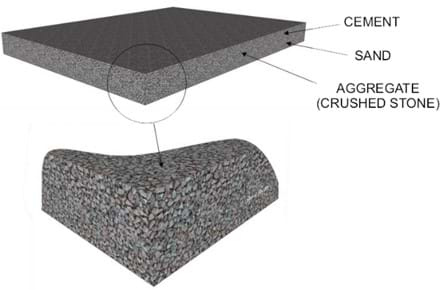
Show Figure 3.
Ask students: Is this cement a composite? Allow students to share their thoughts and reasoning.
Tell students: Cement used for buildings and bridges is made of different materials such as sand, crushed stone, and cement. Because the material is combined without the use of chemicals, cement can be identified as a composite material.
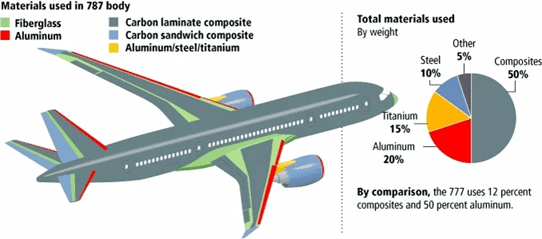
Show students Figure 4. Have them turn to a partner next to them and discuss: Is this plane a composite? Why or why not?
Tell students: Vehicles such as planes and cars are made of composite materials that are lightweight and less expensive.)
In this experiment, we are going to act as materials engineers and look at how composites change the strength of paper. This is research, an important part of the engineering design process. Similar to how engineers researched different materials to build objects such as cars and planes, we will research composites and paper. How much mass does it take to tear one paper strip versus a combination of paper strips? Does combining paper strips impact the strength of the paper? Let’s research the problem and find out!
Procedure
Background
Composite Materials
A composite material is composed of two materials with different physical and chemical properties. The materials are merged together into one structure, yet they do not completely blend together. Concrete, for example, is a composite material formed from a mix of cement, aggregates (gravel, crushed stones), and sand combined with water.
The composite material is stronger and more durable than the original materials. Using composites can also create a result that is cheaper and lighter than using non-composite materials. The use of composite materials is common; they can be found anywhere from concrete structures to backyard decks, cars, and airplanes.
Engineering Design
Engineers follow the engineering design process to develop solutions to design problems. The design process includes 1) Identifying the Needs and Constraints, 2) Researching the Problem, 3) Developing Possible Solutions, 4) Selecting a Promising Solution, 5) Building a Prototype, 6) Testing and Evaluating the Prototype, and 7) Redesigning as Needed. This activity engages students in the Research step of the design process. Students mimic materials engineers to learn about composite materials and test the strength of composite paper.
Instructions: Materials Matter Activity 2
Steps:
- Take two to three sheets of paper and cut them into 4 cm by 8 cm strips.
- After cutting the paper into strips, take out one strip, then two separate strips, then three separate strips, then four separate strips, and then five separate strips.
- Take two strips of paper and glue them together using a glue stick or glue.
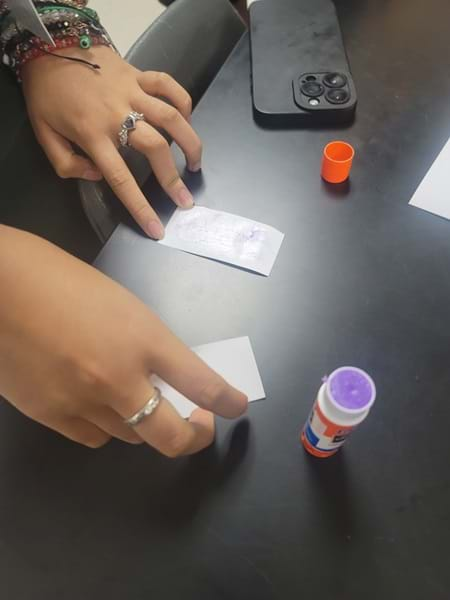
Paper strips being glued together. - Repeat Step 3 and glue three strips of paper together.
- Repeat Step 3 and glue four strips of paper together.
- Repeat Step 3 and glue five strips of paper together.
- Reinforce the top part of each of the combined paper strips with clear or packaging tape.
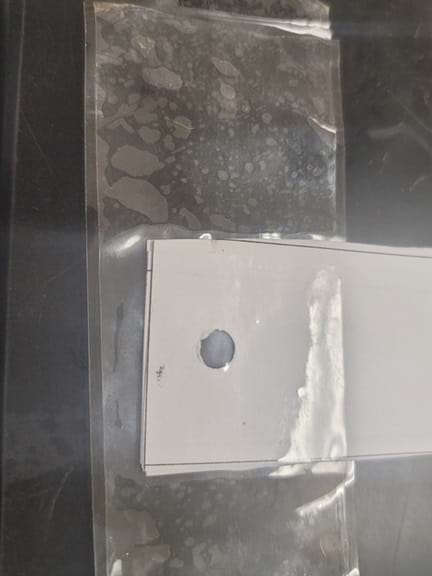
Top part of the strip being reinforced with tape. - Punch one hole on the top and bottom parts of the combined strips (1 to 1.5 cm away from the top and bottom.
- Cut five pieces of yarn/string that are 30 cm long.
- Tie one end of the yarn/string to the top hole of the paper strip.
- Tie the other end of the yarn/string to the ring on the ring stand.
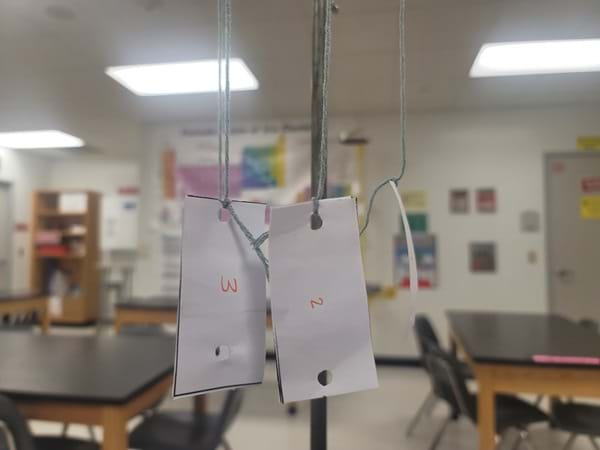
The reinforced part of the paper is tied to a string and attached to the ring on the ring stand. - Repeat Steps 10 and 11 for the other four paper strips. Make sure the strips are hanging at an equal distance.
- Attach a hanging 100 g mass to the bottom hole. Wait for two minutes.
- Attach a second 100 g mass to the first one. Wait for two minutes.
- Keep adding 100 g until the paper breaks. You could change from 100 g to 500 g masses as the paper strips increase.
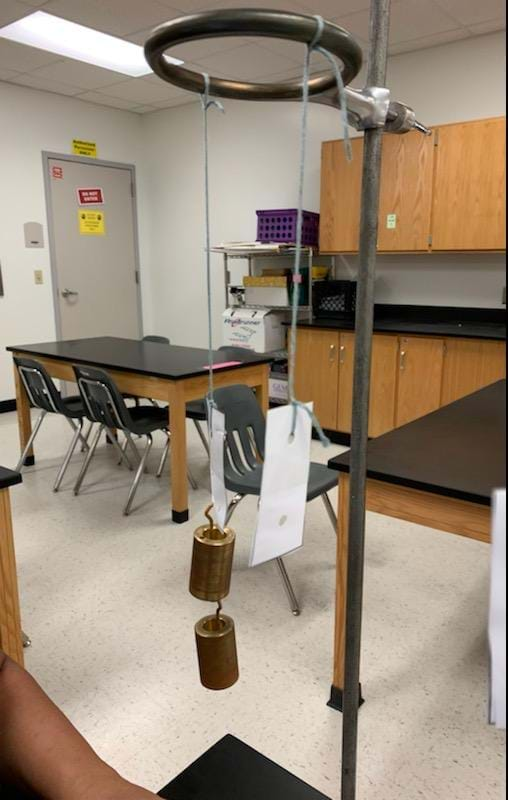
Paper strip with hanging masses.
Before the Activity
- Gather materials and make copies of the Materials Matter Activity 1 Worksheet and Materials Matter Activity 2 Worksheet one per group.
- Provide links to videos on the Materials Matter Activity 1 Worksheet by posting in Google Classroom or another accessible location; alternatively, give students digital versions of the worksheet, which includes hyperlinks: EXPERIMENT: HAMMER VS FRUITS (3:58 minutes) and Machine Breaking Different Material (30 seconds)
With the Students
Day 1
- Allow students to work in small groups of 3-4.
- Distribute copies of the Materials Matter Activity 1 Worksheet.
- As students watch the videos and complete the worksheet, walk around and check on groups. Ask them to explain their answers and ensure that each student has completed their own worksheet.
- Lead students through the Introduction/Motivation section.
- Ask students to reflect on the videos and review their worksheets. Given what they learned about composite materials, have them discuss which, if any, materials from the videos are composites. Allow groups to share their predictions and reasoning with the class. Note: Out of the materials in the videos, plywood is the only composite. Note that it took the most force to break (328.5 lbs.), and composites are often very strong.
Day 2
- Have students return to their small groups. Assign roles such as task manager, material controller, data collector, and safety manager.
- Task manager: Ensures that the group follows the steps of the procedure in order.
- Material controller: Gathers materials and follows directions to assemble and work with materials as needed.
- Data controller: Gathers and records data.
- Safety manager: Ensures that the group is following correct lab safety procedures.
- Remind everyone to follow lab safety procedures.
- Distribute copies of the Materials Matter Activity 2 Worksheet. Have the task manager instruct the material controller on which materials to gather and instruct the safety manager to review lab safety with the group before starting the activity and letting the data controller gather data.
- Allow students to work through the worksheet. Walk around the room to monitor progress and answer any questions. As needed, show students how to glue the strips together and where to punch the holes.
- After students finish gathering data, check that they are working together to answer the Questions and Conclusion on the worksheet.
- As a class, discuss the Conclusion. Students should share how they found that composite paper was stronger than one strip of paper, and that adding more strips of paper to the composite resulted in a stronger material.
- Remind students that they just researched and tested composite paper, similar to how materials engineers research and test composite materials made of wood, metal, and/or plastic. Ask students: “If you were tasked to build a paper bridge to support 2 kg of mass, would you use a single piece of paper or a composite? If a composite, how many strips of paper would you use? Why?” Allow students to discuss with their groups and use the data they gathered to support their answer in a class discussion.
Vocabulary/Definitions
composite: An object made of various parts.
composite material : A combination of two different materials that have different physical and chemical properties.
force: The push or pull of an object.
mass: The amount of mass in an object.
material: The mass that something can be made from.
Assessment
Pre-Activity Assessment
Class Discussion: Students watch the videos and answer the questions on the Materials Matter Activity 1 Worksheet. After completing the worksheet, students should discuss their answers with each other.
Students should be respectful toward each other and hear everyone’s opinion.
Activity Embedded (Formative) Assessment
Testing Composites: Monitor students as they work in small groups to complete the Materials Matter Activity 2 Worksheet. Check that students are working within their assigned roles, and that each student is engaged in the lab and discussion.

Post-Activity (Summative) Assessment
Conclusion and Summary: Students utilize their graphs to compare their data and answer the questions on the Materials Matter Activity 2 Worksheet. Then they write a summary of the experiment as a conclusion.
Investigating Questions
Why do different objects break differently? (Answer: Objects break differently because they are made of different materials. Fruits and vegetables are made of softer materials than plywood, ceramic tile, and dry wood. Different forces are needed to break different materials.)
What are the benefits of composite materials? (Answer: Composite materials are often stronger and more durable than non-composite materials. They may also be cheaper to use and lighter to construct objects and structures with.)
Safety Issues
- Follow lab safety rules.
- Wear safety goggles.
- Do not engage in horseplay with any of the materials.
- Stay with your group.
- Wash your hands after the experiment.
Activity Extensions
Have students use the engineering design process to build a bridge using different materials and test their strengths.
- Tell students the design criteria and constraints:
- The bridge must span 15 cm (approx. 6 in.).
- Students can only combine a max of two types of materials to create a composite.
- Each group must use different materials or combinations of materials.
- Show students various materials (e.g., paper, cardboard, cloth, etc.).
- Allow students to brainstorm which materials to use and how to build their bridge.
- Require students to come up with at least three brainstormed designs.
- Encourage them to use the research they recorded on the Materials Matter Activity 1 and 2 Worksheets to aid their brainstorming.
- Let students research different types of bridge designs. Remind students that engineers do not have to invent brand new designs; they can build on existing ideas and modify them to best solve the given problem.
- Have students select one design to prototype and test.
- Encourage students to list the pros and cons of each design and use the information they researched to justify their decision.
- Once students have selected one design, have them write their chosen materials in a data table on the board.
- Have students gather materials, build, and test their designs.
- Monitor their progress, and once students are ready to test their designs, provide various weights.
- Have students record how much weight their bridge can support.
- Encourage students to keep adding weight until the bridge breaks.
- Once they determine the maximum weight their bridge can support, have them write that weight on the board.
- Have students reflect on their bridge.
- Ask students: “What worked? What didn’t work? Which material(s) supported the most weight? How would they improve their designs?”
- Let students use what they learned from their first design and the class data to iterate on their designs.
- After students have had a chance to iterate once or twice, discuss the results as a class.
- Ask students, “Which material or combination of materials were used in the strongest bridge? Why did that bridge support the most weight?” Student answers will vary, but they should support their answers using evidence gathered from their tests.
- Ask students, “Based on the design process you just did, could you recommend the best material to use to build a bridge that would always support the most weight?” Encourage students to notice that they did not test every possible material/composite material they could use to build a bridge, so while they can recommend the best material based on those tested, there is more research and testing needed before recommending the best overall material.
Activity Scaling
Younger students and lower-grade students can just complete the table and the graph. They can also make observations about other objects that are composite materials. For younger students, teachers can perform a lab demo and start a class discussion of why the combined paper strips hold more mass than the one strip of paper.
More advanced students can create a composite material that can hold the same amount of mass as the combined strips of paper.
Additional Multimedia Support
Experiment: Hammer vs Fruits (3:58 minutes) https://www.youtube.com/watch?v=wovOCDpX8-
Machine Breaking Different Material (30 seconds) https://www.youtube.com/shorts/HNUb3eXZIww
https://www.evodekco.com/how-to-make-beautiful-backyards-ideas-with-composite-decking
https://www.livescience.com/53995-carbon-fiber-may-finally-be-coming-to-cars-everywhere.html
What is a Composite? (1:37 minutes) https://www.youtube.com/watch?v=Z2inwFBdQ9g
https://technologystudent.com/joints/concret1.html
https://www.appropedia.org/Composites_in_the_Aircraft_Industry#/media/File:Composites01.jpg
Subscribe
Get the inside scoop on all things TeachEngineering such as new site features, curriculum updates, video releases, and more by signing up for our newsletter!More Curriculum Like This

Over several days, students learn about composites, including carbon-fiber-reinforced polymers, and their applications in modern life. This prepares students to be able to put data from an associated statistical analysis activity into context as they conduct meticulous statistical analyses to evalua...

Students explore the basic characteristics of polymers through the introduction of two polymer categories: thermoplastics and thermosets. During teacher demos, students observe the unique behaviors of thermoplastics.
References
Wikipedia. Accessed on June 16, 2023. (Source of definitions and background teacher information ) https://en.wikipedia.org/wiki/Composite_material
Engineering Choice. Accessed on June 16, 2023. (Source of definitions, related phenomena, and background) https://www.engineeringchoice.com/what-is-composite-material
BMW. Accessed on Jun 16, 2023. (Source information for introduction /motivation part) Formerly available at: https://www.bmw.com/en/performance/carbon-fiber-in-a-car.html
Simple Flying. Accessed on Jun 16, 2023. (Source information for introduction/motivation) https://simpleflying.com/787-a350-composite
Copyright
© 2024 by Regents of the University of Colorado; original © 2023 University of HoustonContributors
Parvathy PillaiSupporting Program
Research Experience for Teachers (RET), College of Technology, University of Houston, Houston TXAcknowledgements
This digital library content was developed by the University of Houston's College of Engineering under National Science Foundation GK-12 grant number 1855147. However, these contents do not necessarily represent the policies of the NSF and you should not assume endorsement by the federal government.
Last modified: May 31, 2024


User Comments & Tips