Quick Look
Grade Level: 11 (11-12)
Time Required: 1 hours 45 minutes
(two 50-minute sessions)
Expendable Cost/Group: US $0.00
Group Size: 3
Activity Dependency: None
Subject Areas: Biology, Life Science
NGSS Performance Expectations:

| HS-LS1-2 |
Summary
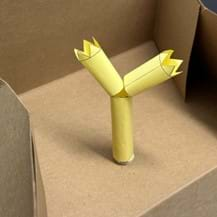
Students learn the basic principles of the humoral immune response and use a model to understand how antibodies and antigens interact in an enzyme-linked immunosorbent assay (ELISA). The ELISA is a laboratory diagnostic tool used to identify and quantify antigens. Through this model, students discover how the interactions between antigens and antibodies can aid in disease diagnosis and provide valuable information for disease management.Engineering Connection
Antigen testing devices use antibodies to detect specific molecules, essential for point of care diagnostics. Their manufacture presents engineering challenges because biological molecules, such as proteins, can be affected by changes in pH, temperature, and other factors, altering their functionality. Biomedical engineers address these issues by testing materials and designs to optimize interactions for accurate signals, combining biological principles with engineering practices. They must also ensure that designs are cost-efficient, enabling widespread healthcare use. This intersection of biology and engineering highlights the pivotal role of biomedical engineering in advancing medical technology and improving patient care.
Learning Objectives
After this activity, students should be able to:
- Describe the basic interaction between antigens and antibodies during an immune response.
- Explain how antigen tests work.
- Discuss conditions that can lead to false positives and false negatives and why controls are important.
Educational Standards
Each TeachEngineering lesson or activity is correlated to one or more K-12 science,
technology, engineering or math (STEM) educational standards.
All 100,000+ K-12 STEM standards covered in TeachEngineering are collected, maintained and packaged by the Achievement Standards Network (ASN),
a project of D2L (www.achievementstandards.org).
In the ASN, standards are hierarchically structured: first by source; e.g., by state; within source by type; e.g., science or mathematics;
within type by subtype, then by grade, etc.
Each TeachEngineering lesson or activity is correlated to one or more K-12 science, technology, engineering or math (STEM) educational standards.
All 100,000+ K-12 STEM standards covered in TeachEngineering are collected, maintained and packaged by the Achievement Standards Network (ASN), a project of D2L (www.achievementstandards.org).
In the ASN, standards are hierarchically structured: first by source; e.g., by state; within source by type; e.g., science or mathematics; within type by subtype, then by grade, etc.
NGSS: Next Generation Science Standards - Science
| NGSS Performance Expectation | ||
|---|---|---|
|
HS-LS1-2. Develop and use a model to illustrate the hierarchical organization of interacting systems that provide specific functions within multicellular organisms. (Grades 9 - 12) Do you agree with this alignment? |
||
| Click to view other curriculum aligned to this Performance Expectation | ||
| This activity focuses on the following Three Dimensional Learning aspects of NGSS: | ||
| Science & Engineering Practices | Disciplinary Core Ideas | Crosscutting Concepts |
| Develop and use a model based on evidence to illustrate the relationships between systems or between components of a system. Alignment agreement: | Multicellular organisms have a hierarchical structural organization, in which any one system is made up of numerous parts and is itself a component of the next level. Alignment agreement: | Models (e.g., physical, mathematical, computer models) can be used to simulate systems and interactions—including energy, matter, and information flows—within and between systems at different scales. Alignment agreement: |
Materials List
Each student needs:
- 1 copy of the Pre-Assessment
- 1 copy of the Formative Assessment
- 1 copy of the Post-Assessment
- 1 lab notebook or paper for recording observations
Each group needs:
- 1 cardboard box (this will be one ELISA well)
- Copies of the ELISA Templates on two different colors of sturdy paper, as follows:
- 1 primary antibody template printed on sturdy colored paper
- 1 secondary antibody template printed on a different color of sturdy paper
- 1 light chain template printed on the same color of sturdy paper as the primary antibody
- 1 light chain template printed on the same color of sturdy paper as the secondary antibody
- 1 copy of the enzyme ELISA Templates printed on goldenrod acid base paper (available at Amazon) or pH paper
- 1 pair of scissors
- 1 roll of tape (double sided works best) or bottle of glue
- multiple pom-poms of different sizes and colors, preferably with some spikes (available at Amazon)
- 2 brown bags, one labeled Patient A Serum and one labeled Patient B Serum
- 1 set of Velcro tape or dots (available at Amazon)
- 1 water bottle or dropper
- 5-10 drops of vinegar
Worksheets and Attachments
Visit [www.teachengineering.org/activities/view/bos-2920-elisa-point-of-care-devices-antigen-activity] to print or download.Pre-Req Knowledge
Students should:
- Be familiar with basic protein structure (i.e., proteins are made of a sequence of amino acids; protein conformation is determined by interactions of amino acids—primary, secondary, tertiary structures determine the shape of the protein).
- Have a basic understanding of the immune response (i.e., understand that white blood cells fight diseases and make antibodies, and that antibodies can bind to and neutralize antigens).
Introduction/Motivation
When was the last time you used an antigen test? Have you ever wondered how these tests work? How do they differ from those performed in hospitals and laboratories? Why is it important to understand how over-the-counter antigen tests function?
Before the SARS-CoV-2 pandemic, antigen tests were mostly used in laboratories and medical settings. For infectious diseases, samples were typically sent to labs for tests such as enzyme-linked immunosorbent assay (ELISA) and polymerase chain reaction (PCR). ELISA identifies and quantifies pathogen-specific proteins (antigens), while PCR amplifies genetic material for precise identification. These clinical tests are accurate, sensitive, and essential for disease management and research. However, they can be costly, time-consuming, and not always readily accessible, which can limit their impact on healthcare.
The rapid development and widespread use of over-the-counter antigen tests was crucial in controlling the spread of SARS-CoV-2 during the pandemic. Many positive patient outcomes depended on the ability to identify infections early.
Antigen tests are now commonplace and will continue to play a key role in diagnosing and monitoring diseases. The development of these tests has also paved the way for other point of care (POC) devices—diagnostic tools that provide near-patient results by detecting disease biomarkers. POC devices reduce the need for laboratory testing, allowing for timely medical decisions.
Many POC devices are miniaturized versions of traditional assays like ELISA. Understanding how conventional tests such as ELISA work is vital for using them effectively and for advancing second-generation devices that can diagnose and monitor a wide range of diseases.
Procedure
Background
Immunoassays provide a great example of how nature offers solutions to complex problems. These tests detect and measure antigens using antibodies, which are molecules our bodies produce during an immune response. To understand how immunoassays work, students first need to grasp the basic principles of antigen-antibody interactions, how these interactions protect us from disease, and how they are applied as diagnostic tools.
Antigens are molecules that trigger an immune response in our bodies (hence the name, "antibody generators"). Specialized white blood cells called lymphocytes protect us by recognizing these proteins, often found on the surface of pathogens or infected cells. When a specific type of lymphocyte called B cells detect antigens, they bind to them and release chemical signals that activate the immune response. Once activated, B cells produce antibodies that are specific to the antigen. These antibodies are released into the bloodstream, where they patrol the body. If they encounter the antigen, they bind to it, neutralize it, and tag it for destruction.
Scientists have learned to manipulate and use antibodies to develop immunoassays. One important example is the enzyme-linked immunosorbent assay (ELISA). In an ELISA, antibodies are used to capture and detect antigens in order to diagnose diseases. The first step in developing an ELISA is to cultivate the antibodies. Antigens from a biological agent or organism are introduced into an animal (usually a mouse, rat, or rabbit). In response, the animal’s immune system produces antibodies, which are then harvested from its blood, prepared, and stored for later use in laboratory tests.
To perform an ELISA, a prepared primary antibody is introduced to a special plate or platform. The patient's blood plasma or another bodily fluid is then added. If the antigen is present, the primary antibody will bind to it and immobilize it on the plate. A secondary antibody, known as the detection antibody, is then added. This antibody binds to the antigen as well and is conjugated with an enzyme that helps generate a signal. The primary antibody, antigen, and secondary antibody form a complex known as a "sandwich." Finally, a substrate is introduced, which reacts with the enzyme, producing a color change. The intensity of the color can be measured visually or using spectrophotometry, allowing the concentration of the antigen in the sample to be quantified.
Before the Activity
- Gather the materials for the modeling activity.
- Make copies of the Pre-Assessment. (1 per student).
- Print the ELISA Templates as follows. (Note: Cardboard will be too hard to shape, but regular paper may be too fragile to hold the “sandwich” created by the two antibodies.)
- Using the same color, print the heavy chain/primary antibody template AND the light chains template on sturdy colored paper (1 of each per group).
- Using a different color paper, print the secondary antibody template AND another light chains template on sturdy colored paper (1 of each per group).
- Using the goldenrod acid base paper or pH paper, print out the enzyme template (1 per group).
- Prepare two brown bags with two kinds of pom-poms for each group:
- Bag 1: Contains small pom-poms with spikes; label the bag Patient A Serum.
- Bag 2: Contains large pom-poms that do not fit in the antibody’s light chains; label the bag Patient B Serum.
- Make copies of the Formative Assessment (1 per student).
- Make copies of the Post-Assessment (1 per student).
With the Students
Day 1
Part 1: Background
- Assign the Pre-Assessment before the activity. Note: Either assign this worksheet as student homework before the activity or give students time in class to read the worksheet information and answer the questions.
- Have a class discussion to check for understanding. (Use the Pre-Assessment Answer Key as a reference.)
- Optional: Present the ELISA and Point of Care Devices Presentation if students need exposure to additional content.
Part 2: Model: Building the antibodies and ELISA well
- Divide students into groups of 2-3.
- Have each group gather their materials and two copies of the heavy and light chain templates.
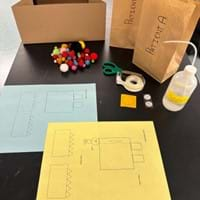
Materials needed for each group of students - Have each group do the following with their ELISA Templates to prepare for the activity:
- Cut out the heavy and light chain templates.
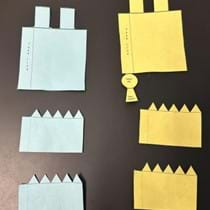
Cut templates for heavy and light chains of primary and secondary antibody. - Fold the heavy chain into a cylinder, using the dotted lines as a guide to overlap edges.
- Use double-sided tape to adhere the edges and form the cylinder.
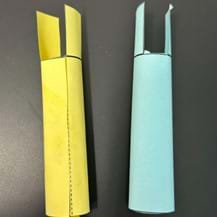
Heavy chains for primary and secondary antibodies - Fold the circle flap to cover the bottom of the cylinder.
- Use double-sided tape on the flap to secure the inside of the cylinder.
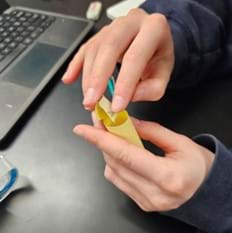
Folding and securing the inner flap of the base on the primary antibody - Adhere one of the sticky sides of a Velcro dot to the bottom of the cylinder. (Note: Save the other Velcro side/piece for the box/well.)
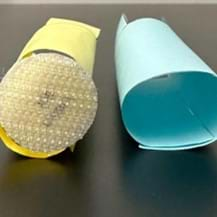
Primary antibody heavy chain with Velcro - Fold two of the side chain templates and secure with double-sided tape.
- Use the dotted lines as a guide for tape placement.
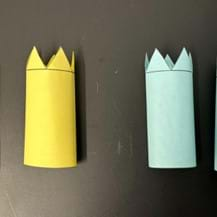
Cut and folded antibody light chains - Insert the light chains into each of the flaps of the heavy chain and secure it with double-sided tape.
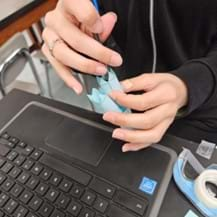
Taping the light and heavy chains together using double-sided tape 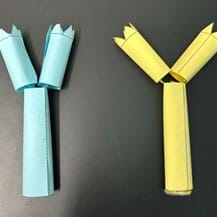
Assembled antibodies - Tape the saved side of the Velcro dot to the middle of the cardboard box.
- Secure the built antibody model to the Velcro in the box by attaching the Velcro dots. Note: The antibody should stand securely inside the box. Invert the box to test the stability of the antibody. Adjust the antibody and Velcro if necessary.

Primary antibody in the ELISA “well”
- Have students build their secondary antibody following Steps a through k above.
- Have students cut the enzyme templates into their circular shape and cut through the dotted line, and then insert the enzymes into the bottom edge of the secondary antibody.
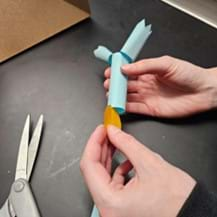
Attaching the enzyme to the secondary antibody
Day 2
Part 3: Modeling the molecular interactions in the ELISA Test
Testing Patient A
- Have students identify their brown bag labeled Patient A Serum and tell them that the bag has several antigens of all types.
- Instruct students to use their fingers to slowly “sprinkle” the antigens (pom-poms) from the bag over their antibody in the cardboard box/well.
- Have students record their observations in their lab notebooks.
- Have students answer the following in their lab notebooks:
- Which antigens are more likely to bind to the surface of the light chains?
- Describe the features in the antigen and in the antibody that allow them to bind to one another.
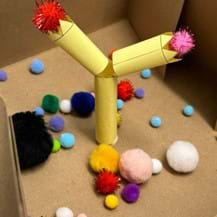
Antigens captured by primary antibodies - Why do some antigens not bind?
- Have students “rinse” the bottom of their group’s well/box by removing all of the unbound antigens. (At this point, they should have some of the spikey pom-poms attached to the light chains.)
- Once an antigen of interest is bound to the primary antibody, attach the second antibody so that the antigen is “sandwiched” between the light chains of both antibodies.

A sandwich of antigen between primary and secondary antibodies - Model the addition of a substrate by spraying the enzyme portion of the secondary antibody with a “substrate” (i.e., vinegar). Alternatively, a dropper can be used to drop some substrate (vinegar) over the enzyme.
- Have students note any color changes.
- Once students finish recording their observations and answering the above questions, have each group “rinse” all components of the ELISA and remove all antibodies and antigens from the box/well.
Testing Patient B
- Have students reattach their primary antibody to the well using the Velcro.
- Have students identify their brown bag labeled Patient B Serum.
- Instruct students to use their fingers to slowly “sprinkle” the antigens (pom-poms) from the bag over their antibody in the cardboard box/well.
- Have students record their observations in their lab notebooks.
- Have students answer the following in their lab notebooks:
- Did any antigen bind to the surface/tips of the light chains?
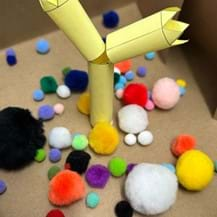
Unbound antigens at the bottom of the ELISA well - Why didn’t some antigens bind?
- Have students “rinse” the bottom of their group’s well/box by removing all of the unbound antigens. Let students invert the box to “rinse” if needed. (At this point, they should have no pom-poms attached to their light chains because the pom-poms are too big.)
- Have students add the secondary antibody to the well. If there are no antigens attached to the primary antibody, then students need to drop the secondary antibody into the well.
- Have students “rinse” the well by inverting it over the table. Note: The unbound antibody should “fall off” the box/well.
- Model the addition of a substrate by spraying the enzyme portion of the secondary antibody with a “substrate” (i.e., vinegar). Alternatively, a dropper can be used to drop some substrate (vinegar) over the enzyme.
- Have students note any color changes.
- Have students work with their group members to answer the Formative Assessment questions.
- Lead the class in a discussion reviewing the answers to the Formative Assessment. Note: Use the Formative Assessment Answer Key as a reference.Have students complete the diagram for each step of the ELISA and write a brief description of what is being depicted in each step in their Post-Assessment. This can be assigned as homework if necessary.
Vocabulary/Definitions
antibody: A large, Y-shaped protein used by the immune system to identify and neutralize foreign molecules.
antigen: A substance that induces an immune response, especially the production of antibodies.
assay: An investigative (analytic) procedure in laboratory medicine, mining, pharmacology, environmental biology and molecular biology for qualitatively assessing or quantitatively measuring the presence, amount, or functional activity of a target entity.
biomarker: A measurable substance in an organism whose presence is indicative of some phenomenon, such as disease, infection, or environmental exposure.
immunoassay: A biochemical test that measures the presence or concentration of a molecule in a solution through the use of an antibody or an antigen.
in vitro: Meaning ‘in glass,’ or ‘in the glass,’ a type of study performed with microorganisms, cells, or biological molecules outside of their normal biological context.
spectrophotometry: A tool that hinges on the quantitative analysis of molecules, depending on how much light is absorbed by colored compounds.
Assessment
Pre-Activity Assessment
Pre-Assessment reading and worksheet: Students read and answer the questions in the Pre-Assessment before the modeling activity. Once completed, engage the class in a discussion about the possible challenges of building point of care devices that use antigens and antibodies.
Activity Embedded (Formative) Assessment
Formative Assessment: Students discuss the questions in their Formative Assessment with their group members and then answer the questions building their model.
Post-Activity (Summative) Assessment
Post-Assessment worksheet: Students complete the diagram for each step of the ELISA and write a brief description of what is being depicted in each step in their Post-Assessment.
Troubleshooting Tips
Print the antibody templates on sturdy colored paper. Cardboard will be too hard to shape, but regular paper may be too fragile to hold the “sandwich” created by the two antibodies. Goldenrod acid base paper requires extra preparation: The paper needs to be soaked in a basic solution and dried out before use; only then it will create a color change when sprayed with an acid. Alternatively, attach a pH paper strip to the enzyme template to achieve a quick color change when sprayed with vinegar.
Activity Extensions
Make your own model extension!
After learning how lateral flow antigen tests work, students can design and test their own models to show how this test works. Students can use any materials of choice, including some (but not limited to) the same materials provided in class for the ELISA plate model. The lateral flow model should include a way to move antigens laterally on any medium of their choice, and show how antibodies trap the antigens and immobilize them. The challenge is to test different materials on a pad that will immobilize and trap both antigen and antibodies, while allowing the movement of non-specific antigens or materials. On the model, antibodies and antigens can be represented by materials of different shapes. The idea is to test materials that allow movement and capture of different components.
Activity Scaling
For more advanced students who want to model an entire ELISA virtually, complete the HHMI Virtual Lab: https://www.biointeractive.org/classroom-resources/immunology-virtual-lab.
Wet Lab: www.edvotek.com/269
Subscribe
Get the inside scoop on all things TeachEngineering such as new site features, curriculum updates, video releases, and more by signing up for our newsletter!More Curriculum Like This

Students learn about the major components and functions of the immune system and the role engineers play in keeping the body healthy through the design of medical care such as vaccinations and antibiotics. They also learn how an astronaut's immune system is suppressed during spaceflight due to stres...

Students learn how engineering design is applied to solve healthcare problems by using an engineering tool called simulation. While engineering design is commonly used to study and design everything from bridges, factories, airports to space shuttles, the use of engineering design to study healthcar...

Students learn how viruses invade host cells and hijack their cell-reproduction mechanisms in order to make new viruses, which can in turn attack additional host cells. Students also learn how the immune system responds to viral invasions, eventually defeating the viruses—if all goes well.
Copyright
© 2025 by Regents of the University of Colorado; original © 2024 Boston UniversityContributors
Janira Arocho, Cambridge Public Schools @ Cambridge Rindge and Latin School; Shereen Mejia, Boston Public Schools @ East Boston High SchoolSupporting Program
NSF Research Experience for Teachers (RET) in Integrated Nanomanufacturing at the Photonics Center, Boston UniversityAcknowledgements
This curriculum was based upon work supported by the National Science Foundation under RET grant no. EEC 1407165—at the Research Experience for Teachers in Integrated Nanomanufacturing at the Photonics Center at Boston University. Any opinions, findings, and conclusions or recommendations expressed in this material are those of the authors and do not necessarily reflect the views of the National Science F oundation.
Last modified: February 3, 2025


User Comments & Tips