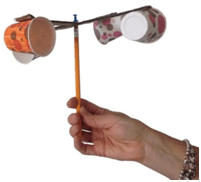
Quick Look
Grade Level: Elementary school
Time Required: 45 minutes
Expendable Cost: US $1.00
Group Size: 2
Subject Areas: Physical Science, Science and Technology
Introduction
Bolded words are vocabulary and concepts to highlight with students during the activity.
An anemometer is an instrument that measures wind speed. Knowing wind speed is important in a variety of situations: at airports (this real-time data helps pilots fly safely); for weather prediction (data is collected on sea buoys, marine vessels, ports and land in order to inform the public); for public safety and efficiency (railroads install wind alarms that report route conditions because high wind gusts cause loss of train power and derailments, and can blow over empty freight cars). Wind alarms also monitor conditions near industrial cranes, exposed roofs or other situations in which high winds can be hazardous. Engineers use data collected from anemometers to design and plan the location of wind turbines (huge windmill-like devices that collect wind as an energy source). The direction and strength of the wind is dependent on local terrain, height and other factors. Anemometers can tell us where the wind is the strongest in a specific area. Today, students build and use anemometers to determine the best place for a wind turbine.
Supplies
- ruler
- 4 paper cups
- marker
- paper
- scissors
- pencil, with eraser end
- push pin
- stapler/staples
- miscellaneous cardboard pieces
Subscribe
Get the inside scoop on all things TeachEngineering such as new site features, curriculum updates, video releases, and more by signing up for our newsletter!Procedure
Procedures Overview
Students work in pairs to build anemometers and use them to measure wind speed. Then they take measurements in various locations outside to determine the best place for a wind turbine. 
Procedure
- Divide the class into student pairs and hand out supplies.
- Instruct groups to color the outside of one of their cups. This is the cup students watch so that they can count the number of rotations their anemometer makes.
- Have students cut two equally sized strips of cardboard: around 1 in. (2.5 cm) wide x 10-12 in. (25-30 cm) long.
- Instruct students to place their two strips of cardboard perpendicular to each other, forming a plus sign; use a ruler to find and mark the center of each strip and overlay the two centers so that their anemometer is symmetrical. Then, have them carefully staple the strips together near the center of the strip (tell them not to put a staple directly in the center). This makes the anemometer frame.
- Next, students staple a cup, turned sideways, to each end of the frame, making sure the cups all face the same direction (see the image).
- Have students press the push pin through the center of the frame and into the pencil eraser (see the image).
- Students test their anemometers by blowing on the cups to see if they turn easily.
Measuring Air Speed
- Have each team pick five places outside that they want to test. (Note: It is okay if multiple groups pick the same location; avoid areas that are protected from wind, such as covered entries and under picnic tables.)
- Take students outside and tell the groups to count the number of times their anemometers rotates in 30 seconds.
- Assign roles: One person in each group is the Counter, who counts 30 seconds by using the method of saying: 1 one-thousand, 2 one-thousand, 3 one-thousand, etc. The other person is the Recorder, who counts and records the number of rotations of the cups.
- Tell students that after they move to one of their selected spots, the Counter holds the anemometer high and begins counting after saying "3, 2, 1, go!" The Recorder counts the rotations by watching the colored cup as it spins by. After 30 seconds, students stop counting and the Recorder reports the total number of rotations.
- On a blank sheet of paper, the Recorder writes the number 1 (for the first anemometer location), and writes the number of rotations made by the anemometer.
- Have groups move to their next selected locations and repeat the above steps two times. They conduct the above steps for each of their remaining locations.
- After all of the recordings, return to the classroom. Have students multiply their rotations by 2 to get the total rotations per minute.
- Have students compare and discuss their results. If time permits, have them draw a map of the outside area on the classroom board with wind speeds noted, so as to determine the locations where the wind speeds are the fastest.
Wrap Up - Thought Questions
- Did any of your classmates record the wind speed in the same place as your group? Did they get the same results? Why or why not?
- Looking at the results, where would be the best place to locate a wind turbine? Why or why not?
- Did some anemometers work better than others? What was different about them?
More Curriculum Like This

Students create their own anemometers—instruments for measuring wind speed. They see how an anemometer measures wind speed by taking measurements at various school locations. They also learn about different types of anemometers, real-world applications, and how wind speed information helps engineers...
Copyright
© 2013 by Regents of the University of ColoradoLast modified: May 12, 2022


User Comments & Tips