Quick Look
Grade Level: 4 (4-5)
Time Required: 2 hours 15 minutes
(four 30-minute sessions, three 45-minute sessions, or two 60-minute sessions)
Expendable Cost/Group: US $0.00
Group Size: 3
Activity Dependency: None
Subject Areas: Computer Science, Geometry, Physical Science, Problem Solving, Science and Technology
NGSS Performance Expectations:

| 4-PS4-2 |
Summary
Students engage in a hands-on exploration of vision and light reflection by creating a program that simulates light intensity and how our eyes perceive images using the LED display on the micro: bits and its radio feature. After creating a model of an eye, students simulate the light intensity and reflection processes before they work in groups to identify and solve real-world problems related to sunlight and vision. Students utilize the engineering design process to research, imagine, plan, create, test, and improve their solutions, such as reminders for when to wear sunglasses or sunscreen, displays of current sunlight intensity, or determining which materials block light/UV rays.Engineering Connection
Optical engineers design, develop, and test optical systems and devices that manipulate light, such as lenses, lasers, fiber optics, and imaging systems. They apply principles of physics, materials science, and engineering to create innovative solutions for a variety of applications, including telecommunications, medical imaging, consumer electronics, and aerospace. Their work often involves computer simulations, prototyping, and rigorous testing to ensure the performance and reliability of optical components and systems. Additionally, optical engineers collaborate with interdisciplinary teams to integrate optical technologies into larger systems and solve complex problems related to light behavior and its interaction with materials.
Learning Objectives
After this activity, students should be able to:
- Develop a model to describe how light reflecting from objects and entering the eye allows objects to be seen.
- Use a micro:bit to simulate the process of light reflection and vision.
- Learn basic coding and how to use a micro:bit for modeling and problem solving.
Educational Standards
Each TeachEngineering lesson or activity is correlated to one or more K-12 science,
technology, engineering or math (STEM) educational standards.
All 100,000+ K-12 STEM standards covered in TeachEngineering are collected, maintained and packaged by the Achievement Standards Network (ASN),
a project of D2L (www.achievementstandards.org).
In the ASN, standards are hierarchically structured: first by source; e.g., by state; within source by type; e.g., science or mathematics;
within type by subtype, then by grade, etc.
Each TeachEngineering lesson or activity is correlated to one or more K-12 science, technology, engineering or math (STEM) educational standards.
All 100,000+ K-12 STEM standards covered in TeachEngineering are collected, maintained and packaged by the Achievement Standards Network (ASN), a project of D2L (www.achievementstandards.org).
In the ASN, standards are hierarchically structured: first by source; e.g., by state; within source by type; e.g., science or mathematics; within type by subtype, then by grade, etc.
NGSS: Next Generation Science Standards - Science
| NGSS Performance Expectation | ||
|---|---|---|
|
4-PS4-2. Develop a model to describe that light reflecting from objects and entering the eye allows objects to be seen. (Grade 4) Do you agree with this alignment? |
||
| Click to view other curriculum aligned to this Performance Expectation | ||
| This activity focuses on the following Three Dimensional Learning aspects of NGSS: | ||
| Science & Engineering Practices | Disciplinary Core Ideas | Crosscutting Concepts |
| Develop models to describe phenomena. Alignment agreement: | An object can be seen when light reflected from its surface enters the eyes. Alignment agreement: | Cause and effect relationships are routinely identified. Alignment agreement: |
Common Core State Standards - Math
-
Draw points, lines, line segments, rays, angles (right, acute, obtuse), and perpendicular and parallel lines. Identify these in two-dimensional figures.
(Grade
4)
More Details
Do you agree with this alignment?
Materials List
Each group needs:
- Bright Ideas Worksheet (one per student)
- 1-2 micro:bits and accessories (depending on how many you have or can buy)
- 1 micro USB cable
- 2 AAA batteries
- 1 battery holder for micro:bit
- 1 Chromebook or laptop computer
- any supplies the students come up with that they will need to solve their problem (e.g., cardboard, paper, tape, sticks, plastic cups, plastic containers, foam sheets, other household materials to test, etc.)
For the teacher to demonstrate (or for students to test on their own):
- 1 flashlight
- 1 mirror
Materials for the entire class to share (these are suggestions to make the eye model):
- cardboard or cardstock (about 2 pieces of cardstock per eye model)
- toilet paper or paper towel rolls (great for the optic nerve)
- paper (in eye colors such as blue, green, and brown, and gray shades and black for the back of the eye)
- markers for the eye color (blue, green, brown, and gray shades)
- paint for eye texture (blue, green, brown, and gray shades)
- tape and/or glue
- scissors
- zip-lock bag or sheet protector (anything clear to act like a cornea)
- compass or other items to help make a circle
- any other craft supplies the students want to use to build their eye model
- (optional) building supplies or clay (to build the eye model out)
- (optional) 3X credit-card magnifier (if you want to add a “real” lens to the eye model)
Videos that support the activity:
- BrainPop Eyes - https://www.brainpop.com/health/bodysystems/eyes/movie (must have a subscription)
- Generation Genius Light Reflection and Vision https://www.generationgenius.com/videolessons/light-reflection-and-vision-video-for-kids (must have a subscription)
- Human Eye - The Dr. Binocs Show https://www.youtube.com/watch?v=axpCN6Vj9p0 (free on YouTube)
Worksheets and Attachments
Visit [www.teachengineering.org/activities/view/umo-2941-bright-ideas-light-reflection-microbits-activity] to print or download.Pre-Req Knowledge
Students should have a basic understanding of how to use block coding and a micro:bit. If the students don’t have this knowledge, there are quick online mini lessons that can be taught.
Introduction/Motivation
(Prepare the Bright Ideas Presentation to be projected for class to view.)
Today we are going to explore how we see the world around us. Has anyone ever wondered how we can see things? What makes it possible for us to see objects, colors, and shapes? (Wait for student responses.)
(Show Bright Ideas Presentation Slide 5.)
We see things because of light. Light is a form of energy that travels in straight lines and can come from sources such as the sun, lamps, candles, and even flashlights. When light hits an object, it bounces off or reflects from the object. This is called reflection. Think of it like playing with a ball. When you throw a ball at a wall, it bounces back. Light behaves similarly when it hits objects.
Can anyone tell me what happens to the light after it reflects off an object? How do we end up seeing it? (Wait for student responses. Guide them to understand that light enters our eyes after reflecting off objects.)
After light reflects off an object, some of that light enters our eyes. Our eyes have special parts that help us see.
- The light enters through the cornea and pupil. (Show Bright Ideas Presentation Slide 6.)
- The lens focuses the light onto the retina at the back of our eyes. (Show Bright Ideas Presentation Slide 7.) (The image appears upside down because the cornea bends light as it enters the eyes, causing the image that hits the retina to be upside down.)
- The retina converts the light into signals. (Show Bright Ideas Presentation Slide 8.)
- These signals travel to our brain through the optic nerve. (Show Bright Ideas Presentation Slide 9.)
- Our brain processes these signals and creates the image we see. (Show Bright Ideas Presentation Slide 10.) (Our brain turns the image right side up when it processes the information.)
The next time you look at an object, remember that light is bouncing off it, entering your eyes, and helping you see it!
(Show Bright Ideas Presentation Slide 11.)
What happens when you shine a flashlight on different objects around the room? What happens when you shine a flashlight on a mirror? (Do this with the lights on and again with the lights off.)
Have you ever tried to see something in the dark? What did you notice? How did the lack of light affect what you could see? (Wait for student responses and turn then turn off the lights in the classroom.) Why is it harder to see in a dark room? (Turn lights back on.)
These experiences help us understand why light is so important for vision. Whether it's a streetlight helping you see at night or the sun lighting up the day, light is essential for us to see the world around us.
For this activity, we’re going to become optical engineers and explore vision and light reflection by creating a program that simulates light intensity and how our eyes perceive images. Then we’ll work in groups to identify and solve real-world problems related to sunlight and vision. Let’s get started!
Procedure
Background
Light is a form of energy that travels in waves and moves very quickly. When light hits an object, some of it bounces off, or reflects, and travels in different directions. Our eyes receive this reflected light, which helps us see objects around us. So, when you look at a book or a tree, you’re actually seeing the light that reflects off those objects and into your eyes. Without light, like when it's completely dark, we wouldn’t be able to see anything because there’s no light reflecting from the objects around us.
Our eyes are like cameras that capture light. The front part of the eye, called the cornea, focuses the light that comes in, helping us see clearly. After passing through the cornea, the light goes through the pupil, which is the dark circle in the center of the eye. The pupil gets bigger in dim light and smaller in bright light, allowing just the right amount of light to enter. Then, the light reaches the lens, which focuses it even more. Finally, the light reaches the back part of the eye, called the retina, where special cells detect light and color, turning them into electrical signals that are sent to the brain. Our brain interprets these signals, allowing us to "see" and understand what we’re looking at.
Colors play a big role in how we see different objects. When light hits an object, some colors are absorbed, and others are reflected. For example, if you see a red apple, it’s because the apple absorbs other colors of light and reflects only the red light, which our eyes detect. White objects reflect all colors of light, which is why they look white, and black objects absorb all colors, making them look dark. This process of light reflection, focusing, and color detection helps us understand the world visually, allowing us to see shapes, colors, and details of the things around us.
Key concepts:
What is light? Light is a form of energy that allows us to see. It travels in straight lines and can come from natural sources such as the sun or artificial sources such as a flashlight or a light bulb.
Reflection of light: When light hits an object, it doesn't just stop. Instead, it bounces off the object. This bouncing off is called reflection. Imagine playing with a ball: When you throw it at a wall, it bounces back. Light behaves similarly when it hits objects.
Path of light: After light reflects off an object, it travels in straight lines in many directions. Some of this reflected light enters our eyes.
How the eye works:
- Cornea and lens: The front part of your eye, the cornea, and the lens inside your eye work together to bend the light and focus it.
- Retina: The light is then focused onto the retina at the back of your eye. The retina is like a screen that captures the light.
- Optic nerve: The retina converts this light into signals that are sent to the brain through the optic nerve. Your brain processes these signals and creates the image you see.
Seeing an object:
- For example, when you look at a red apple, light from a source (like the sun or a lamp) shines on the apple.
- The light reflects off the apple, and some of this light enters your eyes.
- Your eyes focus the reflected light onto the retina, and your brain processes the signals to see the apple.
Common misconceptions to clarify before/during the activity:
Incorrect statement: Light does not travel from a source to an object.
- When an object is illuminated by a lamp or the sun, it is because light is traveling from the source to the object. The farther away from the source you are, the less illuminated an object will be.
Incorrect statement: Light does not need to enter the eye for an object to be seen.
- Light is necessary for our eyes to see objects. This is why it is impossible to see anything in a completely dark room.
Incorrect statement: The light needed to see an object is coming from the eye rather than to the eye.
- Our eyes do not produce any light. Objects must be illuminated by a source (lamp, sun, etc.) for us to be able to see them.
Incorrect statement: Only shiny objects reflect light.
- Shiny objects reflect light well, but any object you can see reflects light; otherwise, you wouldn’t be able to see it.
Incorrect statement: Black does not reflect any light.
- Black does reflect light, just less than white or lighter colors.
Incorrect statement: Light goes around things and does not travel in a straight line.
- Light travels in a straight line. You have a shadow because your body is blocking the path of some of the light from the sun. Light only goes around objects if it is reflected.
Micro:bits
The micro:bit is a pocket-sized, programmable microcontroller designed to make learning and teaching easy and fun. It includes a grid of 25 LEDs that can display messages, two programmable buttons, an accelerometer, a magnetometer, and a Bluetooth antenna. The micro:bit can be programmed using coding languages such Python and JavaScript and platforms such as MakeCode.
Before the Activity
- Review the activity to familiarize yourself with the objectives, materials needed, and procedure steps.
- Gather materials by collecting all the necessary materials listed in the activity plan, including craft supplies for the eye model and the micro:bits for the simulations and real-world problems to be solved.
- Make copies of the Bright Ideas Worksheet. (one per student)
- Prepare the classroom by ensuring that all materials are organized and easily accessible. It might be good to use tables or put desks together to form groups.
- Consider how you will determine which students will be in a group. Don’t forget to consider factors such as student dynamics and participation.
- If you are unfamiliar with micro:bits, it is recommended that you complete a professional development course such as this one.
During the Activity
Part 1 (30-60 minutes)
- Gather students together and introduce the day’s activities by reading the Introduction and Motivation section. (5 minutes)
- Pass out mirrors; if you don’t have enough for each student, have the students work in pairs or groups.
- Tell students they are to look in the mirror and ask the following: (Show Bright Ideas Presentation Slide 12.) (5-10 minutes)
- “What do you see?” (Answer: Themselves)
- “Why?” (Answer: Their sense of vision [eyes and brain] is working with light to be able to see the image of themselves.)
- “How can the mirror show you yourself?” (Answer: The shiny smooth surface of the mirror reflects light, and we see an image.)
- Give each student a Bright Ideas Worksheet.
- Have students draw a diagram that shows how our eyes see our reflections in a mirror in their Bright Ideas Worksheet.
- After students write down their answers, discuss their responses as a class. (Answer: Light reflected off the image enters the eyeball through the front lens. Because light travels in straight lines, it crosses at the lens, inverting the image at the back of our eye. Our brain automatically turns the image right side up!)
- (optional) Show videos to help build background knowledge (Note: You can watch all, some, or none of the videos below; however, two of videos require a paid subscription. You can also show the videos at any time during the activity.)
- BrainPop Eyes- https://www.brainpop.com/health/bodysystems/eyes/movie (must have a subscription) (4 minutes)
- Generation Genius Light Reflection and Vision https://www.generationgenius.com/videolessons/light-reflection-and-vision-video-for-kids (must have a subscription) (10 minutes)
- Human Eye- The Dr. Binocs Show https://www.youtube.com/watch?v=axpCN6Vj9p0 (free on YouTube) (5 minutes)
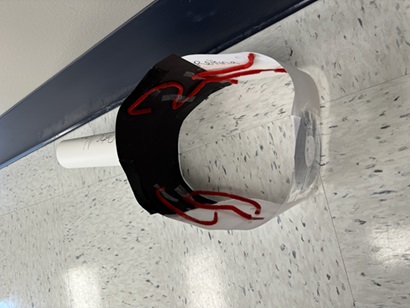
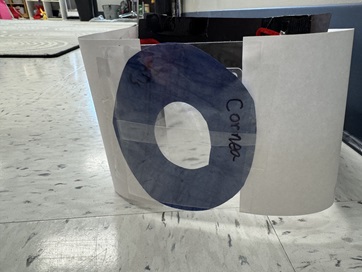
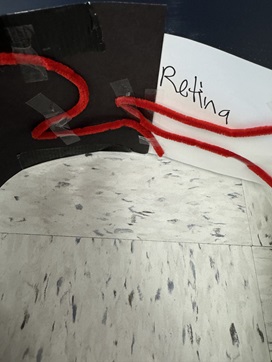
- Have students build an eye model as directed in Bright Ideas Presentation Slide 13.
- Using craft supplies, have students build a model of the eye and then label the different parts.
- This eye model needs to be a side model so students can see the back or put a micro:bit in the back.
- Models can be created by each student or with a partner or group.
- As the students get ready to build, make the following suggestions:
- Outside of the eye: cardboard or cardstock (about 2 pieces per eye model)
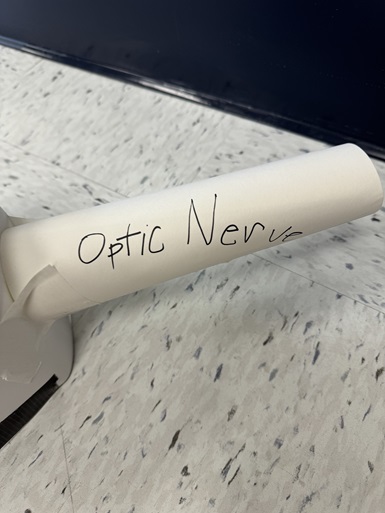
- Optic nerve: toilet paper or paper towel rolls
- Iris eye colors (paper in blue, green, brown, and gray shades; markers or crayons for the eye color, paint to add texture)
- Retina and pupil: black paper or black markers/crayons for the back of the eye
- Cornea: clear zip-lock bag or sheet protector
- Give students time to create their model. Note: This may take an extra day or two, depending on how detailed you want your students to be and how much time you have each day.
Part 2 (30 minutes + 30 minutes if students need extra time learning about micro:bits.)
- This step only needs to be done if it’s your students’ first time using micro:bits. If your students are familiar with micro:bits, skip to Step 2.
- Provide each group with a micro:bit (depending on how many micro:bits you have). If you only have 1-2 for the whole class, then you can skip to the coding part.
- Have the students go to https://makecode.microbit.org to start their first coding project. There are six introductory projects that help your students learn the different features of the micro:bit. It is recommended that they do all six; they don’t take very long. If you don’t have the time, you can pick which ones you want them to do.
- Once you have coded a project, you will need to download the code to the micro:bit by connecting the micro:bit to the computer with the cable and then clicking the ‘download’ button in MakeCode. If you only have a few micro:bits, have the students take turns trying to download code to the micro:bit.
- MakeCode makes it easier to start off with and create code quickly. If your students are familiar with code, or a couple of students are, you are welcome to let them use Python to do text-based programming.
- Coding the micro:bit
- Show students how to create a program that simulates light reflection using the LED display on the micro:bit. This can be done two ways.
- Option 1: Using two different micro:bits to show how the eye sees an image and then the retina signals the inverse to the brain. You can use smiley faces to display this by using the radio feature to display a right-side smiley face and then the “retina” receives the upside-down smiley face. You can have students create their own images. It’s possible to just use buttons A & B, but you can also add more features such as shake, or A + B. If you add more images, you will need to add more radio send numbers and else ifs. You will need each group to change their radio set group to whatever group number you give them. If you don’t do this, then there will be interference between the groups. Figure 1 below is an example of the code: (Show Bright Ideas Presentation Slide 15.)
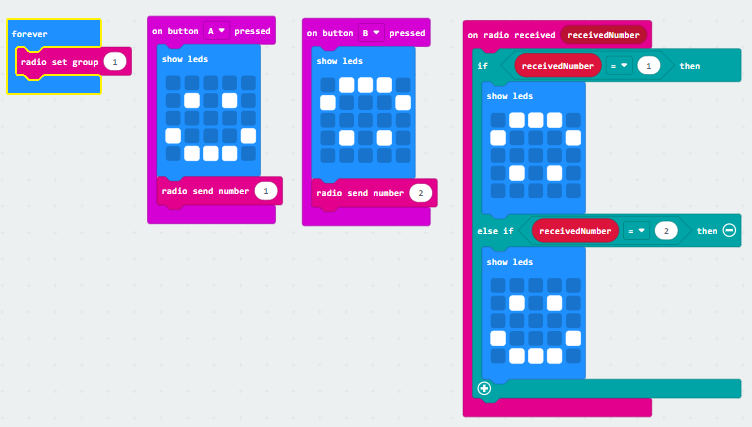
Figure 1. Example code for two different micro:bits to show how the eye sees an image and then the retina signals the inverse to the brain.
- Option 2: Using a 3X credit card magnifier to represent a more realistic lens. If you don’t want to buy several magnifiers, you can buy one and have a model with the lens for the students to see. When demonstrating this option, you will need to have the lights off or down and be near a window. You will want to place the micro:bit near the window (up to a couple feet away) so that you can use the lens to see it. For this option, you would only need one micro:bit per eye model and group to show the image, and then the lens should automatically display the image upside down. You can have students use show LEDs and make their own image, or let them choose one. Just make sure the image would look different if it was flipped upside down. Figure 2 shows some example code: (Show Bright Ideas Presentation Slide 16.)
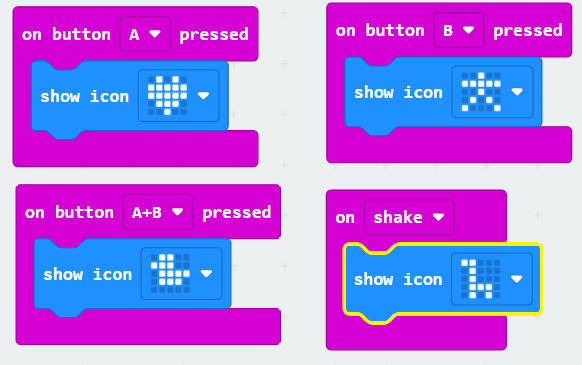
Figure 2. Example code for one micro:bit showing an image that the lens should automatically display upside down.
- You may also choose to have the students create a program that simulates light intensity. This can represent how the pupil changes sizes depending on how much light it is receiving. If you want to just demonstrate this as the teacher, that is also an option. (20-30 minutes)
- Figure 3 is example code for how to simulate the pupil getting bigger in the dark and smaller depending on how bright the light is. You are more than welcome to let the students have more or fewer images, and change the way they look. You can put the micro:bit behind the cornea to represent the pupil and use a flashlight to show the different pupil sizes. Even though the picture is broken into two different pictures, it is one continuous code, all in the forever block. (Show Bright Ideas Presentation Slide 17.)
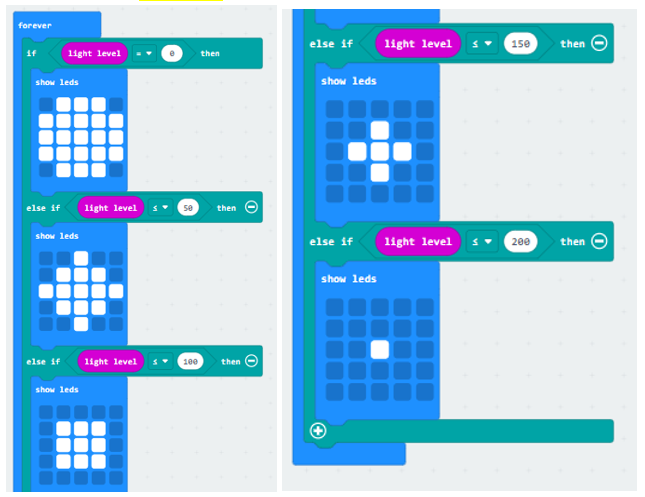
Figure 3. Example code for how to simulate the pupil getting bigger in the dark and smaller depending on how bright the light is.
- For these coding projects you can set it up several different ways.
- Each student creates their own code. (You don’t have to have a micro:bit for each student in order to do this, because the coding program is free.)
- Pair programming, where students code with partners. They should swap roles frequently.
- Driver - creating the code on the computer
- Navigator - guiding, keeping the project on track, and suggesting ideas for improvement
- For group programming, the students would take turns coding, and the other group members would be watching and advising while one person codes. (Note: This option makes it hard for everyone to be doing something all at once.)
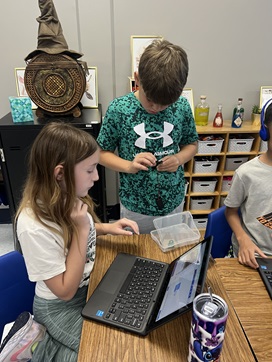
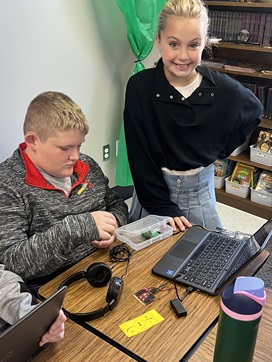
Two students working together to code their micro:bit to show how the eye sees an image and then the retina signals the inverse to the brain.
- Discussion and Reflection (5 minutes)
- Discuss how the micro:bit helped model the process of light reflection and vision.
- On the worksheet or in their science notebooks, ask students to explain in their own words how light reflection allows us to see objects.
- Talk with students about how engineers create models and simulations to analyze existing systems so they can see where flaws might occur and to test possible solutions to new problems. They also use them to recognize the strengths and limitations of their designs. Make sure to emphasize that models and simulations help us develop explanations about natural phenomena; they also make it possible to go beyond observables and imagine a world not yet seen.
Part 3 (60 minutes)
- (optional) Review the engineering design process.
- Give each student an Engineering Design Process Worksheet.
- Separate the class into groups of 3-4 students.
- Present the challenge: Solve a problem that deals with sunlight/light and/or vision. Here are some example problems you can give them if they are struggling to come up with their own:
- Developing a system that displays the current sunlight intensity (if you didn’t have them do this before, or show in the teacher demo).
- Creating a reminder for someone to put on sunglasses or sunscreen.
- Developing a system or test to determine what materials block light/UV rays.
- Detecting UV rays and alerting someone when they are exposed to harmful levels.
- Inventing a pair of “smart sunglasses” that can adjust their tint based on sunlight intensity.
- Designing a device that can monitor light pollution levels in different environments.
- Ask: Have students fill out the “Ask” section of their Engineering Design Process Worksheet. This is where they will write down what problem they will solve and list their criteria and constraints.
- Research, Imagine, Plan: Have students fill out the “Research,” “Imagine,” and “Plan” sections of their Engineering Design Process Worksheet.
- Create: Provide students with the necessary materials to build their design. (Note: You can let students use any materials that they might need to build their design. If you don’t want them to build the actual prototype, you can at least have them code the micro:bit and design a drawing of the prototype.)
- Test: If you have your students build a prototype, have them test their design.

Two students working together to create a program that simulates light intensity.
- Improve: After they test their designs, have them answer the questions in the “Test” and “Improve” sections of the Engineering Design Process Worksheet.
- Reflect: Have students answer the “Reflection” questions in the Engineering Design Process Worksheet to conclude their design challenge.
Vocabulary/Definitions
cornea: The clear layer in front of the eye.
iris: The colored part of the eye that is shaped like a donut.
light: Comes from sources like the sun, light bulbs, and candles. It bounces off things and allows us to see.
light reflection: When light bounces off the surface of an object.
light source: The place where light originates.
pupil: The dark opening in the center of the eye.
reflecting surface: Surface from which the light bounces off.
retina: The back of the eye that senses light and sends messages to the brain.
vision: The ability to see, using our eyes, which detect light that is reflected into them.
Assessment
Pre-Activity Assessment
Have a discussion that includes the following questions:
- Where does light come from? (Answer: Sun, light bulbs, lamps, candles)
- Is light necessary for us to see objects? Why or why not? (Answer: Yes, for our eyes to see objects, light must reflect off the objects and enter our eyes. Without light, we cannot see.)
- How does light travel from place to place? (Answer: Light travels in straight lines and is reflected off things, bounces off them.)
Activity Embedded (Formative) Assessment
Observe students during the hands-on activity to ensure they understand the process of light reflection and vision. Check their code for understanding basic programming concepts. Check that the students are correctly identifying and labeling the parts of their eye model. Check in with each group to make sure they are making progress and understanding.
Post-Activity (Summative) Assessment
Sample questions to discuss as a class or have students write down the answers to.
- What is the main reason we are able to see objects? (Answer: Light reflects off objects and enters our eyes.)
- What happens when light hits a smooth, shiny surface like a mirror? (Answer: The light reflects in one direction.)
- Why can’t we see anything in a completely dark room? (Answer: There is no light to reflect off objects.)
- What is the term for the bouncing back of light from a surface? (Answer: Reflection)
- What did you learn about light and vision during the activity?
- What challenges did you encounter, and how did you overcome them?
- How can the knowledge you gained be applied to a real-world problem?
Safety Issues
The only safety measure that needs to be considered is making sure students are using the scissors correctly and safely.
Troubleshooting Tips
Common snags that you might encounter while conducting the activity would be connecting and coding the micro:bit. The micro:bit was designed for students to use, so it is durable, but they still need to be careful when plugging it in to download the code to it.
Activity Scaling
For lower grades, you can increase the amount of time given to create and complete their eye model and design challenge. Also, instead of having students figure out the micro:bit code on their own, you can give them the code to use.
For older grades or advanced students, you can give them a “budget” for the challenge. You can also let them use whatever supplies they want to make their eye model have more details. They can also try to code new and different things with the micro:bit.
Subscribe
Get the inside scoop on all things TeachEngineering such as new site features, curriculum updates, video releases, and more by signing up for our newsletter!More Curriculum Like This

Students learn about the science and math that explain light behavior, which engineers have exploited to create sunglasses. They examine tinted and polarized lenses, learn about light polarization, transmission, reflection, intensity, attenuation, and how different mediums reduce the intensities of ...
References
“Light Reflection & Vision.” Generation Genius, 15 Mar. 2024, www.generationgenius.com/videolessons/light-reflection-and-vision-video-for-kids.
“Read ‘A Framework for K-12 Science Education: Practices, Crosscutting Concepts, and Core Ideas’ at Nap.Edu.” 3 Dimension 1: Scientific and Engineering Practices | A Framework for K-12 Science Education: Practices, Crosscutting Concepts, and Core Ideas | The National Academies Press, http://nap.nationalacademies.org/read/13165/chapter/7. Accessed 10 July 2024.
Copyright
© 2024 by Regents of the University of Colorado; original © 2024 University of MissouriContributors
Jessica White, Dr. Satish NairSupporting Program
Research Experience for Teachers (RET), University of Missouri ColumbiaAcknowledgements
This work is based on work supported in part by the National Science Foundation under grant no. EEC-1801666—Research Experiences for Teachers at the University of Missouri. Any opinions, findings and conclusions or recommendations expressed in this material are those of the authors and do not necessarily reflect the views of the National Science Foundation.
Last modified: November 13, 2024



User Comments & Tips