Quick Look
Grade Level: Elementary school
Time Required: 1 hour
Expendable Cost: US $6.00
Group Size: 3
Subject Areas: Physical Science
Introduction
Bolded words are vocabulary and concepts to highlight with students during the activity.
During a power failure, or when we need to move around in the dark, we grab a flashlight so we can find our way. What happens inside a flashlight that makes the bulb light up? Why do we need a switch to turn on a flashlight? Have you ever noticed that for the flashlight to work, you must orient the batteries a certain way as you insert them into the casing (holder)? Many people do not know that a flashlight is a simple series circuit. When engineers design electrical equipment, they figure out the optimum circuitry design for the situation, whether it is the installation of solar panels, the design of electric cars, the behavior of traffic signals, a hair dryer's on/off switch, the turn indicator lights on a vehicle or even a simple flashlight. They decide between creating a parallel or series circuit, or they often create a complex circuit system composed of both types.
Supplies
Each group needs:
- 2 D-cell batteries
- 1 bulb holder
- 1 #40 light bulb
- 2 paper clips
- 1 cardboard tube
- reflective material/foil
- 2-3 rubber bands
- thumb tacks
- 12" (30 cm) length of masking tape
- sandpaper
- wire cutters
- scissors
- 5 pieces insulated copper wire
- bubble wrap
- 1 sheet of paper
Subscribe
Get the inside scoop on all things TeachEngineering such as new site features, curriculum updates, video releases, and more by signing up for our newsletter!Procedure
Procedures Overview
Students discuss the components that make up a typical flashlight, then design, build, and test their own flashlights.
Procedure
Instructor note: do not hand out activity supplies until students have turned in their flashlight designs. 
- Discuss with students the components of a good flashlight: on/off switch, reliable, bright, etc.
- Break them up into groups of 2-3 and instruct them to discuss the above (and/or other) components that make up a flashlight and how these qualities are organized within the flashlight.
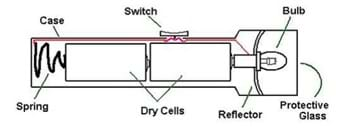
- As a class, have students walk you through drawing a flashlight on the white/chalk board. (Note: it should have all the components shown in Figure 1.)
- Draw the simple circuit diagram (Figure 2), illustrating to students how the batteries are oriented and where the switch is located.
- Hand out sheets of blank paper to students. Explain what supplies they have available to them, and instruct them to draw out a design for their flashlights.
- Approve each teams' design, hand out supplies, and instruct students to build their flashlights based on their proposed sketches.
- Instruct student teams to remove the insulation from their copper wires by using sand paper to lightly sand about 1/4" of each wire end.
- Each flashlight should have the following components:
- a switch
- batteries contained within the paper tube
- a light that is enhanced with some sort of reflector (such as foil)
Note: if students are having trouble with their batteries sliding around in their tubes, have them use a piece of bubble wrap to fill the space above/below. .jpg)
- After students have built their flashlights, they should test for reliability. (Note: consider a flashlight reliable if the lights can be activated three times in a row.)
- If the flashlight does not light up at all, check the flashlight's circuit to make sure it successfully connects all of the required components.
- If it is not reliable, have them fix their switch to try to make it work better.
- If time, have each team present its flashlight to the rest of the class.
Wrap Up - Thought Questions
- Which designs worked the best? Why?
- Why does your switch work? What does it do?
- Did you use a parallel or series circuit? Explain the difference between the two.
More Curriculum Like This

In this hands-on activity, students build flashlights and design their own operating series circuit flashlights.

Students learn that charge movement through a circuit depends on the resistance and arrangement of the circuit components. In one associated hands-on activity, students build and investigate the characteristics of series circuits. In another activity, students design and build flashlights.

During this activity, students build a simple series circuit and discover the properties associated with series circuits.

Students explore the composition and practical application of parallel circuitry, compared to series circuitry. Students design and build parallel circuits and investigate their characteristics, and apply Ohm's law.
Copyright
© 2013 by Regents of the University of ColoradoLast modified: May 12, 2022


User Comments & Tips