Lesson Engineering Bones

Quick Look

Grade Level: 7 (6-8)

Time Required: 30 minutes

Lesson Dependency: None

Animation of a running human skeleton.
The human skeleton
copyright
Copyright © NASA http://virtualastronaut.tietronix.com/textonly/act15/text-skeletonpuz.html

Summary

Students extend their knowledge of the skeletal system to biomedical engineering design, specifically the concept of artificial limbs and joints. Students relate the skeleton as a structural system, focusing on the leg as structural necessity. They learn about the design considerations involved in the creation of artificial limbs, including materials and sensors.

Engineering Connection

Biomedical engineering is the application of engineering techniques to the understanding of biological systems and the development of therapeutic technologies and devices. One type of biomedical engineering is the field of prostheses, or artificial body parts. Since leg bones are important to our body structure, biomedical engineers design prosthetic legs to handle the stresses of a moving body. To design better prostheses, they consider and experiment with various materials. Kidney dialysis, pacemakers, hearing aids and synthetic skin are other products of biomedical engineering.

Learning Objectives

After this lesson, students should be able to:

  • Explain how engineers are involved with design related to the human skeletal system.
  • Identify some of the necessary features of a prosthetic limb.
  • Describe several design criteria that go into choosing the material for a prosthetic limb.

Worksheets and Attachments

Visit [www.teachengineering.org/curriculum/print/cub_biomed_lesson01] to print or download.

Pre-Req Knowledge

Some familiarity with the human skeletal system; see information in the Lesson Background section.

Introduction/Motivation

What would you look like without your skeleton? Well, you would have a very different shape, your vital organs would be unprotected, and you would move in a different way. Your skeleton serves as your body's structure; it gives your body shape and stability. Structure is what gives you the ability to stand (or be in any other position); just like a building's structure is what enables it to stand.

But what about people who have do not have some of these structural bones, such as legs? The technology of prosthetic limbs has recently advanced tremendously. Today we will learn about the structural importance of our skeletons, as well as how biomedical engineers design artificial bones, especially leg bones, to help others.

(left) Image of a standing human skeleton. (right) Photo of a side view of a tall metal structure that is wider at its base than its top.
Why are leg bones thicker than arm bones? More support is needed at the bottom of the human body because it holds more weight, similar to the structure of the Eiffel Tower.
copyright
Copyright © (left) National Institute of Environmental Health Sciences, http://www.ehponline.org/docs/2003/111-10/ss.html (right) 2004 Microsoft Corporation, One Microsoft Way, Redmond, WA 98052-6399 USA. All rights reserved.

Different bones have different primary functions. The most important function of your ribs and skull are to protect your heart, lungs and brain — some very essential organs! The main function of your hand bones is to enable movement so that you can hold things. What bones have the primary function of structure, or holding up your body? The bones that hold the entire weight of your body are very important for structure, such as the leg bones, hip bone and backbone. Structure is the reason that your femur, or thigh bone, is so large and thick. Think about a building, such as the Eiffel Tower in Paris, France. The thickest parts of its structure are at the bottom, because the entire weight of the tower rests on the bottom supports. In terms of structure, the leg bones (bottom supports) are the most important bones in our bodies. Since they are also critical for movement, it is very hard to live without them.

Biomedical engineers study the strength and durability of our bones so that they can replicate them to make prostheses (plural for prosthesis), which are artificial devices to replace body parts. Some prostheses are external and sometimes even removable, such as artificial arms and legs. These prostheses are important for amputees (people who have had a limb removed). Other kinds of prostheses are internal and permanent, such as hip and knee replacements. These kinds of prostheses are used when the original body part is not missing, but is instead badly damaged from an injury or illness (such as osteoarthritis).

How do engineers design prostheses? Let's think about an implant for a total knee replacement. What does a knee do? (Have students brainstorm ideas). A healthy knee is amazing! The strongest and largest joint in your body, the knee lets you move your lower leg back and forth as well as twist slightly. The knee is stabilized by ligaments and cartilage. The meniscus acts as a shock absorber in between the long bones of your knee.

What are the criteria and constraints that a biomedical engineers needs to think about when designing a prosthetic knee? (Again, have students brainstorm). A replacement knee needs to be able to move the way a real knee can move. It needs to able to support body loads and be flexible enough to bend without breaking. It must be strong and durable. The replacement knee must be shock absorptive. It must be lightweight, so that a person does not have difficulty moving around. The replacement knee must be biocompatible (it must not cause the patient to have an adverse immune reaction). It should also last a very long time, so that the patient does not need multiple knee replacements.

Photo shows a man testing his prosthetic leg as a doctor looks on.
copyright
Copyright © Walther Thill, US Department of Veteran's Administration https://www.myhealth.va.gov/mhvPortal/anonymous.portal?_nfpb=true&_nfto=false&_pageLabel=spotlightArchive&contentPage=spotlight/spotlight_prosthetics.html

To satisfy the criteria and constraints that we just talked about, biomedical engineers need to carefully select materials. Knee replacements have metal parts that go where the bone used to be. Titanium alloys and cobalt-chromium are often used for these metal parts because they have similar mechanical behavior to bone and do not easily break down in the body (steel would quickly break down). The meniscus is replaced with a plastic part, often made of ultra-high weight polyethylene. This part needs to absorb shock and be very durable. There is still a lot of work to be done in prosthetic knee design. Current knee and hip prostheses last only 10 to 15 years. This is not long enough for younger patients! Therefore, biomedical engineers research how new materials could improve the lifespan of these prostheses. One way that biomedical engineers are working on making prostheses last longer is by modifying the prosthetic's surface. Implant materials now often have textured or porous coatings that help the surrounding bone grow into and fuse with the prosthesis. Some materials, such as tantalum, can be manufactured to be porous structures without the need for a coating. All in all the choice of materials is key to biomedical technologies, and continues to be researched to better replicate the functions of the original body part.

For external prosthetics, such as a prosthetic leg for an amputee, biomedical engineers must think about how the prosthesis will communicate and connect with the body. Students can act as engineers with the associated actvities Prosthetic Party: Build and Test Replacement Legs and Sticks and Stones Will Break That Bone! by designing and prototyping biomedical solutions for various medical cases. 

A simple type of sensor might be a harness around the shoulder to control a prosthetic arm. A simple connection to the body for a prosthetic leg might be a cuff on the thigh attached to a belt around the waist. Although these methods work, they do not always produce lifelike movements, and may be uncomfortable or burdensome.

Photo shows man assembling prosthetic leg that has a hydraulic knee system.
copyright
Copyright © Bobbi Gruner, US Department of Veteran's Administration https://www.myhealth.va.gov/mhvPortal/anonymous.portal?_nfpb=true&_nfto=false&_pageLabel=spotlightArchive&contentPage=spotlight/spotlight_prosthetics.html

To solve these problems, newer sensor technologies are being developed that are much more accurate and small. Some sensors work by sensing small electrical changes in nearby muscles or nerves, and transmitting that data into prosthesis movement. These sensors are implanted into the body, which is actually less painful than other methods. Modern sensors are becoming more and more lifelike. One artificial knee was designed to sense the joint position and the way the weight of the body comes down onto the knee, and then adjust to that person's walking style by continuously changing resistance to motion. Think of this as similar to doors you may have seen that automatically close, but do so gradually so that they never slam; these doors also work by employing a changing resistance to motion. This artificial knee is just like the door, but is able to adapt to a person's particular walking style, making it move more like a real leg. Sensors and joints are becoming more realistic and lifelike in design, as engineers develop artificial legs that work smoothly and comfortably.

Lesson Background and Concepts for Teachers

The Human Skeleton

An adult human skeleton contains 206 bones. Babies are born with more bones, of which some eventually grow together to make 206. Human bones have a wide variety of sizes and shapes. The smallest bone is the tiny stirrup bone in the inner ear, and the largest is the femur (thigh bone). The structure of a bone consists of compact bone, soft bone marrow and sponge bone.

The human skeleton has several functions. Bones contain calcium and store many minerals for our bodies. The soft bone marrow part of each bone, located inside the hollow center of the bone, produces red blood cells for the circulatory system. Of great importance, the skeleton serves as the body's structure. It keeps the body in shape, protects internal organs and enables movement. We would be shapeless blobs without our bones.

Joint Types

The many different bones in the human body are connected to each other in different ways, enabling different types of movements. Four different types of joints include:

A ball and socket joint is similar to a car's stick shift lever, in that it can move around freely. The shoulder and hip joints are both ball and socket joints. Note that you can move your arm in many more ways than just up and down, or right and left; you can also move it diagonally, and in between all those positions.

A hinge joint moves like a door, allowing 180 degrees of motion, but only in one direction. Your elbows and upper parts of your fingers are hinge joints. You can easily move them up and down in just one direction, and they can never get past 180 degrees (because you cannot bend them backwards).

The vertebrae in the backbone are considered semi-movable joints because each vertebra has very limited movement. Overall, the backbone is flexible because when all the small movements of the vertebrae are combined, the back is able to move in many ways.

Immovable joints do not allow movement at all. Some immovable joints are in your skull. When a baby is born, some skull bones are not yet joined all the way together. During the first two years of life, the bones grow together like a jigsaw puzzle, forming immovable joints.

What about "double joints"? This phrase is used to describe an exceptionally flexible joint (not two joints). While double joints are common in children, most grow out of them because joints become less flexible as we age.

Notable Bones

Different bones have different functions, sizes and shapes. Facts about some important bones:

  • Cranium: Also known as the skull, the cranium is made of 27 bones, most with fixed joints. The primary purpose of the cranium is to protect the brain.
  • Jaw bone: The mandible is the lower jaw, moving up and down, and left and right. The maxilla is the upper jaw; it is part of the cranium and does not move.
  • Hip bone: Also known as the pelvis, your hip bone helps you stand upright and move. Because it supports the body's weight, it is critical to the body's structure. It also protects the intestines.
  • Lower leg bone: The tibia and fibula make up a lower leg. The tibia is in front and supports the body's weight, which is why it is larger than the fibula. The fibula is in back and controls ankle movement.
  • Ribs and sternum: The ribs wrap around to protect the chest, including the heart and lungs. The sternum is the breastbone, where the ribs are connected in front.
  • Spine: Also known as the backbone, the spine consists of 26 bones or vertebrae, which are separated from each other by cartilage. The vertebrae/cartilage arrangement makes the spine very flexible.
  • Femur: The femur, or thigh bone, is important for body structure, and it is the longest bone in the body.
  • Lower arm bone: Two bones make up the lower arm. The radius is along the thumb side and the ulna is along the pinky side. These bones are interesting because when the wrist twists they can cross over each other.
  • Upper arm bone: The upper arm bone is called the humerus.
  • Hand bone: Each hand consists of 27 bones. The bones in the palm are called metacarpals, the bones in the fingers are phalanges, and the bones in the wrist are carpals.
  • Foot bone: Each foot has 26 bones. The bones in the ankle are called tarsals, the bones in the foot are metatarsals, and the bones in the toes are phalanges (same name as the bones in the fingers).

Lesson Closure

Today we discussed that our leg bones, as well as prosthetic legs, must hold up the weight of our entire body. We learned several important design considerations for creating useful prosthetic legs. What are they? (Answer: Strength, durability, weight, endurance, shock absorption.) We also learned about the growing biotechnology of prostheses, and artificial limbs that are becoming more and more lifelike and useful. Sensors and joints are becoming more realistic and lifelike in design as engineers develop artificial legs that work smoothly and comfortably. The biomedical technology of prostheses continues to improve as engineers keep working to create better solutions to help people who need replacement limbs.

Vocabulary/Definitions

amputee: A person who has had a limb removed.

biocompatible: The condition of being compatible with living tissue or a living system by not being toxic or injurious and not causing immunological rejection. Source: Merriam-Webster Dictionary, http://www.merriam-webster.com/dictionary/biocompatibility

bioengineering: The use of artificial tissues, organs or organ components to replace damaged or absent parts of the body, such as artificial limbs and heart pacemakers. Source: The Oxford Pocket Dictionary of Current English, http://encyclopedia.com/doc/1O999-bioengineering.html

biomedical engineer: A person who blends traditional engineering techniques with the biological sciences and medicine to improve the quality of human health and life. Biomedical engineers design artificial body parts, medical devices, diagnostic tools, and medical treatment methods.

biomedical engineering: The application of engineering techniques to the understanding of biological systems and the development of therapeutic technologies and devices. Kidney dialysis, pacemakers, synthetic skin, artificial joints, and prostheses are some products of biomedical engineering. Also called bioengineering.

engineer: A person who applies his/her understanding of science and math to creating things for the benefit of humanity and our world.

prosthesis: An artificial body part to replace a missing one. Plural: prostheses.

prosthetic: A specialty of medicine and engineering that designs, constructs and fits artificial limbs and body parts (prostheses).

structure: That which gives something shape and stability.

Assessment

Pre-Lesson Assessment

Discussion Questions: Ask some discussion questions to get students to think about the upcoming lesson. After soliciting answers, explain that the questions will be answered during the lesson.

  • How important are our bones?
  • What problems might we have if we did not have some of our bones?
  • What are some materials that might be useful for creating artificial limbs? Why?
  • Who knows how many bones are in each of our bodies?
  • What are some of the functions of our bones?
  • Who has ever had a broken bone? When your bone fractures, what does it need to heal? (Discussion points to make: A bone needs time to heal, which is why you wear a cast, splint and/or sling to protect and immobilize it. The bone cells regenerate and replace the missing tissue while you wear the cast. Bone is alive and is able to heal by itself, similar to when you get a scrape and your skin heals itself.)

Post-Introduction Assessment

Question/Answer: Ask students the following questions and have them raise their hands to respond. Write their answers on the board.

  • How many bones are in the human body? (Answer: 206)
  • What are some purposes of the human skeletal system? (Answers: They give our bodies structure, protect vital organs, and the joints allow us to move. They also store minerals and produce red blood cells.)
  • Which bones have a primary purpose to protect organs? (Answers: Skull, ribs, hip bone, etc.)
  • Which bones have a primary purpose to enable movement? (Answers: Hand bones, foot bones, back bone, neck bones, etc.)
  • Which bones have a primary purpose to provide structure? (Answers: Leg bones, hip bone, back bone, etc.)
  • What do we call a person who has lost a body part? (Answer: Amputee.)
  • What are some important characteristics that a prosthetic leg must have? (Answers: Be strong, durable, lightweight, long-lasting, shock absorptive, lifelike sensors and movement, comfortable connections to the body, etc.)

Lesson Summary Assessment

Journal Entry: Have students respond to the following questions by writing a short paragraph in their journals or on a sheet of paper:

  • Engineers create things to benefit the health of future generations, such as better artificial limbs and prosthetics. Describe some features that you think the perfect prosthetic leg would have. (It may even be better than a real leg!)
  • Have you seen any media advertisements involving amputees or prosthetic limbs? What effects do you think the advancement of prosthetic technologies have on how society views amputees? (Ask students if they have seen any TV commercials that show athletes with prosthetic limbs.)

Lesson Extension Activities

What amazing things are being done with prosthetics today? Have students conduct research and report back to the class. See attached example of a successful low-cost foot prosthetic, Jaipur Prosthetic Example. Might the use of prosthetics give people unfair advantage? One study indicated that the prosthetic legs a double-amputee sprinter uses provide less air resistance than normal legs.

Space travel has generated interest in the effects of space environments on the human body, including the skeletal system. We now know that some astronauts lose up to 12% of their weight-bearing bone mass while on the space station. The spine, hip and leg bones lose an average of ~1% of their mass each month. They regain most of their bone mass in the months following their return from space, but not all of it. Have students investigate the impact of space conditions on human bones and report back to the class.

Two photos: (left) 3-D black and white image of upper arm and shoulder shows fractures in top of humerus bone, (right) a man standing by a wall-mounted light box that displays an x-ray of a human spine.
Engineers design imaging tools such as CT scans and x-rays for improved medical diagnostics.
copyright
Copyright © (left) 2007 Denise W. Carlson. Used with permission, (right) 2004 Microsoft Corporation, One Microsoft Way, Redmond, WA 98052-6399 USA. All rights reserved.

Engineers also design many medical tools, devices and methods to better diagnose and repair human bones. For example, x-ray machines help us see bone and teeth structure without invasive surgery. Have students investigate these tools, devices and methods and report back to the class. Examples include: splints, casts and pins; tissue engineering; replacement bones, joints and cartilage; MRI (magnetic resonance imaging) and CT (computer tomography) scans, ultrasound and x-ray equipment.

Are the skeletons of males and females the same? Have students hypothesize and investigate. Answer: Males and females have slightly different skeletons, including a different elbow angle. Males have slightly thicker and longer legs and arms; females have a wider pelvis and a larger space within the pelvis, through which babies travel when they are born. Source: http://www.enchantedlearning.com/subjects/anatomy/skeleton/Skelprintout.shtml

Have students research some intriguing "big questions," about the human body, such as, Can engineers learn from the human body? Amphibians are able to grow replacement limbs, so why can't we? Can we enhance the human body mechanically? Can we control artificial limbs with our brains? Can our bodies heal themselves? Start at the Inside Out Discover Anatomy website: http://www.rigb.org/insideout/anatomy/

Additional Multimedia Support

Good front and back human body skeleton diagram with bones identified. See "Bone Up on Bones," at http://virtualastronaut.tietronix.com/textonly/act16/text-skeletonact.html

Great information (in English or Spanish) on bones at the KidsHealth website page. Topics include: What are bones made of? How Bones Grow, Your Spine, Your Ribs, Your Skull, Your Hands, Your Legs, Your Joints, and Taking Care of Bones. See "The Big Story on Bones," at http://kidshealth.org/kid/htbw/bones.html

To compare buildings to the human body's systems see: http://library.thinkquest.org/J0110521/Parts%20and%20life%20of%20a%20building.htm

Subscribe

Get the inside scoop on all things TeachEngineering such as new site features, curriculum updates, video releases, and more by signing up for our newsletter!
PS: We do not share personal information or emails with anyone.

References

Artificial Limb. The Columbia Encyclopedia, Sixth Edition 2007. Columbia University Press. Accessed October 9, 2008. http://www.encyclopedia.com/topic/artificial_limb.aspx#3-1E1:artifLim-full

Bones of the Human Body, The Human Skeleton, Kidport Reference Library - Science. 2004. Kidport. Accessed October 9, 2008. http://www.kidport.com/RefLib/Science/HumanBody/BodyBones.htm

Bones in Space, Bone Up on Bones, Virtual Astronaut Activities. Last updated September 20, 2005. The Virtual Astronaut, Houston, TX. Accessed October 9, 2008. http://virtualastronaut.tietronix.com/textonly/act16/text-skeletonact.html

Dictionary.com. Lexico Publishing Group, LLC. Accessed October 9, 2008. (Source of some vocabulary definitions, with some modifications) http://www.dictionary.com

Double Joints, A Moment of Science Library. Last updated January 9, 2003. The Trustees of Indiana University. Accessed October 9, 2008. http://amos.indiana.edu/library/scripts/doublejoints.html

The Human Skeleton: Anterior and Posterior Views, pp 45-46. Forensic Anthropology. University of New England. Accessed October 9, 2008. (good handouts for identifying human bones) http://www-personal.une.edu.au/~pbrown3/skeleton.pdf

Human Skeleton Printout. 2005. EnchantedLearning.com. Accessed October 9, 2008. (Use the unlabeled human skeleton print out as a student worksheet; must be a member to access) http://www.enchantedlearning.com/subjects/anatomy/skeleton/Skelprintout.shtml

Levine, Brett, et al. "Porous tantalum in reconstructive surgery of the knee: a review." The journal of knee surgery 20.3 (2007): 185-194.

Joints in the Human Skeleton. Last updated December 4, 2006. The Open Door Team. Accessed October 9, 2008. (good photographs of various joint types) http://www.saburchill.com/chapters/chap0008.html

Total Knee Replacement. American Academy of Orthopaedic Surgeons. Accessed August 13, 2014. http://orthoinfo.aaos.org/topic.cfm?topic=a00389

Shute, Nancy. Building a Better Limb: Veterans are inspiring a big push to create thought-controlled prosthetics. Posted July 23, 2006. U.S. News & World Report, www.usnews.com, July 31, 2006 issue. Accessed October 9, 2008. http://health.usnews.com/usnews/health/articles/060723/31arm.htm

Ward, Logan. Breakthrough Awards 2005. Published November 2005 issue. Popular Mechanics, Hearst Communications, Inc. Accessed October 9, 2008. (Innovators of new products that represent benchmarks of engineering) http://www.popularmechanics.com/technology/engineering/news/1762911

Copyright

© 2007 by Regents of the University of Colorado.

Contributors

Megan Podlogar; Malinda Schaefer Zarske; Denise W. Carlson

Supporting Program

Integrated Teaching and Learning Program, College of Engineering, University of Colorado Boulder

Acknowledgements

The contents of this digital library curriculum were developed under a grant from the Fund for the Improvement of Postsecondary Education (FIPSE), U.S. Department of Education and National Science Foundation GK-12 grant no. 0338326. However, these contents do not necessarily represent the policies of the Department of Education or National Science Foundation, and you should not assume endorsement by the federal government.

Last modified: January 30, 2021

Hands-on Activity Prosthetic Party:
Build and Test Replacement Legs

Quick Look

Grade Level: 7 (6-8)

Time Required: 2 hours

(can be split into two 60-minute sessions)

Expendable Cost/Group: US $5.00

Group Size: 4

Activity Dependency: None

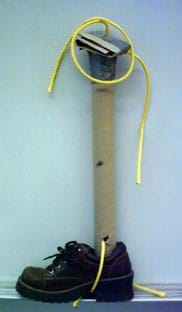
A photograph shows a shoe bound to a cardboard tube with ropes.
Students design and create prosthetic legs

Summary

Student teams investigate biomedical engineering and the technology of prosthetics. Students create lower-leg prosthetic prototypes using various ordinary materials. Each team demonstrate its device's strength and consider its pros and cons, giving insight into the characteristics and materials biomedical engineers consider in designing artificial limbs.

Engineering Connection

For one reason or another, many people require replacement body parts. Those who need artificial legs must have a structurally stable one to replace a critical part of the skeletal system. One specialty of biomedical engineering is designing and creating new and better prostheses (replacement body parts). Biomedical engineers are continually improving the strength, durability, longevity and lifelikeness so amputees can lead full lives.

Learning Objectives

After this activity, students should be able to:

  • Describe the engineering design considerations that go into developing quality prostheses.
  • List characteristics and features that are important for a prosthetic leg.
  • Analyze a prototype prosthetic leg and make suggestions for design improvements.

Materials List

Each group needs:

  • yardstick, ruler or tape measure, for measuring
  • scissors
  • 1 type of prosthetic structural material with which to create a prototype (see suggestions below); note: the number of groups depends on how many different prosthetic resource materials are collected
  • Prosthetic Party Worksheet, one per person

For the entire class to share:

  • 1 roll duct tape

Provide a variety of prosthesis structural material resources. Suggestions:

  • For leg structure: toilet plungers (unused), plastic pipes, metal pipes, metal strips, cardboard tube (from wrapping paper roll), wooden "2 x 4," thin metal duct material (to be rolled and taped into a tube shape), all generally 1.5 ft (or .46 m) long
  • For comfort: large sponges, scrap bubble wrap, scrap cardboard, etc.
  • For lifelikeness: bath towels, pairs of pants, shoes (use students')
  • For body attachment: string, rope, twine (about 30 ft [or 10 m])

Worksheets and Attachments

Visit [www.teachengineering.org/curriculum/print/cub_biomed_lesson01] to print or download.

Pre-Req Knowledge

Familiarity with the idea of bones providing a body's structure, as described in the Engineering Bones lesson.

Introduction/Motivation

What is a prosthesis? (Answer: An artificial body part that replaces a missing body part.) Who might need a prosthesis? Many people are in need of various types of prostheses, including injured soldiers, people who live in war zones, and people who have been in accidents. Biomedical engineers design prostheses for these amputees so that they can live as easily as others.

A photograph shows a below-the-knee prosthetic leg made from a thick sponge, black tube, shoe and duct tape.
A student-made prosthetic lower leg.
copyright
Copyright © 2008 Megan Podlogar, ITL Program, College of Engineering, University of Colorado Boulder

What are some important features required for a good prosthetic leg? The most important characteristics are strength, durability, longevity, shock absorption, lifelikeness and comfort. Biomedical engineers research and design new ways to create prosthetic legs that have all of these characteristics.

Today, we will be biomedical engineers, and design and create our own prosthetic lower legs! Then we will test our prototypes by bending a knee and resting it on the prosthesis. Our goal is to provide all the important features that we talked about. Then, we'll figure out some way to connect our prostheses to a body. Since we do not have real manufacturing equipment, we will use some everyday, around-the-house materials.

Procedure

Before the Activity

With the Students

  1. Divide the class into enough teams so each has a different structural prosthetic material.
  2. Lead a pre-activity discussion and brainstorming session (as described in the Assessment section) so students have a good understanding of the various prosthetic requirements and material resources to meet these needs.
  3. Explain to the students that when engineers design a new or improved product, they work in groups and follow the steps of the engineering design process: 1) understand the problem or need, 2) come up with creative ideas, 3) select the most promising idea, 4) communicate and make a plan to describe the idea, 5) create or build a prototype or model of the design, and 6) evaluate what you have made.
  4. Assign teams different material resources with which to construct their prostheses. Make available other materials for the students to consider incorporating into their design.
  5. Hand out worksheets and have students follow along with its questions throughout the activity.
  6. Have students discuss ideas within their groups, while completing the first page of the worksheet.
  7. Have each group choose one teammate for whom to make the prosthesis. So that the prosthesis fits him/her, measure that student's lower leg from where it bends at the knee.

Three photos: A knee duct taped to a tube presses into a sponge on the top of the tube, folded cardboard taped to the top of a cardboard tube with a rope running through the metal piece inside the tube, a finished prototype leg prosthesis.
Students design and create their own prosthetic lower legs, choosing and combining materials to achieve structural, stability, comfort and lifelikeness requirements.
copyright
Copyright © 2008 Megan Podlogar, ITL Program, College of Engineering, University of Colorado Boulder

  1. Have students collect other materials, such as tape and string, and begin creating their prototypes, creatively addressing the requirements of strength, stability, durability, longevity, shock absorption, lifelikeness, comfort, etc.

Three photos: A wad of bubble wrap duct-taped to a wooden 2 x 4, a piece of wood wrapped in a towel, and a lifelike finished prototype leg prosthesis with jeans and shoe.
Get creative to find ways to make your prosthesis comfortable and lifelike.
copyright
Copyright © 2008 Megan Podlogar, ITL Program, College of Engineering, University of Colorado Boulder

  1. After all teams are finished, have each group present its prosthesis to the rest of the class, explaining the design concepts and material choices, as well as demonstrating the prototype's strength by having the teammate use it to walk (while bending his/her knee and wearing the prosthesis). See post-activity presentation suggestions in the Assessment section.
  2. Conclude with a class discussion using the questions provided in the Assessment section.

Vocabulary/Definitions

amputee: A person who has had a limb removed.

bioengineering: The use of artificial tissues, organs or organ components to replace damaged or absent parts of the body, such as artificial limbs and heart pacemakers. Source: The Oxford Pocket Dictionary of Current English, http://encyclopedia.com/doc/1O999-bioengineering.html

biomedical engineer: An occupation that includes designing artificial body parts.

engineer: A person who applies his/her understanding of science and math to creating things for the benefit of humanity and our world.

prosthesis: An artificial body part to replace a missing one. Plural: prostheses.

prosthetics: A specialty of medicine and engineering that designs, constructs and fits artificial limbs and body parts (prostheses).

prototype: An original, full-scale and usually working model of a new product, or new version of an existing product. Source: American Heritage Dictionary: http://dictionary.reference.com/browse/Prototype

Assessment

Pre-Activity Assessment

Discussion/Brainstorming: As a class, have students engage in open discussion. Solicit, integrate and summarize student responses. Give prompts as necessary. Remind students that in brainstorming, no idea or suggestion is "silly." All ideas should be respectfully heard. Take an uncritical position, encourage wild ideas and discourage criticism of ideas. Have students raise their hands to respond. Record their ideas on the board. Ask the students:

  • What features would make a useful prosthetic lower leg? (Possible answers: Strength, stability, durability, longevity, shock absorption, lifelikeness, comfort.)
  • How can you achieve some of these qualities, using the provided resources? (Possible answers: Use the plunger head for a comfortable knee support, use rope or duct tape for connection to the body, use tube or pipe or wood for strong and sturdy support.)

Activity Embedded Assessment

Worksheet: Have students complete the activity worksheet; review their answers to gauge their mastery of the subject.

Post-Activity Assessment

Conference Presentation: Have each group present their prosthetic lower leg as if they were presenting it at an engineering conference. Have them include the following in their presentations:

  • List of materials and purpose of each
  • How they came up with the design
  • Important design features
  • Estimated cost
  • Demonstration of use

Concluding Discussion Questions: Conclude with a class discussion to gauge students' comprehension of the subject matter covered. Ask the students:

  • What improvements would you make to your prototype prosthesis?
  • What other materials and fasteners would help improve your design?
  • What would be different if you had to make the whole leg, including the knee?
  • What design constraints or limitations might be different for biomedical engineers developing real prostheses?

Safety Issues

Be careful when testing prostheses. Have student "spotters" positioned around the teammate who is testing the prosthesis to catch him/her if s/he falls.

Troubleshooting Tips

If the prostheses are not strong enough to hold the body weight, test them with heavy objects (such as books) while students hold the prosthetic steady.

Since students may be unable to cut certain materials to the correct length, advise groups with these materials to choose their "amputee" teammate by finding the person who has a lower leg length closest to the material length. Or, if the material is too long, they could adjust by elevating the opposite foot (perhaps by standing on a book or strapping an object to the foot). Engineers realize that all materials have pros and cons; if a material is difficult to work with, it is a disadvantage to ultimately choosing it to make prostheses.

Activity Extensions

Expand the design challenge to have teams make a functional prosthetic arm. For an artificial arm, the primary purpose shifts from being structural to enabling movement. Have students brainstorm ways to make the prosthetic arm move. A bonus challenge is to create a prosthetic arm and/or hand that can pick up an object.

See if your local hospital, rehab center, veteran's hospital or medical center can loan you real prosthestic devices to show students. Or, find images of the latest designs on the Internet.

Have students research gait analysis and how engineers help measure a person's gait. How would this analysis be helpful in designing prosthetic limbs?

Activity Scaling

  • For lower grades, instead of testing the device with the weight of an entire body, test it with heavy objects (such as books) while students hold the prototype steady. This way, the prosthetic need not be as strong or dependant on a secure leg attachment.
  • For upper grades, have students draw more than one design. Have them predict and explain why one of their designs would be best, and construct a prototype of that one.

Additional Multimedia Support

As featured in Copper-Hewitt National Design Museum's Design for the Other 90% exhibit (http://archive.cooperhewitt.org/other90/other90.cooperhewitt.org/Design/jaipur-foot-and-below-knee-prosthesis.html), have students investigate the Jaipur prosthesis at http://jaipurfoot.org/.

Subscribe

Get the inside scoop on all things TeachEngineering such as new site features, curriculum updates, video releases, and more by signing up for our newsletter!
PS: We do not share personal information or emails with anyone.

References

The American Heritage® Dictionary of the English Language, Fourth Edition. Accessed October 9, 2008. Dictionary.com. http://dictionary.reference.com/browse/prototype

Copyright

© 2008 by Regents of the University of Colorado

Contributors

Megan Podlogar; Malinda Schaefer Zarske; Denise W. Carlson

Supporting Program

Integrated Teaching and Learning Program, College of Engineering, University of Colorado Boulder

Acknowledgements

The contents of this digital library curriculum were developed under grants from the Fund for the Improvement of Postsecondary Education (FIPSE), U.S. Department of Education and National Science Foundation (GK-12 grant no. 0338326). However, these contents do not necessarily represent the policies of the DOE or NSF, and you should not assume endorsement by the federal government.

Last modified: October 9, 2021

Hands-on Activity Sticks and Stones Will Break That Bone!

Quick Look

Grade Level: 7 (6-8)

Time Required: 1 hours 45 minutes

Two class periods

Expendable Cost/Group: US $2.00

Group Size: 2

Activity Dependency: None

Photo shows a girl with a casted lower arm resting in a cloth sling from her neck.
Students learn about the strength of bones
copyright
Copyright © 2004 Microsoft Corporation, One Microsoft Way, Redmond, WA 98052-6399 USA. All rights reserved.

Summary

Students learn about the strength of bones and methods of helping to mend fractured bones. During a class demonstration, a chicken bone is broken by applying a load until it reaches a point of failure (fracture). Then, working as biomedical engineers, students teams design their own splint or cast to help repair a fractured bone, learning about the strength of materials used.

Engineering Connection

Some engineers study bones, the skeletal system and the human body as they create methods and types of medical devices to help the body with many types of bone-related injuries, diseases and disorders. Modern splints and casts are products that protect, support or immobilize fractures during the healing process, as well as components to custom make them. Example devices include: finger splints, wrist/thumb supports, arthritis supports, cervical collars, knee/back supports, ankle/foot supports, shoulder supports/slings, casts, and compression and taping products, as well as x-ray and MRI equipment for diagnosis. Modern splints, slings and casts are durable, light-weight, comfortable, waterproof and/or removable.

Learning Objectives

After this activity, students should be able to:

  • Use a model to describe how a load might affect a bone.
  • Explain that biomedical engineers design medical devices to help in the healing of fractured bones.

Materials List

For Part 1, the teacher's class demonstration, and Part 3, the load testing station:

  • 2 S-hooks (or strong hooks)
  • 1ft (30 cm) chain link (or strong rope)
  • large water or paint bucket
  • weights, 5 lbs (2.3 kg) each, for a total of 50 lbs (22.7 kg); if no weights are available, use equivalent weight of bricks, rocks, sand, heavy books, or other material.
  • 1 chicken bone (a thoroughly-cleaned chicken wing is ideal)
  • 2 strips of duct tape (~6-in [10cm] each)
  • clear plastic bin or container, for protection from splintering bone

For Parts 2 and 3, each group needs:

For the entire class to share:

  • flathead screwdriver and hammer, to create small crack in each team's chicken bone
  • white glue (such as Elmer's)
  • masking tape
  • a variety of materials with which to make a cast or splint, such as toothpicks, popsicle sticks, paint stirrers, gauze or bandage wrap, tissue, cotton balls, cotton batting, plastic wrap, etc.
  • (optional) plaster (paper-mâché) cast materials: 2-inch (5-cm) newspaper strips (made from about 4-5 full-length newspaper pages per cast), warm water, white glue and flour (mix ratio: 3 parts warm water with 1 part flour and 1 part glue)
  • (optional) Monopoly play money (or from another game)

Worksheets and Attachments

Visit [www.teachengineering.org/curriculum/print/cub_biomed_lesson01] to print or download.

Pre-Req Knowledge

A good understanding of the bones of the skeletal system.

Introduction/Motivation

Do you know anyone who has broken a bone in his or her body? Have you? Bone fractures are common in our society, and some are more serious than others. Bone fractures can range from a very small crack in the bone to a complete break and separation of the bone. On average, people break a bone twice in their life. The occurrence is much higher among young children; bone fractures are among the most common types of injuries for children younger than 15. Children often are treated in the emergency room for a simple closed fracture, the most basic type of fracture.

One person uses rags to tie a piece of wood to another person's leg to immobilize it.
Creating an impromptu splint for an injured leg.
copyright
Copyright © US Centers for Disease Control and Prevention, National Ag Safety Database http://www.cdc.gov/nasd/docs/d001501-d001600/d001543/d001543.html

Today, we will be talking about the strength of bones and medical devices used to help repair a fractured bone. Let me read you a story:

Juan Skeleton is a healthy fourth-grader who loves to play soccer. One day he is outside at recess playing soccer with his friends when something happens to him.

As Juan slides to take the ball away from his friend Julia, his foot gets stuck in a hole in the ground and he hears something crack. This crack is in his lower right leg and it is very painful. Juan does not realize what just happened to him but he knows something is wrong. Bravely, he tries to stand up and walk off the field, but he cannot because the pain is too much to bear. Juan cries for help and his friends call the teacher who sees that Juan's leg is starting to swell.

The teacher, Mrs. Maria, carries Juan into the nurse's office. He explains what happened on the field, and both the teacher and the nurse realize that Juan just fractured the bone in his leg. Juan's parents are called and he goes to the hospital.

At the hospital, Dr. Arenas helps treat Juan's fractured leg. X-rays are taken to determine exactly where the fracture is located and how severe it is. After the tests and x-rays, Dr. Arenas tells Juan's parents that the fracture is not too severe. Juan has a simple closed fracture. Phew!! Good news for Juan (no surgery required to re-set the broken bones). The doctor tells his parents that Juan needs to have his leg wrapped in a cast to help heal the fractured bone.

The next day, Juan goes to school with a comfortable, light-weight and cool-looking cast on his leg. Since Juan cannot put any load on his leg or move it, he must use crutches to help him move. Juan is sad because for the next six weeks he cannot play soccer at recess, but he knows that the cast will protect his bone so it can heal and get better.

Many weeks after Juan hurt his leg, the cast is removed. After his leg regains its strength, he will be able to play soccer again! Yay for Juan!!

Did Juan's leg magically get fixed? What is the cast he had to wear? How did his bone fracture if he is a strong, healthy person? What is a fracture and is it different from a break? Why did Juan use crutches and was not able to apply any load/weight to his leg? You might be thinking about these questions and more!

Two photos: (left) a man looks at a series of MRI results mounted on a wall light box. (right) An x-ray image shows forearm, wrist and finger bones.
In addition to casts, splints and slings, engineers design diagnostic equipment, such as MRIs and x-ray machines to help people understand what we cannot see.
copyright
Copyright © 2004 Microsoft Corporation, One Microsoft Way, Redmond, WA 98052-6399 USA. All rights reserved.

In our activity today, we are going to see that even though Juan's bones are strong, too much load or force causes bones to fracture. A fracture is the same as a broken bone; the word "fracture" is the term that doctors use. As for the cast, it is a medical device designed by biomedical engineers to help repair broken bones. Its purpose is to maintain the bone in a fixed position so that it does not move (get re-injured) and can heal. Today, we are going to measure the load that a bone can hold before it breaks and then you can design your own casts, just like biomedical engineers. Are you ready for some fun with bones and casts and splints?

Procedure

Background

By using chicken bones to simulate human bones (which are many times stronger) students see the amazing strength of bones. In the class demonstration, a point load is applied to a bone with a gradual increase in load (weight) until the bone can no longer support it and fails (fractures). In the hands-on student activity, student teams work as biomedical engineers to create and design casts or splints that immobilize body parts to help the body heal. They also explore the strength of materials as they test the strength of their casts/splints.

Two photos: (left) A lower leg is kept rigid in a splint. (right) A man laying on a gurney with one leg in a cast from below his knee to his toes.
Engineers are always experimenting with new materials to make improved splints and casts that immobilize injured body parts to help the body mend.
copyright
Copyright © 2004 Microsoft Corporation, One Microsoft Way, Redmond, WA 98052-6399 USA. All rights reserved.

Before the Activity

  • Gather materials, and make copies of the Bone Breaking Design Worksheet and Bone Breaking Group Testing Table, one each per team.
  • Thoroughly clean the chicken bones. Make a small fracture in each bone by taking a flathead screwdriver and carefully tapping it with a hammer until the bone cracks, being careful not to completely break the bone. Set aside one bone for the demonstration.
  • Place cast- and splint-making materials on a separate table to serve as the "class store."
  • (optional) If making plaster of Paris casts, cut newspaper into 2-inch (4-cm) strips. Make the paper-mâché mix in advance or have another adult make it during class.

Part 1: Observing Bones and Class Demonstration – Bone Breaking (Day 1)

Using two classroom tables or desks, follow the next steps to set-up the load testing area for the class demonstration.

  1. Move tables or desks to create an open 1.5-inch (~4-cm) span between them (see Figure 1).

Two photos: (left) A tape measure placed across the gap between two tables. (right) Two lengths of silver chain link and two S-hooks.
Figure 1. (left) Arrange two tables to create a 1.5-inch (3.8-cm) open span between their tops. (right) Connect the S-hooks to the pieces of chain link.
copyright
Copyright © Jaime Morales, ITL Program, College of Engineering, University of Colorado at Boulder.

  1. Using the S-hooks, connect a hook to each end of the link chain (see Figure 1).
  2. Hook an end of the chain, using the S-hook to the bucket handle (see Figure 2).

Photo shows the handle of a red bucket held up by an S-hook and chain.
Figure 2. Use an S-hook to attach the chain to the bucket handle.
copyright
Copyright © Jaime Morales, ITL Program, College of Engineering, University of Colorado at Boulder

  1. Divide the class into teams of two or three students each.
  2. While at their desks, give each team a fractured chicken bone to observe. It should be similar to the one you are using for the demonstration, or pass around the bone that you are using for the demonstration to each group. Review pertinent concepts and functions of bones and the skeletal system.
  3. Have each group study their bones for characteristics, such as size, color, shape, strength, etc. Encourage students to examine the bone by sight, touch and smell. Tell them not to taste the bone or break it.
  4. Using Part 1: Gathering Information on the activity worksheet, have students draw the bone, write down any observations about it (size, color, strength, etc.), as well as a prediction of the total amount of load (weight) that the bone will be able to carry before failure (fracture).
  5. Once students have finished Part 1 of their worksheets, have all groups gather around the testing station.

Two photos: (left) Duct tape secures each end of a bone to a tabletop. (right) The same set-up with an S-hook attached to the bone holds a chain that holds a bucket.
Figure 3. (left) Tape the chicken bone securely to tabletops, across the open span. (right) Using a second S-hook, attach the loose end of the chain to the middle of the bone.
copyright
Copyright © Jaime Morales, ITL Program, College of Engineering, University of Colorado at Boulder.

  1. Using duct tape, take the demonstration bone and tape it across the open span of the tables/desks making sure the bone is fastened tightly to each side (see Figure 3).
  2. Use an S-hook to attach the loose end of the chain to the middle of the bone (see Figure 3). The chain and bucket should hang in the middle of the opening (see Figure 4). Make sure the bucket is suspended above the floor.

Photo shows side view of two table edges with a bone across their gap, and a bucket suspended below.
Figure 4. Adjust the chain link to hang the bucket from the bone so it is above the floor and between the tabletop opening.
copyright
Copyright © Jaime Morales, ITL Program, College of Engineering, University of Colorado at Boulder.

  1. For safety, keep bone pieces, marrow and other fragments from flying, by placing a clear plastic bin or container over the bone while you are adding weight to the bucket.
  2. In 5-lb (2.3-kg) increments, carefully add weight into the bucket, pausing for 5-10 seconds to allow the additional weight to settle. Do not drop weights into bucket; place them gently into the bucket. (Note: Most chicken bones are capable of holding 40-50 lbs [18-23 kg].).
  3. Continue to add weight until the bone cracks.
  4. Have students record on their worksheets the amount of weight that caused the demonstration bone to fail (fracture).

Part 2: Engineering Design and Cast-Making (Day 1)

  1. After the class demonstration, discuss with students their observations during the load testing: What did you notice as more weight was added? How strong is a chicken bone? Were you surprised to see the chicken bone carry that much weight? Do you think a human bone could withstand more or less weight?
  2. Review the healing process for fractured bones and the various biomedical devices (casts and splints) used to help heal bones, clarifying the differences between each.
  3. Have student teams return to their desks and complete worksheet Part 2, Analyzing the Information.
  4. Once students have finished Part 2, review the engineering design process with them and explain that they will be acting as biomedical engineers, designing their own type of cast or splint as a team. Explain to students that when engineers design a new or improved product, they work in groups and follow the steps of the engineering design process: 1) understand the problem or need, 2) come up with creative ideas, 3) select the most promising idea, 4) communicate and make a plan to describe the idea, 5) create a prototype or model of the design, and 6) evaluate what you have made, thinking of possible improvements.
  5. Introduce the design concepts and constraints for the activity. Either provide students with already-specified constraints that serve to limit and guide the design challenge, or brainstorm with the class to come up with additional constraints/design goals. Consider the following (or some combination) as suggestions for design goals/constraints: strength of the cast or splint, weight of the cast or splint, cost to make the cast or splint, most realistic cast or splint for usability.
  6. (optional step; follow if using cost as a design constraint) Reveal to students the types of "store" materials available for the construction of casts and splints, and the "cost" of each material (for purposes of this activity). Explain that one of their design constraints is cost; they may spend up to a certain amount of money (such as $200 in play money), but no more, to make their device. Hand out the play money to each team.
  7. Have students pick a specific type of cast (splint or plaster cast) to design. Give them 5-10 minutes to complete their design on their worksheets, including Part 3.
  8. Once students have completed their design and obtained teacher approval, direct one team at a time to obtain (or use their play money to buy) from the "store" (teacher) the necessary materials for their medical device.
  9. After teams have supplies, have them create their model casts, building around their broken chicken bones.
  10. For teams that want to make a plaster cast, follow the paper-mâché-making steps (next section). Note: Making a plaster cast requires an extra 15-20 minutes plus overnight drying time, so allow enough time for this option.
  11. Once all groups have completed their splint or cast, have students pick up and clean their work areas.

"Plaster"-Making (Paper-Mâché) Steps (requires overnight drying time)

  1. Mix three parts warm water with one part flour and one part white glue. Stir until a smooth, creamy mixture is obtained.
  2. Cut newspaper into 2-inch (5-cm) strips.
  3. Dip each strip into the mixture and squeegee any excess material with fingers.
  4. Wrap the wet paper strips around the bone or bone covered with gauze, to make the cast. Help students, as necessary.
  5. Continue to dip and wrap the strips until the cast is finished. Let the groups decide how thick or thin they want their casts.
  6. Once all groups have completed their casts, have students pick up and clean their work areas.

Part 3: Cast Load Testing (Day 2)

  1. Recap with students their activity from the previous day(s). Briefly review the strength of bones, the types of bone disorders (such as fractures, osteoporosis, etc.), the methods and types of medical devices used to assist in these conditions, and the activity itself thus far (design goals, materials, etc.)
  2. Give teams time to make any final adjustments or alterations to their designs, or finish their casts/splints if they have not already done so.
  3. Once all groups have completed their casts/splints, gather around the testing station.
  4. Have teams number off to decide the order to test their casts. Or, provide a pre-selected list for the order.
  5. Guide each team to test the strength of their casts and how well they protect the fractured bones. For each team's cast/splint, use the testing station with bucket and weights, and repeat steps 9 through 14 from the bone-breaking demonstration.
  6. To keep all students engaged during the load testing, have students fill out the testing table to track the weight that each group's design was able to hold.
  7. Conclude by engaging students in the post-activity described in the Assessment section. Ask them to think about the materials in the different cast/splints, what worked and what did not, and what they might do to improve their designs.

Vocabulary/Definitions

cast: A rigid bandage made of gauze and plaster of Paris to immobilize a fractured or dislocated bone or body part while it heals, or to maintain any part of the body in a fixed position.

failure: A decline in strength or effectiveness.

fracture: A partial or complete break in a bone.

load: The weight (force) supported by a structure or part.

model: (noun) A representation of something for imitation, comparison or analysis, sometimes on a different scale. (verb) To make something to help learn about something else that cannot be directly observed or experimented upon.

sling: A bandage used to suspend or support an injured part of the body, commonly a bandage suspended from the neck to support an injured arm or hand.

splint: A thin piece of wood or other rigid material used to immobilize a fractured or dislocated bone, or to maintain any part of the body in a fixed position.

Assessment

Pre-Activity Assessment

Exploratory Discussion: As a class, discuss the following topics:

  • What is a bone fracture? (Answer: A medical condition in which a bone is cracked or broken.)
  • Review the human skeletal system and the importance of bone strength.
  • Have you ever had a broken bone? If so, what was done to help heal the bone?

True/False Trivia: As a discussion extension, ask the following true/false questions and have students respond with thumbs up for true or thumbs down for false. Tally the votes on the board. Then, ask the same questions at the end of the activity and compare results.

  • True/False: Engineers create devices that help heal broken bones. (Answer: True)
  • True/False: Engineers do not need to know about the strength of bones in designing devices to help heal broken bones. (Answer: False. Engineers must study the strength of bones to determine what types of materials might help protect and support the bones.)
  • True/False: Engineers improve our lives by inventing things that can help repair our bodies. (Answer: True. Biomedical engineers study the body and are interested in designing devices to help make our lives better.)

Activity Embedded Assessment

Worksheet: Have students record observations, record results, design their casts and answer questions on their worksheets. Review their worksheets to gauge their understanding of the subject matter.

Engineering Design: Before and during the design and construction portion of the activity, remind students of the engineering design process steps: Define the problem (Ask), brainstorm ideas (Imagine), design (Plan), build and test (Create), and re-design (Improve).

Post-Activity Assessment

Graphing the Results: Using the data from the Group Testing Table, graph the maximum weight held from each team and the type of device used. Based from the graph, discuss which form of medical device proved stronger. Additionally, have students calculate the average weight held by both the cast and splint.

Closing Discussion: As a class, review the activity results and use the following questions to lead a concluding discussion:

  • What happened to the chicken bone as more weight was added to the bucket?
  • Which casts/splints worked best? Why? What were they made of? Which materials worked best? What construction techniques worked best?
  • Based on the testing results from your and other groups, what could you do to improve your design?
  • Do you think human bones would be able to support more or less weight? Why? Would you make any changes to your cast/splint for a human bone? How?
  • What is a bone fracture? What types of medical devices are used to heal or repair a bone fracture? Would you change your design for fractures on an arm compared to a leg?
  • What is biomedical engineering? How are biomedical engineers and the human body related?

Safety Issues

  • Remind students not to taste, eat or bite the bone.
  • Remind students to be careful with scissors.
  • Keep students a safe distance from the testing station when conducting the demonstration or load-testing the casts/splints.
  • During load testing, have one person hold a clear bin over the bone and cast/splint, in case any pieces fly off.

Troubleshooting Tips

Make sure the load testing station works well. As necessary, make adjustments so the bone does not slip when weight is added to the bucket, the bone is covered with a clear bin to catch any scattering fragments, the spacing between the tables is not too wide or too narrow, etc.

Do not impose more than one or two specific design constraints in addition to the cost.

Making a plaster cast takes more time than the other options (+15-20 minutes plus overnight drying time), so allow enough time for this option. It also helps to have an adult assist students who choose to make a paper-mâché cast.

Cooked bones are probably easier to work with (and less messy!) than raw bones, but either can be used.

Activity Extensions

What happens if your bone injury is not a "simple closed fracture"? An "open, multi-fragmentary fracture" usually breaks the skin, exposing the bone to contamination, and involves the bone splitting into multiple pieces, which usually requires surgical repair to restore the bones to their natural positions. Have students research the engineering devices and techniques designed to treat these more complicated fractures. Devices might include surgical nails, screws, plates, pins and wires to hold the fractured bone together. Materials might include titanium, cobalt-chromium alloy, stainless steel and/or plastics.

Activity Scaling

  • For lower grades, remove some of the design requirements for the cast building and limit it to one achievable goal, such as cost, cast strength, or a waterproof cast, etc.
  • For lower grades, instead of having students "buy" the materials for cast building, give each team a certain and limited amount of materials with which to work.
  • For lower grades, the design and construction of the casts may take a while to complete. To reduce the overall required time, eliminate the worksheet or eliminate the paper-mâché as a cast-building option.
  • For higher grades, add two or three additional design constraints and/or goals in addition to cost and strength.

Additional Multimedia Support

For ideas of the types of modern casts, braces, slings and splints, search for orthopedics, splinting and casting products in various online medical product catalogs, such as http://www.allegromedical.com or http://www.sammonspreston.com.

Subscribe

Get the inside scoop on all things TeachEngineering such as new site features, curriculum updates, video releases, and more by signing up for our newsletter!
PS: We do not share personal information or emails with anyone.

References

Cluett, Jonathan. Fracture Information: What is a Fracture? Last updated October 1, 2004. About.com: Orthopedics. Accessed October 13, 2008. http://orthopedics.about.com/cs/otherfractures/a/fracture.htm

Dictionary.com. Lexico Publishing Group, LLC. Accessed October 13, 2008. (Source of some vocabulary definitions, with some adaptation) http://www.dictionary.com

Copyright

© 2008 by Regents of the University of Colorado.

Contributors

Jaime Morales; Malinda Schaefer Zarske; Denise W. Carlson

Supporting Program

Integrated Teaching and Learning Program, College of Engineering, University of Colorado Boulder

Acknowledgements

The contents of this digital library curriculum were developed under a grant from the Fund for the Improvement of Postsecondary Education (FIPSE), U.S. Department of Education and National Science Foundation GK-12 grant no. 0338326. However, these contents do not necessarily represent the policies of the Department of Education or National Science Foundation, and you should not assume endorsement by the federal government.

Last modified: May 25, 2017