Quick Look
Grade Level: Middle school
Time Required: 45 minutes
Expendable Cost: US $1.00
Group Size: 2
Subject Areas: Physical Science, Physics
Introduction
Bolded words are vocabulary and concepts to highlight with students during the activity.
What is friction? Friction is a force that arises when two objects rub against each other, acting against the motion of the objects, slowing them down. Depending on what they are made of, different objects experience different amounts of friction when they rub together. Understanding how friction works helps engineers design moving objects so they can be controlled. Sometimes they design materials to increase friction and other times to reduce friction. Some snow tires have metal studs that poke into the snow and ice, creating more friction than rubber alone. Rollerblade wheels must be sticky enough for control, but not so soft that they create too much drag or wear out too fast. Engineers reduce friction between moving parts so that they run smoothly and do not wear down as quickly. A hovercraft is a vehicle that can travel on a cushion of air, dramatically reducing and even removing the friction between the craft and the ground, giving it the ability to go over rough terrain with ease. 
Supplies
Each group needs:
- 1 compact disc (CD)
- 1 balloon
- 1 plastic bottle, with cap (~16 oz. size)
- hot glue (can be shared)
- 1 craft drill (1x use by instructor)
- 1 hacksaw (1x use by instructor)
- 1 metal file (1x use by instructor)
Supplies note: Before this activity, use the hacksaw to cut the top of the bottle at the neck, leaving about 1" in length on the neck. Save the top and cap, recycle the rest of the bottle. Drill 1-3 holes in each bottle cap, with a different number of holes in different caps so that students can compare the results of hovercraft racers with different numbers of holes in the caps. File any rough edges around the cut-off neck to prevent tearing of the balloon.
Subscribe
Get the inside scoop on all things TeachEngineering such as new site features, curriculum updates, video releases, and more by signing up for our newsletter!Procedure
Procedures Overview
Working in groups of two, students make model hovercrafts using CDs, bottles and caps, and balloons. The air that lifts the hovercraft is stored in the balloon and comes out of a hole in the bottle cap. Then students test their hovercrafts on different surfaces and with different amounts of air to see how their crafts react.
Making a Hovercraft
- Pass out supplies to groups.

- Explain to students what a hovercraft is, and discuss how they think the hovercraft will work on different surfaces.
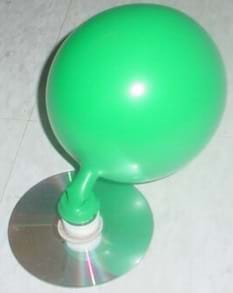
- Instruct groups to attach a balloon to the top of their bottles, going over the cut-off neck and leaving the part that screws to the cap exposed (see image above).
- Help students glue the cap, with the opening up, to the shiny side of the CD, over the hole (see image below). Use enough hot glue to seal the space between the cap and CD, but do not put any glue over the holes in the cap.
.jpg)
- Instruct students to let the hot glue cool completely before continuing.
- To make the hovercraft "hover," instruct students to blow up the balloon through the bottle top, pinch it carefully at the neck area, screw the bottle onto the cap, and then let it go.
Testing the Hovercraft
- Students tap the sides of their hovercrafts to send them gliding.
- Test the hovercrafts on tile floor, carpet, a wet surface, dirt, sidewalk, etc.
- Test the hovercrafts' performance by experimenting with different amounts of air blown into the balloons.
- Instruct students to work with another group who has a different number of holes in its cap and compare the performance of their hovercrafts.
Wrap Up - Thought Questions
- Why does the air from the balloon enable the hovercraft to glide? Does the amount of air matter?
- How do the different surfaces affect the motion of the hovercrafts? Why?
- What are pros and cons of having more or fewer holes in the bottle cap?
More Curriculum Like This

Students gain first-hand experience on how friction affects motion. They build hovercraft using air from balloons to levitate craft made from compact discs (CD), learning that a bed of air under an object significantly reduces the friction as it slides over a surface.

Building upon their understanding of forces and Newton's laws of motion, students learn about the force of friction, specifically with respect to cars. They explore the friction between tires and the road to learn how it affects the movement of cars while driving.
Copyright
© 2013 by Regents of the University of ColoradoLast modified: May 12, 2022


User Comments & Tips