Summary
Students learn that light travels in a straight line from a light source and that ray diagrams help us understand how images will be created by a lens. This prepares students for the associated activity, in which they explore the concepts behind the workings of a pinhole camera.Engineering Connection
Optical engineers design equipment to focus and control light for a variety of purposes — for uses in medical equipment, armed forces and recreation, among many others. Optical engineers design telescopes, binoculars and even the focusing lens on CD drives.
Learning Objectives
After this lesson, students should be able to:
- Explain that light travels in a straight line.
- Draw a simple ray diagram.
Educational Standards
Each TeachEngineering lesson or activity is correlated to one or more K-12 science,
technology, engineering or math (STEM) educational standards.
All 100,000+ K-12 STEM standards covered in TeachEngineering are collected, maintained and packaged by the Achievement Standards Network (ASN),
a project of D2L (www.achievementstandards.org).
In the ASN, standards are hierarchically structured: first by source; e.g., by state; within source by type; e.g., science or mathematics;
within type by subtype, then by grade, etc.
Each TeachEngineering lesson or activity is correlated to one or more K-12 science, technology, engineering or math (STEM) educational standards.
All 100,000+ K-12 STEM standards covered in TeachEngineering are collected, maintained and packaged by the Achievement Standards Network (ASN), a project of D2L (www.achievementstandards.org).
In the ASN, standards are hierarchically structured: first by source; e.g., by state; within source by type; e.g., science or mathematics; within type by subtype, then by grade, etc.
NGSS: Next Generation Science Standards - Science
| NGSS Performance Expectation | ||
|---|---|---|
|
4-PS3-2. Make observations to provide evidence that energy can be transferred from place to place by sound, light, heat, and electric currents. (Grade 4) Do you agree with this alignment? |
||
| Click to view other curriculum aligned to this Performance Expectation | ||
| This lesson focuses on the following Three Dimensional Learning aspects of NGSS: | ||
| Science & Engineering Practices | Disciplinary Core Ideas | Crosscutting Concepts |
| Make observations to produce data to serve as the basis for evidence for an explanation of a phenomenon or test a design solution. Alignment agreement: | Energy can be moved from place to place by moving objects or through sound, light, or electric currents. Alignment agreement: Energy is present whenever there are moving objects, sound, light, or heat. When objects collide, energy can be transferred from one object to another, thereby changing their motion. In such collisions, some energy is typically also transferred to the surrounding air; as a result, the air gets heated and sound is produced.Alignment agreement: Light also transfers energy from place to place.Alignment agreement: Energy can also be transferred from place to place by electric currents, which can then be used locally to produce motion, sound, heat, or light. The currents may have been produced to begin with by transforming the energy of motion into electrical energy.Alignment agreement: | Energy can be transferred in various ways and between objects. Alignment agreement: |
| NGSS Performance Expectation | ||
|---|---|---|
|
4-PS4-2. Develop a model to describe that light reflecting from objects and entering the eye allows objects to be seen. (Grade 4) Do you agree with this alignment? |
||
| Click to view other curriculum aligned to this Performance Expectation | ||
| This lesson focuses on the following Three Dimensional Learning aspects of NGSS: | ||
| Science & Engineering Practices | Disciplinary Core Ideas | Crosscutting Concepts |
| Develop models to describe phenomena. Alignment agreement: | An object can be seen when light reflected from its surface enters the eyes. Alignment agreement: | Cause and effect relationships are routinely identified. Alignment agreement: |
International Technology and Engineering Educators Association - Technology
-
Explain how various relationships can exist between technology and engineering and other content areas.
(Grades
3 -
5)
More Details
Do you agree with this alignment?
-
Design solutions by safely using tools, materials, and skills.
(Grades
3 -
5)
More Details
Do you agree with this alignment?
State Standards
Colorado - Science
-
Identify and describe the variety of energy sources
(Grade
4)
More Details
Do you agree with this alignment?
Pre-Req Knowledge
Longitudinal and Transverse Waves (Lesson 1), Wavelength and Amplitude (Lesson 2), Frequency (Lesson 3), Light (Lesson 6), Electromagnetic Waves (Lesson 7).
Introduction/Motivation
Note: Students each need a pencil and a blank piece of paper to follow along with the introduction.
Angie and Harmon have asked to borrow Fisherman Frank's underwater camera to take with them on their diving adventure to find the treasure ship. How does a camera work, they wonder? Today, we are going to draw ray diagrams to discover how a camera works, and then you will get to build your own small pinhole cameras. Angie and Harmon will soon discover how their camera takes pictures of the sunken treasure ship!
Demonstration: Dim the lights in the room. Take out a laser pointer or a flashlight (a small Maglight® works well, but a laser pointer is best). Shine it on the wall. Ask the students if they can see the light ray (they should report that they can see the spot on the wall, but that's it.) Now have a student clap chalk erasers (or clap hands dipped in chalk dust or heavily rubbed with a chalk stick) through the light source (the stream of light at the point where it begins to the point where it is shining on the wall). Ask the students if they can see the light rays now (they should be able to, as the chalk dust creates a visible pattern). Ask them if light rays travel in curves or straight lines. (Answer: Light rays travel in straight lines.)
We just discovered that light rays travel in straight lines. We can use this fact to construct a simple camera. I'm going to draw a couple pictures on the board now, and you can copy them on your own piece of paper.
Note: Draw Figure 2 on the chalk/white board.
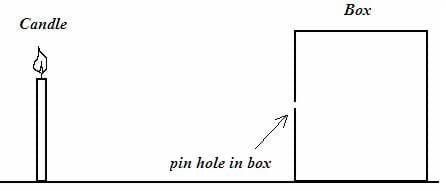
Let's think about this drawing. Do you think that the light rays from the candle will go through the hole? You're right, it will! Since we know that light travels in straight lines, we can figure out how the light will go through the hole.
Note: Draw Figure 3 on the chalk/white board.
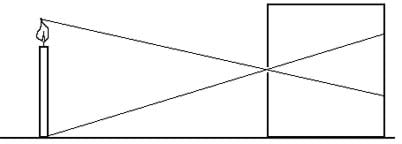
The picture we just drew is called a ray diagram, because it shows us what will happen to the rays of light. The ray diagram shows us that there will actually be an image of the candle on the back of the box. We can tell from the diagram that the image of the candle will be smaller than the original candle. But, here is another question for you: will the image of the candle be right side up, or upside down? Who would like to share their idea of what the image will look like inside the box?
Those are great ideas! Now I'm going to draw a little more of our ray diagram to show you what the image of the candle will appear (see Figure 4) as on the back of the box.
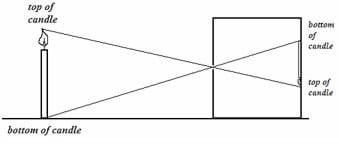
So, we can tell from our diagram that the image of the candle will be smaller and turned upside down!
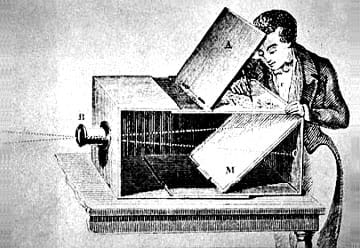
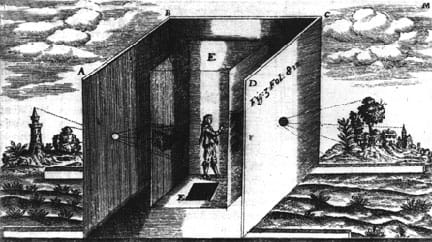
We can use what we learned from our diagram to help us understand how a pinhole camera works. Another word for a pinhole camera is "camera obscura," or "dark chamber." The name dark chamber came about because the first cameras were actually big, dark rooms, with a small hole in one wall.
Optic means eye, and the study of light is called optics. So, engineers who work with light are called optical engineers. Some optical engineers help design and build cameras and telescopes. Now you all are going to act as engineers and build your own pinhole cameras! (Refer to the associated activity Create a Pinhole Camera for more instructions.)
Lesson Background and Concepts for Teachers
The word camera comes from the Latin word for room. The first camera was actually a darkened room, or dark chamber, also known as the camera obscura. These early cameras captured objects or landscapes located outside the room (see Figure 5), by focusing the image through a small hole or lens in the side of the room and displaying it onto the opposing wall in the room. The image projected was in natural color, but inverted.
Modern cameras work on much the same principle as the dark chamber idea of the 17th century, but with more sophisticated lenses and apertures to focus the light. In the early 1800s, a scientist discovered how to use a copper plate and silver iodide to create an actual photograph. Then, more modern advances in technology meant that cameras began using film, which allows multiple photographs to be taken simultaneously. The images are developed in light-sensitive chemical baths and become permanent photographic images on the film.
In the late 20th century, digital cameras were introduced to the world. Digital cameras are essentially little computers with sensors that detect and digitize light patterns, eliminating the need for film. Many professional photographers still prefer to use film, however, believing that something of the richness of the image is lost through digitization. With a digital camera, a person can capture a sequence of images and delete (remove) any unwanted images immediately.
Associated Activities
- Create a Pinhole Camera - Students use milk cartons to make their own simple pinhole cameras.
Lesson Closure
Today we learned that light rays travel in straight lines, and how we can use a ray diagram to predict where the light rays will end up. Now let's learn what happened to our brave adventurers – Angie and Harmon!
Angie and Harmon decided to use all their knowledge about sound and light to dive deep down underwater and explore the sunken treasure ship. They used SONAR to find the ship and special lights to see it. They even brought a special underwater camera with them so they could take pictures of the sunken ship.
Carefully, Harmon and Angie dove down to the sunken ship and began their exploration. As they entered the cargo hold, something shiny caught Angie's eye. They swam over to investigate and discovered ten large chests full of treasure!
Angie and Harmon were excited to find so much treasure. The chests were so full and so heavy that they could not get the treasure out of the sunken ship, so they took lots of pictures and each brought a gold coin up to the surface with them to show Fisherman Frank.
Fisherman Frank was amazed! He reminded them of all the ways that engineers helped them find the treasure: they created the SONAR that helped them find the ship, they made special flashlights for them to use underwater, and they even built the underwater camera that they used to take pictures of the treasure.
"Yes," Angie said, "engineers sure are wonderful! We couldn't have found the treasure without them." "I agree!" said Harmon. "Now we just need some engineers to help us figure out how to get the treasure out of the ship!" Then Angie and Harmon and Fisherman Frank headed off together, with another new challenge to solve.
Vocabulary/Definitions
light ray: A beam of light with a small cross section.
pinhole camera: A simple camera that uses a pinhole to focus light on a surface behind it. All images created by a pinhole camera are inverted – the top becomes the bottom, left becomes right. This can also be called a camera obscura.
ray diagram: A picture that predicts what an image will look like. The light rays in a ray diagram are drawn as straight lines.
Assessment
Pre-Lesson Assessment
Discussion Questions: Use the following questions to prompt discussion and pondering among your students:
- How does light travel from the sun to the Earth? (Answer: as electromagnetic waves)
- Do electromagnetic waves require a medium, such as sound waves do? (Answer: no)
- Is there sound in space? (Answer: No, there is no medium through which sound waves travel.)
- As light comes from the sun to the Earth, does it travel in arcs, squiggles or straight lines? (Answer: straight lines)
Post-Introduction Assessment
Ray Diagram – Part II: In the images drawn on the chalk/white board for students to copy, erase the candle and instead draw a stick person of about the same height as the candle. Draw the person closer to the pinhole camera. Ask the students to draw the image on the back of the box. Is the image still upside down? (Answer: yes) Is the image bigger or smaller than the camera image? (Answer: If the stick figure is closer to the box than the candle was, yet the same height that the candle was, then the image should be bigger than that of the original candle image.)
Lesson Summary Assessment
CAMERA Acrostic: Write the letters of CAMERA vertically on the board and have students help you fill in the acrostic with several words for each letter. Try to use words from throughout this unit. Suggested words: color, amplitude, microwave, music, engineer, electromagnetic, radio wave, etc.
Lesson Extension Activities
Invite a photographer to visit the class and share some of their photography and experiences.
Have a photo exhibit where students display photos that they have taken.
Take a field trip to a local photography studio and ask a photographer to demonstrate how they take and develop pictures (see if you can find a studio that develops real film pictures rather than digital).
Additional Multimedia Support
A good summary of the history of photography, including a camera obscura image: http://extension.usu.edu/files/publications/publication/4-H_Photography_2010-01pr.pdf
Subscribe
Get the inside scoop on all things TeachEngineering such as new site features, curriculum updates, video releases, and more by signing up for our newsletter!References
State of Utah, History for Kids, "The Amazing History of Photography," accessed July 31, 2007. http://ilovehistory.utah.gov/index.html
Copyright
© 2007 by Regents of the University of Colorado.Contributors
Luke Simmons; Frank Burkholder; Abigail Watrous; Janet YowellSupporting Program
Integrated Teaching and Learning Program, College of Engineering, University of Colorado BoulderAcknowledgements
The contents of these digital library curricula were developed by the Integrated Teaching and Learning Program under National Science Foundation GK-12 grant no. 0338326. However, these contents do not necessarily represent the policies of the National Science Foundation, and you should not assume endorsement by the federal government.
Last modified: June 30, 2019


User Comments & Tips