Quick Look
Grade Level: 11 (9-12)
Time Required: 3 hours 45 minutes
(four 55-minute class periods)
Expendable Cost/Group: US $7.55 This activity also uses some non-expendable (reusable) items see the Materials List.
Group Size: 3
Activity Dependency: None
Subject Areas: Biology, Life Science
NGSS Performance Expectations:

| HS-ETS1-2 |
| HS-LS1-2 |
Summary
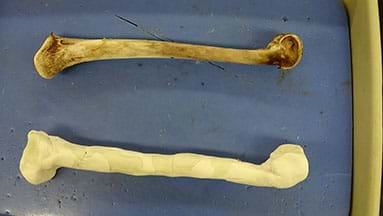
Students investigate the bone structure of a turkey femur and then create their own prototype versions as if they are biomedical engineers designing bone transplants for a bird. The challenge is to mimic the size, shape, structure, mass and density of the real bone. Students begin by watching a TED Talk about printing a human kidney and reading a news article about 3D printing a replacement bone for an eagle. Then teams gather data—using calipers to get the exact turkey femur measurements—and determine the bone’s mass and density. They make to-scale sketches of the bone and then use modeling clay, plastic drinking straws and pipe cleaners to create 3D prototypes of the bone. Next, groups each cut and measure a turkey femur cross-section, which they draw in CAD software and then print on a 3D printer. Students reflect on the design/build process and the challenges encountered when making realistic bone replacements. A pre/post-quiz, worksheet and rubric are included. If no 3D printer, shorten the activity by just making the hand-generated replicate bones.Engineering Connection
Biomedical and materials engineers are continually designing improved prosthetics for humans and other animals. One rapidly emerging field of study in biomedical engineering is bone tissue engineering. For example, veterinarians can use the technology to design replacements for a dog’s leg bone or a bird’s wing bone that are specific to that animal’s anatomy and physiology. Like engineers, students follow the steps of the engineering design process to design and create bone prototypes that could replace nonfunctioning body structures.
Learning Objectives
After this activity, students should be able to:
- Design and create a turkey femur prototype that is similar in structure, mass and density to real turkey femurs.
- Use CAD software to generate 3D images of a turkey femur cross section.
Educational Standards
Each TeachEngineering lesson or activity is correlated to one or more K-12 science,
technology, engineering or math (STEM) educational standards.
All 100,000+ K-12 STEM standards covered in TeachEngineering are collected, maintained and packaged by the Achievement Standards Network (ASN),
a project of D2L (www.achievementstandards.org).
In the ASN, standards are hierarchically structured: first by source; e.g., by state; within source by type; e.g., science or mathematics;
within type by subtype, then by grade, etc.
Each TeachEngineering lesson or activity is correlated to one or more K-12 science, technology, engineering or math (STEM) educational standards.
All 100,000+ K-12 STEM standards covered in TeachEngineering are collected, maintained and packaged by the Achievement Standards Network (ASN), a project of D2L (www.achievementstandards.org).
In the ASN, standards are hierarchically structured: first by source; e.g., by state; within source by type; e.g., science or mathematics; within type by subtype, then by grade, etc.
NGSS: Next Generation Science Standards - Science
| NGSS Performance Expectation | ||
|---|---|---|
|
HS-ETS1-2. Design a solution to a complex real-world problem by breaking it down into smaller, more manageable problems that can be solved through engineering. (Grades 9 - 12) Do you agree with this alignment? |
||
| Click to view other curriculum aligned to this Performance Expectation | ||
| This activity focuses on the following Three Dimensional Learning aspects of NGSS: | ||
| Science & Engineering Practices | Disciplinary Core Ideas | Crosscutting Concepts |
| Design a solution to a complex real-world problem, based on scientific knowledge, student-generated sources of evidence, prioritized criteria, and tradeoff considerations. Alignment agreement: | Criteria may need to be broken down into simpler ones that can be approached systematically, and decisions about the priority of certain criteria over others (trade-offs) may be needed. Alignment agreement: | |
| NGSS Performance Expectation | ||
|---|---|---|
|
HS-LS1-2. Develop and use a model to illustrate the hierarchical organization of interacting systems that provide specific functions within multicellular organisms. (Grades 9 - 12) Do you agree with this alignment? |
||
| Click to view other curriculum aligned to this Performance Expectation | ||
| This activity focuses on the following Three Dimensional Learning aspects of NGSS: | ||
| Science & Engineering Practices | Disciplinary Core Ideas | Crosscutting Concepts |
| Develop and use a model based on evidence to illustrate the relationships between systems or between components of a system. Alignment agreement: | Multicellular organisms have a hierarchical structural organization, in which any one system is made up of numerous parts and is itself a component of the next level. Alignment agreement: | Models (e.g., physical, mathematical, computer models) can be used to simulate systems and interactions—including energy, matter, and information flows—within and between systems at different scales. Alignment agreement: |
Common Core State Standards - Math
-
Reason quantitatively and use units to solve problems.
(Grades
9 -
12)
More Details
Do you agree with this alignment?
-
Solve linear equations and inequalities in one variable, including equations with coefficients represented by letters.
(Grades
9 -
12)
More Details
Do you agree with this alignment?
International Technology and Engineering Educators Association - Technology
-
Medical technologies include prevention and rehabilitation, vaccines and pharmaceuticals, medical and surgical procedures, genetic engineering, and the systems within which health is protected and maintained.
(Grades
9 -
12)
More Details
Do you agree with this alignment?
State Standards
North Dakota - Math
-
Reason quantitatively and use units to solve problems.
(Grades
9 -
12)
More Details
Do you agree with this alignment?
-
Solve linear equations and inequalities in one variable, including equations with coefficients represented by letters.
(Grades
9 -
12)
More Details
Do you agree with this alignment?
North Dakota - Science
-
Relate the functions of cells in multicellular organisms to their cell type (e.g., nerve cells, blood cells, guard cells)
(Grades
9 -
10)
More Details
Do you agree with this alignment?
-
Use appropriate safety equipment and precautions during investigations (e.g., goggles, apron, eye wash station)
(Grades
9 -
10)
More Details
Do you agree with this alignment?
-
Use appropriate technologies and techniques to solve a problem (e.g., computer-assisted tools, Internet, research skills)
(Grades
9 -
10)
More Details
Do you agree with this alignment?
-
Select and use appropriate technologies, tools, and techniques to solve a problem (e.g., computer-assisted tools, Internet, research skills, CBL, graphing calculators)
(Grades
11 -
12)
More Details
Do you agree with this alignment?
Materials List
Each group needs:
- 1 calipers, such as steel Vernier calipers from Flinn Scientific at https://www.flinnsci.com/vernier-calipers-steel/ab1006/
- 1 turkey leg, from grocery stores; remove meat and boil
- a computer loaded with CAD software, such as free Google Sketchup from https://www.sketchup.com/ or AutoCad at https://knowledge.autodesk.com/support/autocad
- a variety of bone-building materials such as clay, pipe cleaners, straws, cardboard, coffee stirrers and tape
- 500-ml graduated cylinder
- water, sink and drain
- 1-2 sheets of graph paper
- Bone Transplant Pre/Post-Quiz, two per student
- Bone Transplant Worksheet, one per student
- 3D Bone Prototype Rubric, one per group
- printout of online article (one per student) that describes a 3D-printed eagle humerus at http://3dprintingindustry.com/news/saving-eagle-rapid-prototyping-82967/; alternatively, arrange for students to read online
To share with the entire class:
- capability to show the class a 17-minute online video
- white air dry modeling clay, about 4 oz (113 g) per group (depending on femur size), such as 2.5 lbs (enough for 10 groups) from Hobby Lobby at https://www.hobbylobby.com/Crafts-Hobbies/Kids-Crafts-Activities/Crafts/White-Crayola-Air-Dry-Clay/p/22438
- pipe cleaners, about 10 per group; such as a package of 140 foot-long brown chenille stems (enough for class) from Hobby Lobby at https://www.hobbylobby.com/Crafts-Hobbies/Basic-Crafts/Chenille-Stems/Light-Brown-Chenille-Stems-Value-Pack/p/140308
- plastic drinking straws, about 10 per group; such as bag of 100 (enough for class) at Hobby Lobby at https://www.hobbylobby.com/Party-Baking/Party-Supplies/Tableware/Assorted-Straws/p/110892
- scotch transparent tape, such as half-inch width (1 roll enough for class)
- additional building supplies, such as coffee stirrers and cardboard, or other reasonable material requests from groups
- electronic balance, such as this 300-g capacity scale from Flinn Scientific at https://www.flinnsci.com/flinn-scientific-electronic-balance-300-x-0.1-g/ob2138/
- hack saw, such as a 10-inch standard hack saw from Home Depot at https://www.homedepot.com/p/Stanley-10-in-Adjustable-Hack-Saw-STHT14039/311327254
- eye protection, for when using the hacksaw
- 3D printer
- extra paper, as needed, for prototype redesigns
Worksheets and Attachments
Visit [www.teachengineering.org/activities/view/nds-1726-bone-transplants-biomedical-mimic-3d] to print or download.Pre-Req Knowledge
Students should:
- Know the different tissue types in bones.
- Know the basic structure of bones.
- Know how to make measurements using calipers.
- Know how to calculate the density of irregularly shaped objects.
- Know how to use CAD software to design 3D images.
- Be familiar with the steps of the engineering design process.
Introduction/Motivation
(Be ready to show the class a 16:47-minute TED Talk, Anthony Atala: Printing a Human Kidney, at https://www.ted.com/talks/anthony_atala_printing_a_human_kidney?language=en.)
According to the Mayo Clinic, in 2016, 120,000 people were waiting for organ transplants. In order to help alleviate this problem, biomedical engineers are using 3D printers to design organs, like kidneys. Let’s watch this TED Talk. (Show students the video.)
Pretty cool right? The 3D printing of organs is not limited to only humans, but has also been used for pets and other animals. Let’s read this news article. (Have students read the article about an eagle humerus that was 3D printed and surgically implanted at http://3dprintingindustry.com/news/saving-eagle-rapid-prototyping-82967/.)
(Facilitate a class discussion about the video and article. At this point, as necessary, review how the engineering design process is used for problem solving. The basic steps are: Ask: identify the need and constraints, research the problem, imagine: develop possible solutions, plan: select a promising solution, create: build a prototype, test and evaluate prototype, improve: redesign as needed.)
Now that we’ve looked at some examples of real-world 3D printing and biomedical engineering,
- What is the problem that these researchers are addressing? (Answer: Printing viable replacement human organs, printing a replacement bird bone.)
- What is some information that they would need to research or fully understand before developing their plans or solutions? (Answer: The types of cells in the organs, blood vessels and flow, bone size, shape and functionality, etc.)
- What was the prototype that they created? (Answer: A human kidney, an eagle’s humerus.)
Today, your challenge is to work as a team of biomedical engineers to create a turkey femur prototype that could be used as a transplant for a bird. Like real-world engineers, you’ll follow the steps of the engineering design process, which include first getting a full understanding of the need and constraints, then researching the problem, brainstorming possible solutions with your team, creating a plan for your best solution, and then building a prototype that you improve to make it as close as possible to the real bone.
Specifically, you will use calipers to determine the exact measurements of a real turkey femur, draw sketches on graph paper, and create a prototype using various provided supplies. Your aim is to create a prototype that not only mimics the structure of the turkey femur, but it is also similar in mass and density. In addition, you will use a saw to cut the turkey femur to make a cross-section. Using calipers again, you will take the measurements of the cross-section and use CAD software to create a 3D image that will be printed on a 3D printer, resulting in a model of that bone’s cross-section. Let’s get started!
Procedure
Background
Unlike human bones, many bird bones are pneumatic, or hollow and part of the birds’ respiratory system. These characteristics contribute to a lightweight skeleton that assists in flight. Bird skeletons also contain many bones that have been fused together to support the muscle structure required for sustained flight. A bird femur is fairly standard; it runs from the pelvis to the knee.
To find the density of an irregularly shaped object, divide the mass of the object by its volume. Find the mass using a weighing scale. To measure the volume, place the object in a graduated cylinder filled with water and measure the amount of water displaced. For more information, see the Determining Densities activity.
Before the Activity
- Gather the supplies, such as cleaned turkey bones, calipers, graph paper and materials for fabricating prototypes.
- Make copies of the Bone Transplant Pre/Post-Quiz (two per student), Bone Transplant Worksheet (one per student) and 3D Bone Prototype Rubric (one per group).
- Decide if you want to print handouts of the online article or have students read it online.
- Set up the computers with CAD software.
- Get ready to show the TED Talk video to the class.
- If students are not confident using CAD software, give a tutorial on using CAD software and have students generate some practice 3D models of basic shapes such as cylinders and squares.
With the Students: Day 1 (55-minute class period)
- Administer the pre-quiz to determine what students know about bird bones, 3D printing, the engineering design process and biomedical engineering.
- Divide the class into groups of three students each.
- Hand out the worksheets and rubric.
- Explain the rubric to students and discuss the grading criteria.
- Give each student group a turkey femur, graph paper and calipers.
- If students are unfamiliar with using calipers, demonstrate how to use them to take measurements.
- Have students take measurements of the turkey femur using calipers and draw the bone to scale on graph paper. Be sure they create several annotated drawings so as to show views from the front, back, two sides, and the ends. Suggest that students read the “bone diagrams” criteria in the rubric. Depending on student level, encourage details such as the bone protrusions necessary for bone articulations, and tendon and ligament attachments necessary for interactions with the muscular system.
- Have students use the electronic scale to determine the femur mass and record it in the worksheet table.
- Direct students to fill a large graduated cylinder half full with water and record the water volume.
- Have students place the femur in the graduated cylinder and record the volume of the water + femur.
- Have students calculate the volume and density of the bone and record those values.
With the Students: Day 2 (55-minute class period)
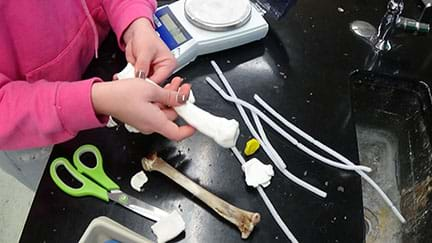
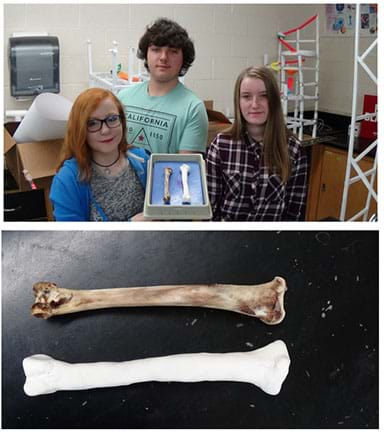
- Groups work together to create femur prototypes using their precise measurements of the external structure, mass and density, and a variety of bone-making materials, as shown in Figure 1.
- Have students draw on their worksheets rough sketches of their bone prototypes.
- Have students use the rubric to self-assess their prototypes. Remind students to keep in mind that the goal is to make the femur prototype with the exact measurements as the real turkey femur. In addition, they are aiming to make the prototype the same mass and density as the real turkey femur. Encourage them to make prototype improvements, as necessary.
With the Students: Days 3-4 (55-minute class period)
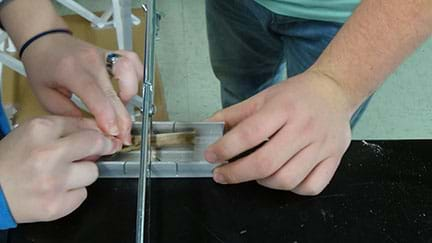
- Have teams use the hacksaw to carefully saw a cross-section through the shaft of the turkey femur to create a cylindrical section of bone (see Figure 2).
- Have groups use calipers to take measurements of the femur cross-section and use those measurements to generate a 3D image using CAD software (see Figure 3 example).
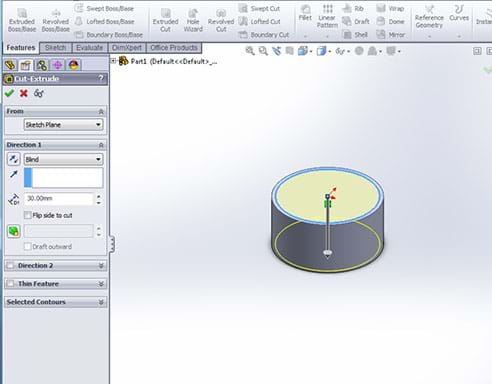
- Tell teams to save their designs as “stl” files and then print the 3D images using a 3D printer (see Figure 4).
- Have students answer the worksheet reflection questions.
- Administer the post-quiz.
- Facilitate a class discussion about the process and challenges that students faced when making the prototypes. Discuss what difficulties researchers and inventors might need to address when creating bone prototypes for any organism.
Vocabulary/Definitions
bone marrow: Soft flexible tissue material that fills the cavities of bones; red bone marrow is vital to blood cell formation; yellow bone marrow is inactive fatty tissue.
compact bone: Dense bone. The hard, rigid bone tissue. Also called cortical bone.
density: Mass per unit volume.
diaphysis: The main or midsection (shaft) of a long bone.
epiphysis: The rounded end of a long bone.
femur: Thigh bone.
humerus: The long bone of the upper arm that runs from the shoulder to the elbow.
spongy bone: Porous bone tissue in the end of a long bone that may be filled with marrow.
Assessment
Pre-Activity Assessment
Pre-Quiz: Administer the nine-question (multiple choice, true/false and short answer) Bone Transplant Pre/Post-Quiz to determine what students already know about bird bones, 3D printing, the engineering design process and biomedical engineering. At activity end, administer the same quiz to assess learning gains.
Activity Embedded Assessment
Worksheet: Have students follow the Bone Transplant Worksheet for its step-by-step activity instructions, including data collection and reflection questions about the process. Review their answers to gauge their depth of comprehension.
Post-Activity Assessment
Post-Quiz: Have students complete the Bone Transplant Pre/Post-Quiz again. Compare their pre- and post-quiz scores to determine their learning gains.
Investigating Questions
- What are the structure characteristics of bird bones? (Answer: Hollow and lightweight)
- How much does an average turkey leg bone weigh? (Answer: ~10 grams)
- What is the density of a turkey leg? (Answer: 1-4 g/ml)
Safety Issues
When using the hacksaw to cut the bird femur, wear eye protection and be careful.
Activity Extensions
Add to the challenge by requiring students to add realistic details to their prototypes, including the bone protrusions necessary for bone articulations, and tendon and ligament attachments necessary for interactions with the muscular system.
Have students examine and measure a preserved sheep kidney or other organ and then create 3D-printed prototypes. Animal organ source: http://biologyproducts.com.
Activity Scaling
- For lower grades (or if no 3D printer is available), simplify the activity by limiting it to only making femur replica prototypes using clay, straws, pipe cleaners, etc.
- For higher grades, have students use CAD software to create images of and then 3D print the entire turkey femur.
Additional Multimedia Support
Show students the 16:47-minute TED Talk, Anthony Atala: Printing a Human Kidney, at https://www.ted.com/talks/anthony_atala_printing_a_human_kidney?language=en.
Have students read the online article, Saving an Eagle with Rapid Prototyping, by Katie Armstrong, June 21. 2016, at http://3dprintingindustry.com/news/saving-eagle-rapid-prototyping-82967/.
If unfamiliar with measuring using calipers, watch a 2:41-minute tutorial video at https://www.youtube.com/watch?v=FNdkYIVJ3Vc.
If unfamiliar with CAD software or to brush up on skills, see the CADTutor tutorials at http://www.cadtutor.net/tutorials/autocad/.
Subscribe
Get the inside scoop on all things TeachEngineering such as new site features, curriculum updates, video releases, and more by signing up for our newsletter!More Curriculum Like This

Using bags of icing and mock 3D bioprinters made from ordinary materials, student teams design and then print their own prototypes for replacement tissues—bone, muscle, skin—for a fictitious patient. Doing this shows students the value of learning about complex cellular tissue composition and the de...
References
Bird Skeleton. Skeleton. Fernbank Science Center, Atlanta, GA. Accessed June 1, 2017. (Labeled diagram of a typical bird skeleton) http://fsc.fernbank.edu/Birding/skeleton.htm
“Organ Donation: Don’t Let These Myths Confuse You.” Last modified April 26, 2016. Mayo Foundation for Medical Education and Research. Accessed October 1, 2016 (Source of organ transplant statistics) http://www.mayoclinic.org/healthy-lifestyle/consumer-health/in-depth/organ-donation/art-20047529
Thibodeau, Gary A. and Patton, Kevin T. Structure & Function of the Body. Tenth Edition. St. Louis, MO: Mosby-Year Book, Inc., 1997.
Copyright
© 2017 by Regents of the University of Colorado; original © 2016 North Dakota State UniversityContributors
David Breitbach; Deanna GrandalenSupporting Program
RET Program, College of Engineering, North Dakota State University FargoAcknowledgements
This curriculum was developed in the College of Engineering’s Research Experience for Teachers: Engineering in Precision Agriculture for Rural STEM Educators program supported by the National Science Foundation under grant no. EEC 1542370. Any opinions, findings, and conclusions or recommendations expressed in this material are those of the author(s) and do not necessarily reflect the views of the National Science Foundation.
Last modified: February 13, 2024


User Comments & Tips