Quick Look
Grade Level: 10 (9-11)
Time Required: 45 minutes
Expendable Cost/Group: US $0.00
Group Size: 3
Activity Dependency: None
Subject Areas: Algebra, Earth and Space, Physical Science, Physics, Problem Solving, Science and Technology
NGSS Performance Expectations:

| HS-PS4-5 |
Quick Look 
- Grade Level:
- 10 (9 – 11)
- Time Required:
- 45 minutes
- Group Size:
- 3
- Subject Areas:
-
Algebra Earth and Space Physical Science Physics Problem Solving Science and Technology -
NGSS Performance Expectations:
HS-PS4-5

 atop the platform of Chile’s Cerro Paranal. A mix of colours sweeps across the sky in this image. From the fiery red sunset up to the dusty purple band of the Milky Way.")
Summary
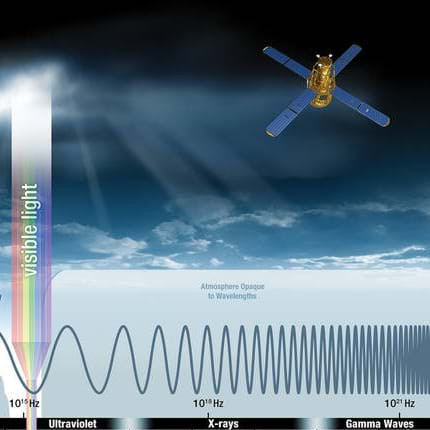
Image distortion from the atmosphere accounts for a real-world problem faced by engineers in a range of optical applications. In this activity. students do two kinesthetic activities to model how atmospheric turbulence causes light rays to refract on their way from the Sun or distant stars down to the surface of Earth, resulting in distorted or blurry images. Students then draw conclusions to generalize their observations and apply it to light rays traveling through other media of non-uniform density or temperature.Engineering Connection
Atmospheric distortion is a real-world problem that scientists and engineers in a variety of fields must either accept as a source of systematic error or can try to overcome and correct for using adaptive optics (AO) systems. The turbulence in the atmosphere causes issues mainly for people who design astronomical telescopes and laser communication systems.
Learning Objectives
After this activity, students should be able to:
- Explain physically how temperature fluctuations/differences in the Earth’s atmosphere contribute to the distortion of light in its path.
- Describe the visual appearance or result of atmospheric turbulence and distortion of light (such as the “blurriness” or “fuzziness” of an image on a wall or the human eye).
- Summarize the connection between a macroscopic/human scale model of atmospheric distortion and a smaller scale visualization of the distortion of light through a turbulent medium.
Educational Standards
Each TeachEngineering lesson or activity is correlated to one or more K-12 science,
technology, engineering or math (STEM) educational standards.
All 100,000+ K-12 STEM standards covered in TeachEngineering are collected, maintained and packaged by the Achievement Standards Network (ASN),
a project of D2L (www.achievementstandards.org).
In the ASN, standards are hierarchically structured: first by source; e.g., by state; within source by type; e.g., science or mathematics;
within type by subtype, then by grade, etc.
Each TeachEngineering lesson or activity is correlated to one or more K-12 science, technology, engineering or math (STEM) educational standards.
All 100,000+ K-12 STEM standards covered in TeachEngineering are collected, maintained and packaged by the Achievement Standards Network (ASN), a project of D2L (www.achievementstandards.org).
In the ASN, standards are hierarchically structured: first by source; e.g., by state; within source by type; e.g., science or mathematics; within type by subtype, then by grade, etc.
NGSS: Next Generation Science Standards - Science
-
DCI.PS4.A.9-12.6.
The wavelength and frequency of a wave are related to one another by the speed of travel of the wave, which depends on the type of wave and the medium through which it is passing.
(Grades 9 - 12)
More Details
Do you agree with this alignment?
-
DCI.PS4.C.9-12.4.
Multiple technologies based on the understanding of waves and their interactions with matter are part of everyday experiences in the modern world (e.g., medical imaging, communications, scanners) and in scientific research. They are essential tools for producing, transmitting, and capturing signals and for storing and interpreting the information contained in them.
(Grades 9 - 12)
More Details
Do you agree with this alignment?
| NGSS Performance Expectation | ||
|---|---|---|
|
HS-PS4-5. Communicate technical information about how some technological devices use the principles of wave behavior and wave interactions with matter to transmit and capture information and energy. (Grades 9 - 12) Do you agree with this alignment? |
||
| Click to view other curriculum aligned to this Performance Expectation | ||
| This activity focuses on the following Three Dimensional Learning aspects of NGSS: | ||
| Science & Engineering Practices | Disciplinary Core Ideas | Crosscutting Concepts |
| Communicate technical information or ideas (e.g. about phenomena and/or the process of development and the design and performance of a proposed process or system) in multiple formats (including orally, graphically, textually, and mathematically). Alignment agreement: | Solar cells are human-made devices that likewise capture the sun's energy and produce electrical energy. Alignment agreement: Information can be digitized (e.g., a picture stored as the values of an array of pixels); in this form, it can be stored reliably in computer memory and sent over long distances as a series of wave pulses.Alignment agreement: Photoelectric materials emit electrons when they absorb light of a high-enough frequency.Alignment agreement: Multiple technologies based on the understanding of waves and their interactions with matter are part of everyday experiences in the modern world (e.g., medical imaging, communications, scanners) and in scientific research. They are essential tools for producing, transmitting, and capturing signals and for storing and interpreting the information contained in them.Alignment agreement: | Systems can be designed to cause a desired effect. Alignment agreement: Science and engineering complement each other in the cycle known as research and development (R&D).Alignment agreement: Modern civilization depends on major technological systems.Alignment agreement: |
Materials List
Required materials for each group:
- red poster paper, approximately 1 m x 1 m
- (alternatively, can use white paper with red drawn outline/coloration, so need a red marker)
- blue poster paper, approximately 1 m x 1 m
- (alternatively, can use white paper with blue drawn outline/coloration, so need a blue marker)
- clear plastic cup filled with ~150 mL of mineral oil
- eye chart (printed on a standard sheet of white paper)
- roll of clear/Scotch tape
Teacher must also have in their possession:
- 1-2 green or red laser pointers (~5 - 500 mW) -- do not hand out to students
- 3.8 L (1 gallon) bottle of mineral oil – will be distributed into small clear plastic cups
- roll of blue or green painter’s tape -- for making finish line on floor for Activity 1
- 2 - 4-meter sticks -- for the class to share during Activity 2
Each student should get:
- A copy of the Atmospheric Distortion Worksheet; can be either hard-copy or a digital editable copy
Worksheets and Attachments
Visit [www.teachengineering.org/activities/view/bos-2743-atmospheric-distortion-light-bubbles-air] to print or download.Pre-Req Knowledge
- Understanding that light travels in straight lines, usually represented as light rays.
- Knowledge of the basics of refraction of light, including – index of refraction, the speed of light in different media, potentially an understanding of Snell’s Law.
Introduction/Motivation
*This following is an additional/optional “read-aloud” for students to do before they start the activity. It can be printed out and given to students and they can read it silently, or they can read it in pairs, or it can be done as a reading activity with the whole class. The fourth paragraph, while important and informative, gives away the “answer” or solution to the problems that are brought to the students’ attention in this first activity, so it is at the teacher’s discretion whether to include or omit that paragraph from the read-aloud.
Remember the song you may have learned as a child, Twinkle, Twinkle, Little Star? Although you may not have paid much attention to the lyrics when you were younger, there is a profound scientific observation right in the title. Stars do twinkle, and you can observe this phenomenon easily on a clear night—just look up at the sky and focus on any star for a few seconds. You’ll likely notice that it has subtle changes in color and might even have a “wavy” or “fuzzy” aspect to it. What’s going on?
Even when professional astronomers look up at the night sky with a powerful telescope, they still encounter the same issue, called atmospheric distortion. When light travels from distant stars and down to Earth’s surface to hit our eyes and our telescopes, it must first pass through the Earth’s atmosphere, which extends for miles above our heads. The air in the atmosphere is transparent—you can see right through it, and the light from the stars can pass through it—but it is not uniform. Some “pockets” of air have slight differences in temperature and density, which causes the light from the stars to travel at very slightly different speeds in hot pockets vs. cold pockets, and this results in the light bending a bit on its way through the atmosphere, which is an example of refraction. The light rays, which were all initially parallel to each other, are now composed of rays which are “crooked”, no longer traveling in parallel paths. When the light has finished its journey at your eyeball or a telescope’s camera, the light rays create an image that is blurred, smeared, or distorted from a “perfect” image.
It’s important to remember that other mediums (or media) that light can travel through, such as water or oil, are also subject to turbulence and can cause the light rays to become bent as well, causing a blurry image. By working through a couple different activities, you will construct multiple models of the process of atmospheric distortion and turbulence, and then compare them to see how they are each valuable in understanding and visualizing the process by which images become fuzzy. We’ll look at a human-scale version of how light rays become bent, and we’ll look at a smaller scale example of what an image looks like when light becomes distorted.
***To deal with the effects of atmospheric distortion, engineers who design and build telescopes to do have come up with optical systems (that is, special mirrors) that “fix” the non-parallel light rays that would normally hit the telescope camera, so that they get a clear image instead of a blurry one. The system that does this is called adaptive optics, and it is complex. It involves a deformable mirror and a wavefront sensor, as well as a fast computer.
Procedure
Background
When light travels normally (i.e., through a vacuum or through air of constant temperature/density), it moves at the speed of light (c = 3 x 10⁸ m/s = 186,000 miles per second) in straight lines. Light from a distant source, like the Sun, can be assumed to be traveling in parallel lines, or rays, when it reaches us. However, the Earth’s atmosphere is turbulent. Air in the dozens of miles of atmosphere above our heads is not of uniform temperature or density, and so the light rays do not all travel at precisely the same speed during their journeys; some will be faster or slower depending on which pockets of air (hot or cold) they traveled through to get to our eyes or cameras. Because of the difference in speed, and because the light also gets bent when it goes from a medium of one density to a medium of a different density (called “refraction”), the light rays will not be parallel or arriving at exactly the same time to our eyes. The optics term for this is called a “perturbed wavefront”, and the result is that our images look blurry, smeared, and if you are taking a video or series of images, the picture might move around a bit or look distorted. This is the same effect that gives stars their “twinkle”.
The issues caused by atmospheric distortion are mainly a problem for astronomers whose science goals involve having crystal clear pictures of stars, galaxies, planets, and other astronomical phenomena. But other industries, such as engineers who design communication systems that use lasers traveling through the atmosphere, must also contend with these issues. A different but still related problem occurs in optical microscopy: when scientists and engineers look through a microscope at tissue of a human or animal, the material of the tissue can be of different densities and cause the light to be refracted in ways that reduce the quality of the microscope images. Getting the highest resolution images in both astronomy and the biological sciences requires coming up with creative solutions to the issues caused by atmospheric distortion.


Before the Activity
- Optional: hand out printed copies of the introduction/motivation section paragraph for students to do a brief “read-aloud” activity
- On one side of the room, put down a “finish line” of tape on the floor for each group and ensure there are no tables/chairs between the other side of the room and the “finish line.” Alternatively, put down one “finish line” in the hallway and use one setup for all groups. See the Atmospheric Distortion Setup Diagram for reference.
- Make copies of the Atmospheric Distortion Worksheet, one per student. Or, have digital versions of the worksheet available for students.
With the Students
- Divide the students into groups of 4 and distribute copies of the Atmospheric Distortion Worksheet.
- Hand out 1 piece of red poster paper and 1 piece of blue poster paper to each group.
- Have groups pair up: for example, this means Group A and Group B, each composed of 4 students, will work together (for the first part of the activity). They should now be in a pod of approximately 8 students.
- Instruct students to set up the pieces of poster paper as shown in Figure 1. The Figure is also available on the worksheet for students to reference.
 stand side-by-side with their arms linked together. This line of people is oriented 90 degrees counter-clockwise, and a series of about 10 horizontal arrows pointing to the right are drawn beneath their feet. To the right of the arrows there are 2 red squares and 2 blue squares, all of the same size but offset in position (either further horizontally or further vertically) from the row of people, but all the squares are in the “path” of the people if they were to walk as a line across to the right. At the extreme right is a thin vertical line labeled “Finish Line”.")
Figure 1. Approximate locations of pieces of red and blue poster paper on the floor, relative to the finish line (a tape line put on the floor by the teacher). - Have students link arms and walk at a slow, constant speed across the floor as shown in Figure 1. The rules for walking from their starting area to the finish line are:
- Students cannot unlink arms, although they might shift position slightly relative to each other.
- While walking on a red poster, speed up your walking (only for the duration that you are on the poster paper). The same goes for a blue poster but slow the speed of your walk instead.
- Pay attention to the direction different students are walking when they cross the finish line, and at what times (earlier or later) they cross it.
- Have students return to their 4-student groups that they had originally formed into. They should then complete up to question #7 on the Atmospheric Distortion Worksheet (which marks the end of “Activity 1”).
- After students have an opportunity to work through the rest of the “Activity 1” questions on the worksheet, provide each group with 1 plastic cup, 1 eye chart, and 1 roll of Scotch tape. Place meter sticks in a central location in the room for students to use as needed.
- Each group should tape up the eye chart on a wall near their area, set at about 1.7 m high. Students should take turns trying to read the eye chart from different distances--they should start at 5-6 m away, and after each student goes at that distance, they can all move forward to shorter distances and see how it changes their accuracy.
- While groups are testing their eyesight, go around to each group and pour about 150 mL of mineral oil from the large jug into each of the group’s cups.
- Instruct students to place the cup of mineral oil on a desk and look through it at the eye chart, again from a distance of 5 to 6 m to start, and then move it closer after they have all had a chance to view it. They may move the eye chart to a lower height on the wall if necessary.
- Take your laser pointer (do NOT let students handle it, even if they ask nicely or beg) and go around to each group. Shine it at the wall from a distance of 5 to 6 m, and then 1 to 2 m, to demonstrate to students what the laser light looks like when it is incident on the wall traveling only through air (undisturbed).
- While with the same group, shine the laser through the cup of mineral oil at the wall. Make sure students have a few moments to observe the distortions in the light. Then move on to the next group.
- Have students complete the Atmospheric Distortion Worksheet and reflect on what they learned from the activity.
- *Optional extension: at the end of class, if you have a tea light or small candle, you can light it at the front of the room and put it on a desk. You can then aim the laser at a wall, but direct it through the air above the candle, which is another way to demonstrate atmospheric distortion. Students can then compare this level of distortion, which is actually caused by hot pockets of air, to what they saw in the mineral oil.
Vocabulary/Definitions
distortion: An issue resulting from something being pulled or twisted out of shape or being disrupted or contorted.
medium: A physical material such as air, water, or wood that a wave travels through. Not all materials can transmit waves of all types, and not all waves require a medium to travel through.
non-uniform: A fluid, such as air or water, that has “pockets” or “granules” or areas within it that are of different temperatures and/or densities.
refraction: The phenomenon of light, sound, or other types of waves being bent when passing between one medium and another OR through a medium of varying density. This results in a change in direction of propagation of the wave as a result of its traveling at different speeds at different points along the wave front.
scientific model: A physical, mathematical, and/or conceptual representation of a system of ideas, events or processes in science. Although a model may not be completely accurate to the reality of the particular science process, it usually helps scientists visualize, understand, explain, see patterns, and make predictions about the process.
turbulence: Violent or unsteady movement of air or water, or of some other fluid.
Assessment
Pre-Activity Assessment
Brainstorming: Discuss these questions as a class: What do we know (as a class) about how light travels? What types of things can interfere with the motion of light? What types of careers/jobs rely on clear, undisturbed paths of light to be successful?
Activity Embedded (Formative) Assessment
Worksheet: Have students complete the Atmospheric Distortion Worksheet with their group, discussing any questions they have trouble with. At the end of the class, have students read out their answers to a few of the questions if they are comfortable, for the sake of comparing what different students got out of the activity.
Post (Summative) Assessment
Exit Ticket: Have students complete a short half-sheet of paper (or 1-3 question Google Form) that follows up on content they learned in today’s activity. The questions can be direct checks of their achievement of the learning objectives from today, and they can be either open response (longer but more detailed) or multiple choice (simple, easy to grade, but might show less insight into student learning). Example questions to use are:
- Light traveling from the Sun or distant stars down to the surface of the Earth (and into your eyeballs) can become distorted or messed up. In your own words (or pictures, if you like), how or why does this happen?
- What does an image or picture that has been distorted “look like”? How would you describe the “messed up” image?
- How did our activity today use scientific models?
(see Learning Objectives section for answers to these questions)
Investigating Questions
- Why do stars twinkle?
Light waves coming from the stars travel at different speeds as they move through the Earth’s atmosphere. The waves can also get bent as they travel through mediums of different densities (called “refraction”). Due to these effects, the light waves will not or parallel or arriving at exactly the same time to our eyes (called a “perturbed wavefront”). The result is a blurry, wavy, or distorted image – a twinkling star.
- How is this connected to the problems posed to astronomers due to atmospheric distortion?
The issues caused by atmospheric distortion are mainly a problem for astronomers whose science goals involve having crystal clear pictures of stars, galaxies, planets, and other astronomical phenomena.
- What is the purpose of a model?
A model helps us to understand complicated or large-scale systems such as how light get distorted while traveling from the stars to our eyes. Scientists use models to help explain phenomena, and engineers may use models from which to create designs based on the science.
Safety Issues
- Students should not attempt to run while linking arms with their classmates for Activity 1.
- Students should not drink the mineral oil. It is safe for them to touch, but it is discouraged, as it is not the point of this activity. If you have a concern about students touching it, consider using small plastic bottles that have a closable top, rather than open cups, for this portion of the activity.
- Be cautious when shining the laser, making sure that students do not have their eyes in the path of the laser light. It is safe for them to put their hands in the path (if you are using a low-powered red or green laser). Do NOT use a high-powered blue laser, as these can burn various materials.
Troubleshooting Tips
When linking arms and walking at different speeds, students should end up walking in odd directions, not quite parallel to how they started. If nothing frustrating is happening for the students’ walking paths, they probably aren’t doing it right. Have them significantly change their walking speed on the posters if it doesn’t work the first time.
If the mineral oil is too difficult to see through, have students bring the cup of it much closer to the wall with the eye chart. That should make it easier for them to read it.
If the laser stops working, have some backup batteries ready. It also helps to make sure the laser is warm when you are using it, so keeping it in your pocket or rubbing your hands together before using it might help.
Activity Extensions
As suggested in the Introduction/Motivation section, you may have students read the additional/optional “read-aloud” before they start the activity. It can be printed out and given to students and they can read it silently, they can read it in pairs, or it can be done as a “popcorn” reading activity with the whole class. The fourth paragraph, while important and informative, gives away the “answer” or solution to the problems that are brought to the students’ attention in this first activity, so it is at the teacher’s discretion whether to include or omit that paragraph from the read-aloud.
As suggested in the final step of the procedure, you can use a tea light or candle to show how a pocket of hot air dramatically distorts the light traveling through it.
Consider showing a few videos of atmospheric distortion, such as this one of the moon:
https://www.youtube.com/watch?v=WnMWOHUydgU, this one of a house:
https://www.youtube.com/watch?v=NWDZTk0v5q8&t=5s, and this one of Saturn:
https://www.youtube.com/watch?v=L1GojX66PdM. Plenty of others available on YouTube. These videos do a great job of demonstrating the real effects of the atmosphere on image quality and give students a much-needed visual connection of their mental model to the final image they see.
Follow-up activities about the parts of adaptive optics systems, including pivotable plane mirrors, deformable mirrors, and wavefront sensors, will give students a more complete understanding of the issues caused by atmospheric distortion and how scientists and engineers have designed solutions to these problems.
Have students explore the movement of light through the PhET Bending Light simulation: https://phet.colorado.edu/en/simulations/bending-light
Activity Scaling
For more advanced students, extensions could include:
- [Requires more materials] Have students compare the distortion level in laser light on the wall when it is shined through water, water with food color matching the color of the laser, vegetable oil, and clear dish soap (all in comparison to the original mineral oil).
- Have students answer the research question: Are sound waves affected by atmospheric distortion in a similar way to light waves? How could you test this out (i.e., what materials and experimental setup would be required)? Why might the distortion of sound waves be important in society or certain careers?
- Have students answer the thought-provoking question: Before researching anything more about optics systems that correct for atmospheric distortion, how do you (the student) think we could reduce or eliminate the effects of atmospheric distortion? Should we design the camera differently, or move our telescopes somewhere, or something else entirely?
For less advanced students (or small classes), modifications could include:
- Do the “Activity 1” portion (walking with linked arms across the posters) with the students as a whole class, so they do not break into groups until starting Activity 2.
Additional Multimedia Support
Astronomy Notes - Description of the Effect of Atmospheric Distortion on Telescope Limits and Requirements (website and GIFs) - https://www.astronomynotes.com/telescop/s11.htm
Interplanet IRA, Astronomy: The Solar System - https://interplanetira.wordpress.com/2018/02/12/twinkle-twinkle-little-star/
Throwback Thursday: Why Observatories Shoot Lasers at the Universe - https://medium.com/starts-with-a-bang/throwback-thursday-why-observatories-shoot-lasers-at-the-universe-53a045d765a5
Using Models to Teach Science - https://www.nsta.org/science-teacher/science-teacher-novemberdecember-2019/using-models-teach-science
Subscribe
Get the inside scoop on all things TeachEngineering such as new site features, curriculum updates, video releases, and more by signing up for our newsletter!More Curriculum Like This

Through role playing and problem solving, this lesson sets the stage for a friendly competition between groups to design and build a shielding device to protect humans traveling in space. The instructor asks students—how might we design radiation shielding for space travel?
Students learn about the science and math that explain light behavior, which engineers have exploited to create sunglasses. They examine tinted and polarized lenses, learn about light polarization, transmission, reflection, intensity, attenuation, and how different mediums reduce the intensities of ...
References
Strobel, Nick. Telescopes, Astronomy Notes. Updated June 5, 2019. Accessed July 28, 2021. https://www.astronomynotes.com/telescop/s11.htm
Wikipedia. “Astronomical Seeing”. Updated July 16, 2021. Accessed July 28, 2021. https://en.wikipedia.org/wiki/Astronomical_seeing
Robert T. Sparks, Stephen M. Pompea, Constance E. Walker, Erin F. C. Dokter, “Teaching adaptive optics concepts in the high school classroom using an active engagement, experimental approach,” Proc. SPIE 7783, Optics Education and Outreach, 77830C (30 August 2010); doi: 10.1117/12.862633. Accessed July 16, 2021. https://www.spiedigitallibrary.org/conference-proceedings-of-spie/9289/928906/What-can-we-teach-using-adaptive-optics/10.1117/12.2070278.full?SSO=1
Boston Micromachines Corporation. “Adaptive Optics 101: Overview, Tech Review & Applications
Introduction and Motivation.” Updated September 2014. Accessed July 28, 2021. https://www.thorlabs.com/images/TabImages/AO_101_White_Paper.pdf
Copyright
© 2023 by Regents of the University of Colorado; original © 2021 Boston UniversityContributors
Yaron Teich, Somerville High School at Somerville Public SchoolsSupporting Program
NSF Research Experience for Teachers (RET) in Integrated Nanomanufacturing at the Photonics Center, Boston University, supervised by Helen FawcettAcknowledgements
This curriculum was based upon work supported by the National Science Foundation under RET grant no. EEC 1407165—at the Research Experience for Teachers in Integrated Nanomanufacturing at the Photonics Center at Boston University. Any opinions, findings, and conclusions or recommendations expressed in this material are those of the authors and do not necessarily reflect the views of the National Science Foundation.
Last modified: June 15, 2023
User Comments & Tips